Ronan The Accuser Build 2016 - Completed

BattleGrade

Active Member
Because you can't have too many Ronan's right?

After months scouring the web, researching, drafting, planning, buying, cutting, glue'n here is where I land, RPF.
Finding all the builders with awesome skills here, its what motivated me to actually spend money.
I started as anyone might, found what others had done and replicated what I wanted in my style.

So I bought a bunch of materials and began the madness...
What follows is my WIP build from "where to begin confusion" to a final 2016 OCT completion yet to come.

Ideas, designs and printouts to figure sizing for me.
A week cutting and just creating some idea in cardboard mockups.

1.JPG 2.JPG 3.JPG 4.JPG 6.JPG


Some basic observation\math show there is a lot of armor tiles to be made.
Knowing each persons size would be diff I just did a mock up with paper tiles and estimated for my size.

5.JPG 7.JPG 8.JPG


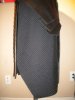
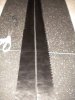
Cutting tiles and random work.

10.JPG 11.JPG 9.JPG


Some finals for front.

12.JPG 13.JPG DSCN5269.JPG DSCN5271.JPG DSCN5273.JPG DSCN5358.JPG DSCN5360.JPG DSCN5342.JPG

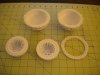
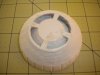
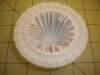
Infinity Stone and Orb progress.
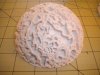
I thought this would be a cool addition so had my bro print up a Orb for me.
What an epic adventure that was.
Took him over 60hr print time and some nozzle troubles along the way.
It came out great and I am totally jazz'd how it came out.

orb_1.jpg reached post limit on pics , so more to come...
 

Attachments

  • orb1.JPG
    orb1.JPG
    86.9 KB · Views: 309
  • orb2.JPG
    orb2.JPG
    73.1 KB · Views: 300
  • orb3.JPG
    orb3.JPG
    58.7 KB · Views: 300
  • orb4.JPG
    orb4.JPG
    61.3 KB · Views: 288
Last edited:
Re: Another Ronan The Accuser Build 2016

Orb work, getting somewhere...

DSCN5299.JPG DSCN5344.JPG DSCN5347.JPG


More armor-tile hell!
I cut out each one as perfect as I could, then super glued the small cross strip on the face.
Then after it dried folded it in the small cuts, trimmed and then again super glued the back side as flush as I could.
Probably the most boring part so far.

Only 100's to go, luckily I finished up the front tiles so its on to the back side armor.

DSCN5362.JPG

As this design is a "on going" creation I am making changes on the fly and then making templates again and again as I dial it in.
So far its working pretty well and parts are sizing in about right for my size.
This is the side armor layer3/redo, with the tail flaps and cut lines for the side plates.

DSCN5391.JPG DSCN5397.JPG

Boot work.
Just some templates and some test pieces.
Might redo again using shoes and not boots.

DSCN5072.JPG DSCN5075.JPG

Front boot armor and strapping.
I have some buckles but they are too heavy but I will use them for a test fit.

DSCN5409.JPG DSCN5410.JPG


Some random background work:

Hammer:
Lots of work needed.
DSCN5406.JPG

Headdress ideas:
This is tile madness at its finest... I should put the number of tiles required in a jar and make a poll asking for the magic number. heh

DSCN5398.JPG DSCN5402.JPG
 
Last edited:
Re: Another Ronan The Accuser Build 2016

This is some beautiful work. Definitely subscribing to this thread. What kind of printer/material are you using for the infinity stone & orb?


Sent from my iPhone using Tapatalk
 
Re: Another Ronan The Accuser Build 2016

This is some beautiful work. Definitely subscribing to this thread. What kind of printer/material are you using for the infinity stone & orb?


Sent from my iPhone using Tapatalk

Thanks for taking a look, its my first build so just winging it as I go.
I don't think I would classify it as "beautiful". lol

I've put a lot of thought into all the details the original has.
Trying to work all those out but still build it too, just never satisfied with a piece, a fit or the part so I redo it until I am..

I think I have watched GOTG too many times now I might have drain bramage.
As others before me have found its the back part that we don't get to see much of.
I have a fair idea now of all the parts so just going to go for it.

I have a long way to go and hundreds more tiles to cut, paint, glue and redo...
Then the helm madness can begin.

The orb was printed on a RostockMax using PLA. Had some nozzle issues so had some stepping but its usable.
Its just going to be a "left hand" costume prop so I didn't spend a lot of time buffing it up and cleaning all the left-over print lines/hairing.

Stone is a cheap piece of quartz from a random "bag" lot I found that was blue and white, I tried to die a bunch of them and this was the only one that turned purple, ha go figure. It's about the right size and looks good lit by the led.

Tons more to come.

Orb needing some final touch-ups.
DSCN5414.JPG DSCN5331.JPG

DSCN5299.JPG DSCN5344.JPG DSCN5347.JPG


Some more work on boots and strapping. I wasn't happy with my first set so I redid them in the stiffer 1/4" EVA.
Still not sure about them but will just make one up and see how it looks.
DSCN5412.JPG


Front to back-side armor templates, a bit more refining to go but almost there. I keep reworking these over and over.
This is probably the 4th gen so far and is not 100% accurate but I will add in my own little changes here and there.
DSCN5391.JPG DSCN5397.JPG

6 piece tail paper template.
DSCN5416.JPG

Helmet tile mock up for sizing and count. Oh joy only 570 to go...
DSCN5398.JPG
 
Last edited:
Re: Another Ronan The Accuser Build 2016

Hammer time:
DSCN5419.JPG DSCN5424.JPG DSCN5430.JPG

Just refining as I go.
DSCN5437.JPG DSCN5479.JPG DSCN5484.JPG

Leaving some room for batts and EL module.
Will coat with SmoothOn and try to sand a bit then apply some kind of weathering.

I have an idea to use some PCB stencils to make the hammer pattern as its just like a circuit board.
I am not up for hand painting that.
hammer_texture.png


Some more work on back and front armor. [redo]
Tried creating some "leather pattern" using the foil/iron method.
Works great.
DSCN5472.JPG DSCN5476.JPG DSCN5491.JPG

Front armor work, I am working from front to back and will try and pull it all together to a "buckle" seam in the back hidden by the center "back" tail cloth.
DSCN5496.JPG DSCN5508.JPG DSCN5511.JPG DSCN5518.JPG

DSCN5525.JPG DSCN5528.JPG

Final back work, more tile/piles. ;)
DSCN5456.JPG DSCN5513.JPG

I need more Barge, crap...
 
Last edited:
Re: Another Ronan The Accuser Build 2016

Some progress. [all random]

Working on head piece [helm] and skullcap.
Some mockups and a head form.
Just planning it out now and doing some test pieces to see how good I can replicate the form with foam.
I want it to be as accurate as possible and still be flexible and not bunch up if I move my head around.

I see that the skull cap piece is only about 3/4 attached to the head and has some hidden straps in the back.
Also noted is the forehead is extended up past Lee's own head so its not form fitting its enlarged a few inches high.

DSCN5449.JPG DSCN5460.JPG

Work on front armor panels and some details finalized. I may revisit some here and add more panels or details but I will wait for finals before doing any additions.
DSCN5492.JPG DSCN5590 - Copy.JPGDSCN5539.JPG

Back panel and clipping system [wip].

Armor panel came out ok and fits well after I trimmed out some layers of foam.
I opt'd for just copying the front side trims instead of going the full length like in all the pics of Ronan I could find.
I figure it will mostly be covered by the tails most of the time anyway so not to worried about details and accuracy.
Plus it makes the tail really stiff and I want some flexibility in it.
DSCN5587 - Copy.JPG DSCN5593.JPG

Found some cheap plastic clips at our local military surplus store.
What a great resource for these as they had many different sizes and types, the ones I bought were curved and fit flush in the foam.

I made some cutouts and had a hand at sewing up some straps and creating a strap/locking deal for the back.
Some "pre sewing" practice since I will need it for the under suit work TBD.

Worked out great and keeps the suit square like I wanted. Everything is hidden by the back tail piece that is velcro'd on and some top fins I have not created yet.

DSCN5615.JPG DSCN5619.JPG DSCN5633.JPG
 
Last edited:
Re: Another Ronan The Accuser Build 2016

Helmet/Headdress cap [what I am calling it] top piece test.
I goofed the glue line on this one so making another.
DSCN5685.JPG DSCN5659.JPG DSCN5673.JPG DSCN5676.JPG

Front edge template, its large and a funky shape. I will most likely rework this a few more times.
DSCN5682.JPG

Skull cap progress.

DSCN5695.JPG DSCN5699.JPG DSCN5703.JPG

Foam cutouts.
DSCN5716.JPG

Curved and glued.
DSCN5719.JPG DSCN5722.JPG DSCN5724.JPG DSCN5726.JPG DSCN5730.JPG
 
Last edited:
Re: Another Ronan The Accuser Build 2016

Started work on head-dress tiles. I am starting with small tiles at the top and then as I work my way down
I will enlarge the next tile set a tiny bit each set getting larger and larger to the final sized tiles.
Since there are some folds and rolling curves I am going to do it row by row so I can build in the flow.
I am backing it with thin lycra so it can bend and move a bit more freely than if I glued to a sheet of EVA.

DSCN5775.JPG DSCN5777.JPG DSCN5780.JPG DSCN5789.JPG DSCN5793.JPG

Second row, 17 to go.

DSCN5798.JPG
 
Re: Another Ronan The Accuser Build 2016

104 tiles completed on the head-dress. This is a chore and the next sets increase in size 3 times.
DSCN5804.JPG DSCN5805.JPG DSCN5809.JPG

Research shows the tiles are woven [leather] and very thin .100 or less.
I imagine they were stamped from a die.
head_tiles.png

Found some foam trim to use for the neck lining.
Had a hard time finding anything that was close or was a "foam" material not rubber.
I even thought of using windshield wipers.

DSCN5812.JPG

Going to try and cut this up into some angled pieces and heat it to a curve and clean the neck line up.

Hammer:
Slow going here as I need to integrate the EL lighting and LED's before I plastic coat it.
I won't be able to get back in once I seal it up so its a "one and done" deal.

EL tests:
DSCN5667.JPG DSCN5671.JPG

Handle progress.
Sanding joy...
DSCN5815.JPG DSCN5817.JPG
 
Last edited:
Re: Another Ronan The Accuser Build 2016

More hammer work.

Took apart the El driver and pulled the switch and rewired leads for my setup.
I put the tach switch in a small tube and then glued it to a small piece of plastic, then glued that to the foam.
DSCN5821.JPG

Then I embedded this in the back of the handle location. So to turn it on/off you use a toothpick or a small rod to click the button in the tube.
I didn't want anything visible on the outside so I made it just a tiny hole.

DSCN5824.JPG DSCN5827.JPG DSCN5829.JPG

I am using 2 AA's soldered together and heatshrinked. [my own batt pack]
There ins't much room in the handle so putting in a AA batt holder took too much room so I scraped that idea.
I resorted to making my own pack.

Some EL wire weaving.
DSCN5834.JPG DSCN5837.JPG DSCN5839.JPG DSCN5841.JPG DSCN5842.JPG

Handle progress, needs to dry for 72 hrs so be next week before I can prime, paint, then apply decals.
DSCN5861.JPG DSCN5863.JPG

Chain Mesh skirt progress.

The best simulation I could fine here is using some type of "chain malle" looking material like others have.
So I found some fabric that had squares and rubbery texture.

I painted it with about 3 cans of plastic-dip over a weeks time.

I cut on the bias so as to create a triangle flow instead of a square pattern.

Paper sizing tests.
DSCN5844.JPG DSCN5848.JPG


1/2 Skirt completed.
DSCN5854.JPG DSCN5853.JPG DSCN5857.JPG DSCN5859.JPG
 
Last edited:
Re: Another Ronan The Accuser Build 2016

Took a break today and did some more work on Ronan.

Finished painting the handle and weathering.
Just finishing up the circuit pattern decals for the cutouts then I can final coat and attached the head.
DSCN5966.JPG DSCN5971.JPG

Hammer head is currently curing and needs a few more coats of resin before sanding [ugh] and paint.
Its starting to get kind of heavy now. [for a prop]
DSCN6014.JPG DSCN6010.JPG

Chain-mail completed. Gluing all the pieces together without getting any glue on anything was the hardest part actually.
I was pretty OCD about that the whole time.

Attaching to the main armor.
DSCN5988.JPG side.png

Collar trim, I finally found something I liked so on it went.
DSCN5952.JPG DSCN5956.JPG
 

Attachments

  • DSCN5929.JPG
    DSCN5929.JPG
    187.1 KB · Views: 243
Last edited:
Re: Another Ronan The Accuser Build 2016

Armor Tails:

Used two types of "vinyl pleather" to recreate the pattern effect.
A diamond one for the back two mains and then a flat "no texture" one for the four top tails.

I went round and round trying things to emboss the pleather with a "similar cross sticth pattern" seen in the real costume. [leather weave]
I tried metal butter knives, wood rods, a grill spatchula, chop sticks, metal grill, on and on. heh

The best and the "local" concensus was rebar. [yup]

So I wrapped up a few with some tape and laid the pleater down and used an old crappy iron and pressed the pattern on over the length of the tails 3" at a time. I made sure to get the angles to match the cut edges.
Came out better than I hoped for the material used.

DSCN6021.JPG DSCN6035.JPG DSCN6106.JPG DSCN6122.JPG DSCN6124.JPG DSCN6126.JPG DSCN6127.JPGDSCN6136.JPG DSCN6141.JPG

Attached with Velcro at the top shoulder.

DSCN6118.JPG
 

Attachments

  • DSCN6102.JPG
    DSCN6102.JPG
    116.2 KB · Views: 221
Re: Another Ronan The Accuser Build 2016

I searched really long to get some Pictures of the "cape"-thing and before you finish the second one here they are.
Zwischenablage01.jpgZwischenablage02.jpg

They look very different from everything most people make. The "spikey" and segmented stuff is just on the inside i think. The outside looks just like plain fabrik.
 
Re: Another Ronan The Accuser Build 2016

I searched really long to get some Pictures of the "cape"-thing and before you finish the second one here they are.
They look very different from everything most people make. The "spikey" and segmented stuff is just on the inside i think. The outside looks just like plain fabrik.

Agreed as I am sure every one is going for a duplicate/copy, and I have these pics.
Matter of fact I have every pic you can get from "on the line" ever posted of Ronan. ;)

The back 4 tails look mostly flat in all pics with no leather weaving like the large back two have and only here and there is the saw blade cut pattern visible.
Its not plain fabric and does have the cut edges in some places. If you watch the gag reel dance off [which you have] you get the best pics of his backside and the texture of the tails. [above pics]

In this pic you can see the leather weaving pattern and the edgy saw tooth pattern they created.
These are the back two main tails.

large tails.png

I am not going for 100% accurate [maybe some day]. Or I would never finish this build as my OCD would prevent me. ;)
So I opt'd to use some fabrics I had in my piles that matched as close to the look "from a distance" I could find.

Also noted if you look close I screwed up the emboss on the outer tails, I did it upside-down so actually I am making those again.
I was like wait a tic why is that pointing up , then it hit me DOH!

I can redo them no problem as they just Velcro on so I can swap tails out very easy..

I couldn't find anything that has a decent weave style pattern anywhere, you got any resources for material like that?
How are you doing your tails?
 
Last edited:
Re: Another Ronan The Accuser Build 2016

I think these are just two pieces with the spikey pattern on the "inside", maybe glued on.
A bit like this:

Ha ha, great minds man, I thought this is what it was too. And I even did a paper mock up of it for my first go almost exactly like your pic.
But if you watch the vid a few times you can see them free float around and separate as he moves so they are not folded and are totally separate pieces. However they do appear to be attached near the top to the back two tails so maybe as they go down they separate.
I just watched the vid about 20 times and it does look like they are attached to the tails at the top 1/3 ish they float free the rest of the way down.
All speculative of course. ;)

I wish they would have taken some good backside pictures as these are really lacking and we all have to guess this part out best we can.
Keep the ideas coming Styxx always appreciated.
 
Last edited:
Re: Another Ronan The Accuser Build 2016

Believe me, as i started the 2 costumes i really thought that Ronan would be the easy one. But yes, there are almost no good photos out there and even screens of the movie doesn´t help much. I wish they had made a Ronan figure like this Star Lord one.

hot-toys-guardians-of-the-galaxy-star-lord-sixth-scale-figure-04.jpg
That would helped alot.
 
Re: Another Ronan The Accuser Build 2016

Believe me, as i started the 2 costumes i really thought that Ronan would be the easy one. But yes, there are almost no good photos out there and even screens of the movie doesn´t help much. I wish they had made a Ronan figure like this Star Lord one.

That would helped alot.

Totally with you on that one, I even emailed HotToys and asked them why they haven't made one. They responded with "Thank you for your input we will pass this on to our development teams" well of course they will. ha ha

I am sure you were like me and once you got going were like, crap what's the back look like. heh
I do want it to be as close as possible, but I am going to have to live with something soon.
 
This thread is more than 6 years old.

Your message may be considered spam for the following reasons:

  1. This thread hasn't been active in some time. A new post in this thread might not contribute constructively to this discussion after so long.
If you wish to reply despite these issues, check the box below before replying.
Be aware that malicious compliance may result in more severe penalties.
Back
Top