The Tattooine Lounge

DarthDerf

Member
Well, where to start. I guess I am now taking my obsession to the next level and making it into my actual work environment. I'll get to entertain others as well as live out my own little fantasy. I love Star Wars and sci-fi all together as well as a bit of horror so, I am going to make what I think a person in the Star Wars universe would go to get a tattoo. My occupation is that of a tattoo artist and I wanted to build an area that resembled some of my favorite scenes from Star Wars and have it for my clients to see/touch/experience. That led to some big dreams but nothing I thought that would actually manifest…. I then made the Bespin Bin, which was a workspace that I decided to make resemble areas of Bespin, but wound up adding some ANH references with the “garbage chute”. You can also look up the build here: http://www.therpf.com/showthread.php?t=248118

I will be adding my drawings to the forum as well as soon as I size the rest of the photos for this thread..

Thanks for looking..

installed.jpg

I then went on to make a shelf that was to hold my soak tray. This has more of an ANH Death Star feel to it, which I don’t mind.

it begins again.jpg

I decided to add a shelf for my soak tray to open up more area for figurines... LOL..

primer.jpg

I wanted to have a feel of ANH with the shelf. I added a tube in the back to run the wiring.

test lighting.jpg

Testing the lighting..
addatives.jpg

Adding some greeblies and pin striping tape.. I'd love to eventually add lighting to the buttons. That is a whole new mountain to climb.

Han and Chewie.jpg

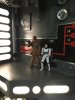
Han and Chewie approved..

Then it went to work.
installed.jpg

Underside greeblies that added a little flair..
Under shelf greeblies.jpg


That led to me taking an old sharps container with glove box attachment and modifying it to blend in with it’s new home. I wrote “Biohazard” and “Gloves” both in Aurebesh.

serveimage-4.jpeg

base coat.jpg

This was one of the wall mount units that were in the back and not in use due to lost key.. I took it and started to add some flair to it and make it fit in more..
magnets.jpg
The lock was removed and I added magnets to hold the access panel closed.

I then started with the greeblies..
progress.jpg

I also added stenciled lettering, which I now have a new way of doing this which will be way more effective and precise...

stencils.jpg

The stencils are in Aurebesh and say "Biohazard" and "Gloves"

finished?.jpg

After I had to "smooth" out the edges of the biohazard symbol, the polycoat of acrylic made some of the paint run. This at first really made me mad but after a few minutes I realized how cool it really looked and added to the piece.

Here it is installed in my office.
installed.jpg

While all of this has been going on, I’ve been discussing more additions to my booth with studio owner and I’ve been given full autonomy of my office. So, here comes the Tattooine (tattooing) Lounge. ;)

Here is my office present day (minus some of the additions)
IMG_2683.jpg
IMG_2685.jpg
IMG_2687.jpg
IMG_2689.jpg

This is all about to change... It will be a slow process but I hope all will look good and will keep adding to this thread as often as possible.. The reason I'm making it public is to keep me working on it... LOL... If not,I'll procrastinate.

Now that that is all out of the way...
Let's begin with the new shelf that is currently in progress...
IMG_2575.jpg
Working on a shelf that is going to sit on top of the filing cabinet and will be my new book shelf. I plan on having lighting and some other additions as well.. I'd love to add light patterned effects but that will come soon enough.

IMG_2698.jpg
These are going on the outside of the shelves to give it a more industrial feel.. I have more pictures to add but haven't sized them yet.. Just thought I'd get this out there and start rekindling the fire under my buttocks to start working again on my office.
 

Attachments

  • IMG_2554.JPG
    IMG_2554.JPG
    1.5 MB · Views: 272
Super cool dude...Nice touch adding the Aurebesh. I'm doing something similar myself. Don't u find yourself constantly scanning for anything lying around that looks kinda Star Warsy?
 
Dear heavens.... I have people that I work with bringing me their "garbage" to let me look at it to see if I could find a purpose for it.. It never stops... I also enjoy that most of the greeblies I'm using are found in the studio. This could range from ink caps to disposable lids from cartridges. It's actually kinda cool to know that I'm up cycling or what ever it is called..LOL
Super cool dude...Nice touch adding the Aurebesh. I'm doing something similar myself. Don't u find yourself constantly scanning for anything lying around that looks kinda Star Warsy?

- - - Updated - - -

Oh, there is more coming... a lot more.. big plans, BIG PLANS!!
Great stuff. Can't wait to see more.

- - - Updated - - -

Thank you kind sir.

Fantastic! Love it!

- - - Updated - - -

I do the same every time I turn it on... Just makes me smile...
I. LOVE. That shelf. :love

Sorry, just fanboy-ing over here...
 
Got a little bit more of the book shelf worked on today, not a lot but it's progress!
Book of Sith shelf.jpg

This is the center support/spacer/dedicated area for my Book of the Sith Holocron.

I then added the side walls and center shelf. I also decided on a floor just because and added the back walls. I will be adding a ceiling and front facade that may/may not have lighting.
center shelf.jpg progress with back wall, sides and floor.jpg

Have a good one!!
 
Derf, this is looking great! If I walked into a tattoo shop and saw this, I would immediately trust your artistic judgment. Now, you can not only charge for tattoos, but charge an admission fee to your room! :lol
 
Yep. I could easily sit in your chair while you work and look at your legitimate, "work space" all day, easily.

Amazing! Way to make it "yours".
 
I've been talking about doing this for several years now and finally got off my rear and decided to do it. (now if I could just turn off the Division for a minute)
When I'm building anything for the room, it all has to have a purpose because I am short on space so everything need to have storage built in and all wall space will be used and possibly ceiling. There are plans for a 6" stage in the room as well to separate the tattooing area from when the "support" sits... If possible, I've been looking into making the floor light up like the carbonite chamber but I have no clue how that could be done and have a floor surface that can be mopped/sterilized.. That in on the back burner at the moment.. who knows what's on the horizon though.. I do have complete autonomy of this since they've never shot a tattoo scene in SW..LOL..

Yep. I could easily sit in your chair while you work and look at your legitimate, "work space" all day, easily.

Amazing! Way to make it "yours".
 
Here's an open question.. Is there a specific size of the "dot dash" pattern all over the SW universe? I'm just guessing at the moment. When I go to make some specific pieces I was wanting to be as close to the real deal as possible. If anyone knows, I'd appreciate it.

Also does anyone have any references to different doors throughout the SW universe? I need to decorate the backside of my door so when it's closed it'll help with the atmosphere.

serveimage.jpeg

or

serveimage-3.jpeg

Were some of my ideas...

Thanks for any help.
 
Last edited:
Just some updates.. got some new pieces in and I will stick with acrylic sheeting now!! I have tested the dispersion with the lighting sets I am going with on this build and the acrylic is supposedly made for better LED dispersion. The lighting is really close and you can't see a bulb in the panels so this is pretty awesome!!

ON TO THE PICS!!!

test lighting with new acrylic.jpg

Somehow my markings got messed up and I messed up the light bars.. I'm hoping that once the lighting is installed that it will distract from the whole thing being offset. During the mid section gluing process the center shelf moved and created an off set. Then I screwed up the upper light bar measurements and I'm not redoing it so hopefully I can "squirrel" people with the lighting..

parts.jpg

Came up with a cool idea for my light switch.... and I've started developing it.

falcon door.jpg

New door facade maybe??

ney tools.jpg

got a new toy! LESS SANDING TIME!!

multi-task.jpg

multi-task!
 
Last edited:
Just a little update to show some more progress and other projects going on..

greeblies.jpg

playing around with greeblies and placements before I make them permanent...

debating.jpg

Also have decided to cover the lightswitch in the booth with a light panel and a similar looking door/bridge control panel to the DS one that Luke shot.
The problem is those really awesome looking light panels...
headache.jpg

details.jpg

close up...
and the concept

IMG_3006.jpg

Until next time!!
 
Glue, sand repeat...
light panel getting it's glue on.jpg

The scale of this thing is actually starting to settle in and I don't know if I'm ready for this.... LOL...
Already buying new tools and I wished I had stock in Rust-oleum... HA!!
Anyways.. more previews .. now I have a router!!

details again.jpg

and I love greeblies... now if only I knew how to actually get lighting sequences down for random light patterns.. I believe it's called arduino? I dunno.. I just know that I want some flashing buttons on the next project that I haven't started...LOL...
I will say that I really like the acrylic, gonna test light tomorrow after glue dries...
I think this is gonna look awesome!!
acrylic sheets.jpg

Also decided to put mylar on the back of the shelf lighting to help reflect the light better.

mylar.jpg

The tape light also has a dimmer function. I bought it at HomeDepot but have looked online at a site called armacost I believe and they sell color changing/dimmable LED tape light that is very user friendly and I plan to try it out next. It has the same connection set up as does the commercial electric lighting I already bought. It just seems to have more options that available "in town".

Until next time...
 
Isn't it neat to take garbage and make it look neat?

greeblies 00.jpg

greeblies 01.jpg

flat black next...

Tested the lighting for the light switch and were going to need the larger amount of LED's.

testing.jpg

or put another strip on the opposite side to compensate?? Duh... (still going to look into the other lighting though....)

This is so cool....
 
Here's an open question.. Is there a specific size of the "dot dash" pattern all over the SW universe? I'm just guessing at the moment. When I go to make some specific pieces I was wanting to be as close to the real deal as possible. If anyone knows, I'd appreciate it.

Also does anyone have any references to different doors throughout the SW universe? I need to decorate the backside of my door so when it's closed it'll help with the atmosphere.

View attachment 625973

or

View attachment 625974

Were some of my ideas...

Thanks for any help.

DEF go with the top concept! :)
 
Just a few steps ahead of you SK.. I believe you may be biased though to the door styles.;)
It has begun though...

planning.jpg backside of door.jpg

I made these out of 3/4" MDF and will be making the inner part with 1/4" MDF. Also the top right corner had to be redone, I have no idea how the measurements went wrong... It has already been changed though and the happiest part for me was I used nothing but scrap leftovers!! Yay me for not wasting.. I'm even saving the circle cutouts from the light bars for who knows what?

Is there a jig for these buttons/rocker switches or specific measurements?
rocker buttons.jpg

Mind you, I haven't gotten a table saw as of yet.. It is on the horizon though...


DEF go with the top concept! :)
 
Is there a jig for these buttons/rocker switches or specific measurements?
View attachment 629279

...

Hey D,

The rockers you see are actually casts taken from a mold I created a few years back for the 1:1 Scale cockpit build. I had some extra rockers laying around and gave them to Fuzz for his project. I have a new set of molds. When we start making new rockers we always make extras. Consider those yours - when we get to it. :)
 
This thread is more than 5 years old.

Your message may be considered spam for the following reasons:

  1. This thread hasn't been active in some time. A new post in this thread might not contribute constructively to this discussion after so long.
If you wish to reply despite these issues, check the box below before replying.
Be aware that malicious compliance may result in more severe penalties.
Back
Top