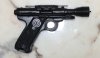
Resin Greedo Blaster

thd9791

Master Member
RPF PREMIUM MEMBER
Hi everyone,

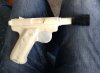
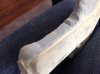
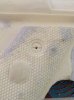
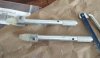
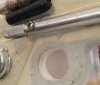
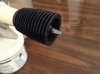
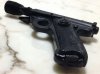
I never thought I'd be making one of these, as replicas don't really exist, but I came across a Holster Mold and it's just asking to be made into a Greedo blaster.
Screen Shot 2016-04-21 at 12.46.32 PM.png

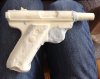
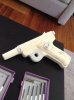
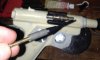
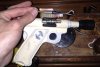
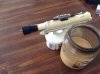
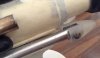
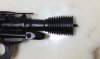
I might as well just drill a hole and make the one with the reinforced trigger guard.
Screen Shot 2016-04-21 at 12.46.39 PM.png

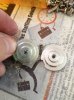
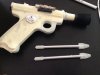
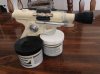
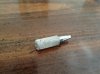
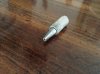
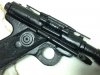
I think I also want to pick up the tomtit parts from overseas since they're still making them...any reference and tips are more than appreciated!
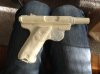
 
Where's you snag this from?

It was a random seller on evilbay. He has a couple revolver molds too, I was really shocked when I came across it.
Holster Molds came up as a suggested search because I'm trying to find a Lytle cast aluminum Broomhandle Mauser that doesn't cost an arm and a leg.
 
I used some apoxie sculpt to fill in some bubbles, I cut away and re shaped the rear sight and chopped the barrel down...thinking going the resin cast route since this is resin
 

Attachments

  • image.jpeg
    image.jpeg
    1 MB · Views: 82
  • image.jpeg
    image.jpeg
    1.4 MB · Views: 84
  • image.jpeg
    image.jpeg
    450.8 KB · Views: 83
  • image.jpeg
    image.jpeg
    411.8 KB · Views: 80
  • image.jpeg
    image.jpeg
    1.5 MB · Views: 82
  • image.jpeg
    image.jpeg
    1.4 MB · Views: 89
I used a half inch drill bit to begin to hollow out the trigger guard, drilled through a couple reject Mitchell discs that had solid centers and added a screw with a head that fit...thinking I might use metal stand-offs for te antenna greeblie? I can put a screw through it and the screw can feed into the hole in the antenna head! They would have to be mounted to reach the height though, without anything the antenna just tips downward.
 

Attachments

  • image.jpeg
    image.jpeg
    712.6 KB · Views: 81
  • image.jpeg
    image.jpeg
    918 KB · Views: 82
  • image.jpeg
    image.jpeg
    704.4 KB · Views: 81
  • image.jpeg
    image.jpeg
    298.3 KB · Views: 86
  • image.jpeg
    image.jpeg
    433.6 KB · Views: 89
I used metal stand-offs for the top greeblies. I super-glued two together for the nearly right length (longer than the pontoon) and epoxied them to a piece of T track. I cut the ridge down and ground a little curve in the track before glueing.

Then I cut the head off a long thin machine screw the same size as the stand-offs and fed it through. I stuck the exposed ends in the antennae and glued those together! After epoxy-ing the whole unit to the gun, I also drilled and installed a phillips head screw to hold it in place....very OT style :rolleyes

DSCN3812.jpgDSCN3815.jpg

For the side greeblies I super-glued two of those sockets together, and epoxied them to the pontoon...and then the pontoon to the gun. This was very straightforward...pontoon facing the barrel and center the sockets. I realized how precarious this position is though and added some putty to support the greeblies.
DSCN3809.jpg DSCN3814.jpg
 
There's just something so charming and authentic looking to seeing glue dabs and epoxy everywhere. It's a great compliment when I say that I can almost smell them from your photos.:p

Also, isn't Apoxie Sculpt just the best? I honestly don't know how I lived before without it.
 
Thank you!
The goop came from me experimenting with 90% cured epoxy. There are so many small parts on here I was trying to build support..it worked :lol

I found vintage X-acto knives that I'm going to use for the push-rods. I have to find some tone arm connectors and little cones for the rear of the Missiles.


There's just something so charming and authentic looking to seeing glue dabs and epoxy everywhere. It's a great compliment when I say that I can almost smell them from your photos.:p

Also, isn't Apoxie Sculpt just the best? I honestly don't know how I lived before without it.
 
Major update over here!

i got some frosted ultra detail tone arm connectors from Shapeways, and I got the smaller diameter ones because...

i I had a hard time finding the push rod. I'm broke and quite frankly wanted to continue my slightly off blaster with some found parts.

I used x-acto knives! They're 1-2mm smaller in diameter and some have better knurling than others. Mine are okay, again I got them really cheap.
so I cut them down to length and used automotive tape to fill in the gap underneath the tone arm connector, slicing it to shape with a razor blade. I also slid a screw and some putty into the side hole for good measure.

then I drilled the hole in the tone arm connector roughly where the originals are (right?). I was going to putty them on, but they fell off twice and I decided to put wood screws in the holes. Repaired like a true OT prop, messy and haphazard!
 

Attachments

  • image.jpeg
    image.jpeg
    910.9 KB · Views: 85
  • image.jpeg
    image.jpeg
    564.4 KB · Views: 86
  • image.jpeg
    image.jpeg
    1.5 MB · Views: 76
  • image.jpeg
    image.jpeg
    1.5 MB · Views: 71
  • image.jpeg
    image.jpeg
    783.1 KB · Views: 71
  • image.jpeg
    image.jpeg
    969.8 KB · Views: 96
Tom this looks great, I like the exacto blade idea

Thanks! I used VHT tape and it worked, but I really had to jam the missile heads on. It would appear the whole section naturally tips downward because of the shape of the side of the gun, and I made sure to put them flat, since greedo's blaster is this way and the Jawa blaster is the other.
 
I nearly forgot to add it here, I'm debating on whether I should epoxy or putty this thing in.

I puttied the head to a mechanical pencil into an X-acto knife, and chopped off the end of it. I then drilled a hole into the radial engine and then deeper into the resin barrel. There is a small gap between the two, so I worry epoxy will just sink.
 

Attachments

  • image.jpeg
    image.jpeg
    1,016.6 KB · Views: 66
  • image.jpeg
    image.jpeg
    982 KB · Views: 64
  • image.jpeg
    image.jpeg
    986.4 KB · Views: 61
I hit it with satin black after wet sanding all the putty and weird spots. Then...rust oleum satin clear coat and it looks like she's done for now!
 

Attachments

  • image.jpeg
    image.jpeg
    360.4 KB · Views: 84
  • image.jpeg
    image.jpeg
    445.4 KB · Views: 73
  • image.jpeg
    image.jpeg
    739.2 KB · Views: 83
  • image.jpeg
    image.jpeg
    513.2 KB · Views: 75
  • image.jpeg
    image.jpeg
    1.1 MB · Views: 80
This thread is more than 7 years old.

Your message may be considered spam for the following reasons:

  1. This thread hasn't been active in some time. A new post in this thread might not contribute constructively to this discussion after so long.
If you wish to reply despite these issues, check the box below before replying.
Be aware that malicious compliance may result in more severe penalties.
Back
Top