Imperial knight warden warhammer 40k conversion

Nm1cciola

Active Member
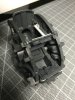
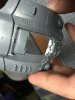
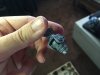
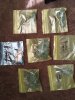
I picked this awesome little kit up on ebay, I really don't know a thing about Warhammer 40K nor the lore but I know I do like the look of this kit as well as the mobility that this kit included. Anyway I already separated the different parts to assemble for the kit such as the Weapons, the upper torso, the lower torso, the legs, as well as the cockpit I plan to create for this. Kept the sprue's so as I can build up in the kit so that it can be magnetized. Plan on reposing the legs so I cut only one apart and kept one together just in case thereposing doesn't work I can always put it back in the original pose. I haven't primed not washed this kit yet Just wanted to separate the assembly's since there are so many little pieces that can go missing it's easier if each assembly is separated. See attached pictures.
2016-04-17 15.13.31.jpg2016-04-17 15.13.57.jpg2016-04-17 15.15.31.jpg2016-04-17 15.17.10.jpg
IDK what I plan in doing for this yet I don't want to go based on the paint schemes that are in the instructions. I am thinking that I can convert this into to either another body for metallo, A brainiac Robot, or something that Batman from the Dark Knight Returns would use if the Bat tank he had was out of commission. IDK i'm kinda on a batman kick recently so maybe Batman IDK, letting the ideas fester for a while till I hit this kit again.
 

Attachments

  • 2016-04-17 15.15.11.jpg
    2016-04-17 15.15.11.jpg
    2.6 MB · Views: 211
Last edited:
If anyone is seeing this I would just like to know what it general scale of this kit I know it stand 7-8 inches tall and I know that generally speaking a regular space marine figure is 1.4 inches tall I just want verification that this scale is 1/24.
 
Definitely not 1:24 if it's in scale with the figures. Even Inquisitor minis aren't that big (1:32 or so). A lot of the vehicles are grossly undersized for the scale as well. So it seems to range anywhere from 1:72 on larger vehicles down to maybe approaching 1:48 on some stuff. I would shoot for between 1:50 and 1:64 if you didn't want to measure it out and do a bunch of math.

-Rog
 
UPDATE TIME!
So I haven't been on here for a while I have some updates for what I am planning to mod on this kit. I rec'd the Powered Gaming lighting kits I plan to use to light this kit and they are working pretty well and it's easy to use I have to say being the first lighting kits I rec'd. I had to purchase some assembly's again such as the head and legs b/c once I start doing the mods I want to have a back up in case I screw up on certain parts of this kit. I actually screwed up on the head as you will see in the pictures and have some light bleeding out where the drill bit I used to drill out the eyes holes they nicked the outside of the head and I tried to use Aves Epoxy to repair it but that didn't work I ended up following this and it worked I am actually happy with then result, (as you will see).

2016-05-24 21.29.19.jpg2016-05-24 21.32.01.jpg2016-05-24 21.29.14.jpg2016-05-24 21.32.05.jpg2016-05-24 21.29.16.jpg
2016-05-24 21.34.00.jpg2016-05-24 21.34.05.jpg2016-05-24 21.35.29.jpg2016-05-24 21.33.43.jpg2016-05-24 21.35.35.jpg

Then I bought a Chaos Engine which I am planning to use to create and engine for this kit, I cut it down and used this link as a guide as to how to cut it down and make it fit the hollow interior torso. I plan on creating a cockpit and lighten this as well so I need a way to get at the battery in case it the battery dies. So I plan on gluing some spare sprues and creating slots where the chaos engine can just sit on top of, Which you'll see in the pictures, I am happy to soya that it woks and looks AWESOME. I also cut a small hole into the engine and glued a small piece of metal so that it will be easy to pull up, which you also see in the pictures.


2016-05-24 19.17.19.jpg2016-05-24 19.18.15.jpg2016-05-24 19.17.25.jpg2016-05-24 19.17.31.jpg2016-05-24 19.17.08.jpg2016-05-24 19.17.34.jpg

Lastly the Cockpit I am being extremely ambitious and plan on doing both a lighting kit as well as cockpit for the model so this is gonna take some time. I created a few temples I plan on using and am going to start woking on some mockups. I punched some cockpits already. I purchased a cockpit from Dark Angels Land Speeder Vengeance as well as a cockpit from the Blood Angels Stromraven. I don't know which to choose but i'm leaning towards the storm rate right now based on a few images I've seen of people modding the kits. I already trimmed down the Strom Raven cockpit so that it can fit inside the interior or the titan, See attached pictures.

2016-05-24 21.21.44.jpg2016-05-24 19.18.30.jpg2016-05-24 19.21.13.jpg

Things i've learned from working on this kit if your planning on lighting the kits then don't glue things right off the sprue and just be patient I can't tell how many times i've had to double back and rework some things. Hope you like. Also if you're purchasing bits from vendor for kit or wants to replace things then best places to but then is Hoard of bits , and or Bits World, good customer service.
 
Last edited:
Here ares some updates from this model That I have done for the past few days. Since the last update has to modify a few things to make things stinger and fit better such as in the case with the front of the imperial where the controls lay. Reason for that I because I chose to use the cockpit from the stormtaven which is a bit of a tight fit. As you see in the first picture I posted of the side panel of the torso there is a little landing in made for the cockpit seat to lay on because there was no other way to test fit it, every time it kept moving to a different spot. Unfortunately there is less room for the wiring now but on the other hand the cockpit can fit snuggly. Also had to pin the from for the torso because everytime I kept placing the cockpit it kept moving it especially when I was putting the cover on. Also as you will see I filled in some spots near the holes where the controls are not a big fan of the unsightly holes that were there so.
1.side panel of torso 2016-06-01 05.32.00.jpg 1. Bottom piece of torso2016-06-01 05.33.08.jpg

3. Cockpit of imperial knight2016-06-01 05.33.44.jpg 4. Front torso of imperial knight2016-06-01 05.34.05.jpg

5. Test fit of the imperial knight cockpit and torso (sans cover).
2016-06-01 05.35.05.jpg2016-06-01 05.35.39.jpg2016-06-01 05.37.00.jpg

P.S
Also if anyone reading this has experience magnetizing, what best magnets to use and what size works best I've seen somewhere the 3 & 5 mm magnets work but also I've seen some people say they're too weak. So like I said if anyone has experience doing this advice would be much appreciated, also on the powered play gaming lighting kit I bought unfortunately with the design I chose for the cockpit the 9volt battery to power it won't work does anyone know what battery I can use that is as powerful as a 9 volt battery but small.
 

Attachments

  • 2016-06-01 05.33.13.jpg
    2016-06-01 05.33.13.jpg
    3 MB · Views: 151
  • 2016-06-01 05.35.35.jpg
    2016-06-01 05.35.35.jpg
    1.6 MB · Views: 157
  • 2016-06-01 05.33.55.jpg
    2016-06-01 05.33.55.jpg
    1.4 MB · Views: 170
  • 2016-06-01 05.36.59.jpg
    2016-06-01 05.36.59.jpg
    1.7 MB · Views: 154
Last edited:
Love the LEDs in the eyes. This model really screams for a cockpit. Here is one I did last year, I think it needs lighting so that the cockpit isn't so dark:

View attachment 630027
View attachment 630028
View attachment 630029

Where do you plan on hiding the switch for the LEDs?

i agree this model screams to have a cockpit and lighting is needed so it isn't so dark. Your knight looks awesome great work on paint job as well as the cockpit looks awesome. Did you light yours?, I plan on hiding the switch for the lights in the back of the model where it won't be seen mostly.
 
I did not and I wish I had. The interior is difficult to see through the access door. I might add lighting in the future. I have plenty of room behind the cockpit to hide the light and electronics.
 
I did not and I wish I had. The interior is difficult to see through the access door. I might add lighting in the future. I have plenty of room behind the cockpit to hide the light and electronics.

Did you magnetize your knight, and if so what size magnets did you use? I keep checking online and people use varying sizes and each time they're either happy with or the attachments is fidley?
 
UPDATE TIME!
So for the past two days Iv'e been working on this pretty nonstop and have a bunch of updates and here are the results. Just to begin I used these sites as a reference: 1 , 2, 3, 4. I used LOCTITE ULTRA LIQUID CONTROL, which sets in 15 sec.

1) IMPERIAL KNIGHT BODY ARMOR/ ARMOR WEAPONS:
- I started doing the magnetizing on the Carapace Armor I drilled a 5.5 MM hole into the area where peg attaches for the missile luncher as well as the double cannons. Once I drilled the hole I use Aves Apoxie to secure the magnets as seen in the pictures below I it worked pretty well and the bond is strong. I used 2x 5 MM to create a stone bond and for the double cannon platform and the aisle launcher I used on 1 5 MM magnets.

-For the Missile Launcher I used a pieces of spure and 3 MM magnets. First I drilled 2 holes into the middle of the missile faces and glued 2 MM magnets in each hole to have a better bond b/c with 1 magnet it wasn't enough a strong bond for me. What I found easier is to put the magnets that are glued to the sprue first on the magnets on the faces of the missile launcher then dabbing loctite on the back of the magnets pushing the faces in to where I glued the sprue and leaving it there till it stuck.I found with 2 magnets located inside the missile launcher the bottom face of the luncher isn't as fiddle.
IMPERIAL KNIGHT BODY ARMOR #1.jpgIMPERIAL KNIGHT BODY ARMOR #2.jpgIMPERIAL KNIGHT BODY ARMOR #3.jpgIMPERIAL KNIGHT BODY ARMOR #4.jpgIMPERIAL KNIGHT BODY ARMOR #5.jpgIMPERIAL KNIGHT BODY ARMOR #5A.jpgIMPERIAL KNIGHT BODY ARMOR #8.jpgIMPERIAL KNIGHT BODY ARMOR #6.jpgIMPERIAL KNIGHT BODY ARMOR.jpgIMPERIAL KNIGHT BODY ARMOR #7.jpg

2) IMPERIAL KNIGHT RAPID FIE BATTLE CANNON/ MELTA CANNON:
- My next step was magnetizing the different guns set for this set I started out with the RAPID FIRE BATTLE CANNON. I started out with drilling out 3 5.5 MM holes as well as a 3.5 MM holes to fit the 3 MM magnet onto the side where the AMMO CARTRIDGES are placed I then put a piece of metal tin inside the AMMO CARTRIDGES to that I wouldn't have to worry about the polarity of the magnets. Then on the opposite side of the base for the guns that I drilled another 5.5 MM hole and glued in a 5 MM magnet where the small ammo cartridge for the stubber is placed. Then I glued a 3 MM magnet empty recess of the cartridge. Also I used telescoping tubes from this link, as a way of attaching the front gun mounts so I don't run into the problem of magnetizing the faces as well. The tubes are 6 inches long not really good for other projects but if with what I'm working with here it's fine. I glued the tubes in the cannon for the metal guest and the rapid fire one as well and just slide the armor guard till the cannons lock into the face, which the slides into the tube inside the base for the guns. For the arm mounts to switch out the guns I chose to use TIN to fill in the arm mounts rather magnets b/c I would have to worry about the polarity and I believed I might be easier to fix if anything happen when switching out the guns.

A) RAPID FIRE BATTLE CANNON:

IMPERAIL KNIGHT RAPID FIRE CANNON.jpgIMPERIAL KNIGHT RAPID FIRE BATTLE CANNON #1.jpgIMPERIAL KNIGHT RAPID FIRE BATTLE CANNON #3.jpgIMPERIAL KNIGHT RAPID FIRE BATTLE CANNON #4.jpgIMPERIAL KNIGHT RAPID FIRE BATTLE CANNON #5.jpgIMPERIAL KNIGHT RAPID FIRE BATTLE CANNON #2.jpg
IMPERIAL KNIGHT RAPID FIRE BATTLE CANNON #5.jpgIMPERIAL KNIGHT RAPID FIRE BATTLE CANNON #6.jpgIMPERIAL KNIGHT RAPID FIRE BATTLE CANNON #7.jpgIMPERIAL KNIGHT RAPID FIRE BATTLE CANNON #4.jpgIMPERIAL KNIGHT RAPID FIRE BATTLE CANNON #8.jpgIMPERIAL KNIGHT RAPID FIRE BATTLE CANNON #12.jpgIMPERIAL KNIGHT RAPID FIRE BATTLE CANNON #9.jpgIMPERIAL KNIGHT RAPID FIRE BATTLE CANNON #13.jpgIMPERIAL KNIGHT RAPID FIRE BATTLE CANNON #10.jpgIMPERIAL KNIGHT RAPID FIRE BATTLE CANNON #11.jpg

MORE ON POST #2
 
Last edited:
... Cont from first post

B) MELTA CANNON:

View attachment 6363432016-06-19 14.08.23.jpg2016-06-19 14.06.54.jpg
2016-06-19 14.08.47.jpg2016-06-19 14.08.08.jpg
(for this canister at the end of the METAL CANNON since the pipe will be in the way with the other gun options I chose to cut it off and magnetize it so when I am using I can easily just switch it out.)
2016-06-19 14.06.36.jpg2016-06-19 14.09.12.jpg2016-06-19 14.08.16.jpg2016-06-19 14.06.42.jpg


3) REAPER CHAIN SWORD:
- Just like with the ARM MOUNT attachment for the RPADI FIRE BATTLE CANNON I used a piece of tin and glued it into the attachment. I put this sword together first them the attachment which was a pain in that ass had to loosen it up which lind of freaked me out but seen by the pictures it worked so YAY!.
2016-06-19 14.10.17.jpg2016-06-19 14.10.12.jpg

4) IMPERIAL KNIGHT TORSO LEFT/RIGHT SIDE:
-I Used a 5 MM as well as a 4 MM magnet for the shield/ stubber assembly's b/c to fit the assembly then I paved over that with aves apoxie as seen in the pictures below. For the stubbers I cut off the top nub of the stubber and glued 2x 3 MM magnets to create a stronger bond and try to copy the same assembly. For the shield I used 2x 5 MM magnets and cut off the peg attachments and glued those in place then in the hole where the peg was inserted I put in a 4 MM magnets and it created a strong bond.
A) LEFT SIDE:
2016-06-19 14.01.40.jpg2016-06-19 14.01.14.jpg2016-06-19 13.59.49.jpg2016-06-19 14.01.49.jpg2016-06-19 14.01.21.jpg2016-06-19 14.00.45.jpg2016-06-19 14.01.26.jpg2016-06-19 14.00.59.jpg2016-06-19 13.59.42.jpg
B) RIGHT SIDE:
2016-06-19 14.09.29.jpg2016-06-19 14.09.54.jpg2016-06-19 14.10.05.jpg2016-06-19 14.09.26.jpg

CONT ON TO POST# 3
 

Attachments

  • 2016-06-19 14.10.25.jpg
    2016-06-19 14.10.25.jpg
    1.5 MB · Views: 130
Last edited:
... CONT FOM LAST POST.

5) THUNDER STRIKE GAUNTLET:
- So for this what I wanted was an articulated elbow and hand, As seen in the pictures what I did was drill 4x 3.5 MM holes, and glued 4X 3MM magnets into the attachment for the gauntlet. This part wasn't the hardest part what was the hardest thing to do was glue magnets into the gauntlet hand itself. I glued a 4.5 MM hole into the top of the ball joint of the hand and glued 4x 3MM magnets into the gauntlet as well to match the attachment. This was very difficult and used lots of glue and Aves Apoxie (also might have lost 1 magnets in the empty recess of the gauntlet itself.

2016-06-19 14.11.25.jpg2016-06-19 14.10.41.jpg2016-06-19 14.11.05.jpg2016-06-19 14.10.25.jpg2016-06-19 14.11.06.jpg2016-06-19 14.10.34.jpg


NOTES: SO one of the things I really and happy I found out was that was DIY past to use if melted down sprue I used this mostly to fill in the ARM MOUNTS. I advent glued the top art of the ARM MOUNTS yet not have I magnetize the face yet I am planning to wait on those till I am waiting for all this to dry. Going to wait to glue the head for last when I figure out the lighting for this kit.
HOPE YOU LIKE!
 
Last edited:
UPDATE TIME:
So I was able to work on this bit magnetized the head used a 3MM magnet on the op of the head and in the back of the mask of the head I used a 4 MM magnet. I then magnetized that faces. Since I cut out the eyes holes with a 1/8th drill bit the movable joint for the top of the head was too big so I cut it down and regaled it. See attached pictures.

2016-06-29 04.38.59.jpg2016-06-29 04.39.34.jpg2016-06-29 04.39.40.jpg2016-06-29 04.39.56.jpg2016-06-29 04.41.52.jpg


next Here are the legs reposed I decide to repose both legs this was a pain in the ass I had to recreate the ball joint with aves apoxie which works but was tedious also the joint for the legs didn't work so I used the telescoping tubes but then I overreached and I tried to add magnets to it to help keep the pose and that didn't work so I fixed everything with Aves Apoxie and I drilled 2 little holes and added small styrene rods to help keep the pose and it worked, but i'm just bummed that I had to get rid of the telescoping tubes. Also to get the pose I wanted to leg joints I had to cut them down a bit and at at an angle to get a more natural pose with legs. See attached pictures.

2016-06-29 04.35.00.jpg2016-06-29 04.35.03.jpg2016-06-29 04.35.06.jpg2016-06-29 04.36.58.jpg

Then I purchased a alternate missile launcher (Alternative Space Marine Whirlwind or Sisters of Battle Exorcist) from bitspudlo I am planning to put a magnets on the bottom of it and use it an alternate Carapace weapons it might be too weighty. Any way I wanted to modify this so that it can posable I drilled holes through the main body and the missile launcher put on of the telescoping tube in the holes and them proceeded to insert them and lo and behold it worked anglo modified it a little bit with showing that some miles were already launched. See attached pictures.

2016-06-29 04.42.54.jpg2016-06-29 04.43.14.jpg2016-06-29 04.42.37.jpg2016-06-29 04.42.46.jpg

2016-06-29 04.38.59.jpg


2016-06-29 04.39.34.jpg


2016-06-29 04.39.40.jpg


2016-06-29 04.39.56.jpg


2016-06-29 04.41.52.jpg


2016-06-29 04.35.00.jpg


2016-06-29 04.35.03.jpg


2016-06-29 04.35.06.jpg


2016-06-29 04.36.58.jpg


2016-06-29 04.42.37.jpg


2016-06-29 04.42.46.jpg


2016-06-29 04.42.54.jpg


2016-06-29 04.43.14.jpg
 
Last edited by a moderator:
This thread is more than 7 years old.

Your message may be considered spam for the following reasons:

  1. This thread hasn't been active in some time. A new post in this thread might not contribute constructively to this discussion after so long.
If you wish to reply despite these issues, check the box below before replying.
Be aware that malicious compliance may result in more severe penalties.
Back
Top