Genji Cosplay (Overwatch)

Hello!

This will be my first ever thread here on the RPF, so bare with me! :ninja

For my first ever cosplay, i did a lot of research material-wise, and spent countless hours watching all the propmaking and cosplaying legends! (Kamui Cosplay, PunishedProps, Evil Ted)

Character wise, im super hyped for Overwatch, and id be wanting to try making Genjis helmet (reference link for those who havent seen him: http://eu.battle.net/overwatch/en/heroes/genji) for a school project, but i decided to go ahead and make the whole thing!
My school has Laser cutters, 3D printers, saws, grinders, sanders,vacuu-forming, pretty much every single tool you could want for making props and armor.
I always wanted to try making stuff out of foam, so i got myself some well known EVA mats and started patterning.

The steps are all basic, nothing special.
Research (Blizzard reference kits!) -> Patterning -> Cutting -> Heat bending -> Glueing -> Plasti-dipping -> Painting -> Weathering

I will try to keep you updated on the project when i have made progress :) Currently at week 2, with some hours each day to work with. Helmet is currently 90 % done, missing a strap + LED´s. I will be using a balaclava with the attached "pony tail" scarf on the back.


Hope you like my build, havent seen anyone do Genji yet :)
(Also, huge thanks to Haerverk for being my sensei! :darnkids)


(Build start, tracing my patterns to foam, cutting, glueing, repeat)
View attachment 615487

I've got to say I'm really becoming a fan of yourself, and I want to cosplay Genji too, but I don't know how to make the helmet, how did you do it? Any template?
 
I've got to say I'm really becoming a fan of yourself, and I want to cosplay Genji too, but I don't know how to make the helmet, how did you do it? Any template?

I traced out the Reference kits blizzard made to make my templates, they are very basic :)
 
Some updates! I forget to post on the RPF as i also post progress on my Instagram, anyways, heres the current progress, finally coming together!

I guess by the end of the week, most of it ( excluded weapons ) will be DONE! :D

Below is an online link to my instagram account, couldn't find the source image on my system :/
https://www.instagram.com/p/BFb4vgXygDV/?taken-by=cosplay_just

As for the undersuit, i just ordered the print from GunHeadDesign as MemorY suggested! As i live in norway, it will probably take a while to get it, but it was an awesome print, and should really help complete my cosplay!

Cheers!
 
Last edited by a moderator:
I traced out the Reference kits blizzard made to make my templates, they are very basic :)

Yeah.. But this is my first cosplay and i don't also have any head model or something.. Could you make the patterns again and scan them to post it? I'ld be so happy with that :D
 
Subbed. I've been following your progress on the 'Gram as well, I really can't wait to see this finished. What are your plans for the weapons? I'm currently working on the shuriken, I have v1 printed out and hope to be able to case duplicates by the weekend. Gambatte, Genji-san!
 
Subbed. I've been following your progress on the 'Gram as well, I really can't wait to see this finished. What are your plans for the weapons? I'm currently working on the shuriken, I have v1 printed out and hope to be able to case duplicates by the weekend. Gambatte, Genji-san!
Thanks mate, glad to hear it!
I will be recieving my laser cut acrylic 10 mm sheet soon, which will have leds installed in the back, for the sword, making the rest out of thick foam and worbla detail. Same goes for little sword, but using a wooden blade or something :) I guess i will 3D print the shuriken as i already finished the 3D model! Good luck!
 
Small update:

The build is nearing DONE!

Missing now is:

-Clear coat on new parts
-Large katana
-Small sword
-shuriken
-attaching ponytail/scarft to back of hood
-sewing undersuit (waiting for print delivery )

Heres some shots of the suit in light vs dark room, and a picture showing the arms and gloves, pretty happy with how they came out! :)

20160524_165810.jpg20160524_165748.jpg20160524_164252.jpg


- - - Updated - - -


any pdo files for this
Not that i am aware of. I made the patterns based on reference images :)
 
If I ever saw you in a cosplay contest I would just surrender, THIS IS AMAZING! I wish I could work with foam like this, I can just never make it look right, that under suit hex pattern is awesome! I have been looking for a method to do a hex pattern on another cosplay and I think you nailed it!
 
If I ever saw you in a cosplay contest I would just surrender, THIS IS AMAZING! I wish I could work with foam like this, I can just never make it look right, that under suit hex pattern is awesome! I have been looking for a method to do a hex pattern on another cosplay and I think you nailed it!

Thank you so much Sturds! :)
 
I'm thinkin about making shin guard pieces for the sparrow/young genji skin but I have no idea how to approach it. I'm ao on a me crunch ofabout a month because ill be oving to Malaysia anthey don't have suff to build things likethat over tere. also any ideas for theheadband
 
I'm thinkin about making shin guard pieces for the sparrow/young genji skin but I have no idea how to approach it. I'm ao on a me crunch ofabout a month because ill be oving to Malaysia anthey don't have suff to build things likethat over tere. also any ideas for theheadband

I havent really checked out the skin as it´s probably my least favourite skin in the game atm, but anyways, EVA foam or worbla is a pretty safe bet :)
 
-- UPDATE --

I figured i would do a writeup of my process in detail, as i have been getting countless messages through various channels ( bit late tonight, but tomorrow i will get a nice post up for all to follow!)

Two new pictures though!
Little sword/tanto/ wakizashi almost complete (forgot to take more pictures today, scabbard also close to done!) I will be starting on the large katana the next few days!
Also, a full shot of the armor so far, and REJOYCE the undersuit print just arrived from the US! Will need to sow it with some help from my friend! Nearing completion!

20160531_161802.jpggenji.jpg

Stay tuned for the full writeup with pictures and progress of all the steps :)

Cheers!
 
Do you have any measurements that would be of use to anyone looking to replicate this? Also possibly the amount of foam you bought vs how much you used?
 
Do you have any measurements that would be of use to anyone looking to replicate this? Also possibly the amount of foam you bought vs how much you used?

As all the "measurements" are based on my own body, it makes it hard for people to translate it i guess. I also don't have my templates, as it was cleaned out from where i stored them (not digitally)

As for today, i finished the little sword/tanto/wakizashi, and the scabbard! Also started and almost finished the large katana!

IMG_20160606_200509.jpg

The Process:
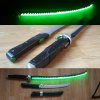
Wakizashi: Blade made of 6 mm plywood, cut to shape, then beveled with a sander. The hilt/handle was made using EBAboard ( a dense, but easily sandable foam we have in our workshop) Cut out the rough shape, sanded it smooth, and using Worbla directly on top for details. Then two coats on everything except the blade with PVA (wood) glue. After this came a layer of primer, and then painting using acrylics, both rattlecans and regular applied with brushes. The scabbard/sheathe was made the exact same way, cutting the shape in two, and adding a middle part, making it so that the blade could slide inside. Also applied a "D" metal ring on the back, and some fabric band to make it attachable to my belt.

The Katana/Dragonblade:
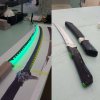
I had the blade laser-cut from a 10 mm sheet of Acrylic (Plexiglass), following a template i traced from the reference sheets. The blade was given a slight bevel using different sanding bits and machines, before it was all sand-blasted to make it catch the light from the LED's better, aswell as hiding some of the diodes.
The sawtooth pattern was cut from a thin sheet of regular PET plastic, and was painted dark grey, and glued directly to the blade.
The hilt was made similar to the small blade, but using a denser type of EBA that requires more work and sweat, but is highly durable, like wood without the grain/fibers.
I made a small cut to fit a portion of the blade inside, and found a suprisingly strong superglue, that held it all together like a dream. Lastly, i drilled and dremeled out a hole for my 9v battery pack at the end of the hilt, and attached the LED's to the back of the blade.

Tomorrow i will make the details and the final "cap" on the back of the blade that hides the LED's etc.

Good night! (Sorry for the lack of good pictures of the process... i am in a real rush to get this done in the next two days! :) )
 
Sorry for not keeping the post up to date, Exams getting the best of me, haha...
So anyways,

Swords are DONE
Shurkens are PRINTED
Undersuit is ALMOST done
And im soldering LED's for the helmet and thighes as i write!

More pictures!

genji.jpg

IMG_20160609_203044.jpggenji-stars-render.jpg
(The picture of the shuriken is a Render! not the actual stars, haha)

When i have the time i will try to re-write the whole step by step guide, with more in depth process!

Thanks for looking!
 
This thread is more than 5 years old.

Your message may be considered spam for the following reasons:

  1. This thread hasn't been active in some time. A new post in this thread might not contribute constructively to this discussion after so long.
If you wish to reply despite these issues, check the box below before replying.
Be aware that malicious compliance may result in more severe penalties.
Back
Top