ROGUE ONE Jyn Erso - open build thread!

Took Jyn out for a small test run during our Science Center's Star Wars night. Just completed the vest last night and I still have a lot of work to do, but damn was it comfortable.

You look great! Also the Ezra (I think?) in the picture is a friend of mine!
 
Might be of some use.

scarf.jpg
 
Awhile back I said I'd ordered a Jyn costume kit off aliexpress and would report back on the quality. Well, it came in today! Here are my thoughts.

I knew I was taking a risk on quality when I made the purchase, and I'm still undecided on whether or not the risk was worth it. I'd put fabric quality at meh to poor, overall construction at middling. I gave them my custom measurements, but some of it still feels too big. Here's what I think of the individual pieces, top to bottom:

Scarf - Crap. Feels like it's made out of tarp material. Lightweight and slippery with a sheen.

Jacket - Absolutely the wrong color and correct me if I'm wrong, but I don't think the stripes go down both arms? Also missing pocket details. A dye job and some tailoring might make it usable.

Vest - Not terrible but needs a lot of work. Color is fairly okay. It feels a bit too baggy on me towards the waist. The webbing and the greeblies aren't the worst but I would definitely attempt to replace with accurate materials. The lining is orange satin rather than red cotton. I feel like the pockets are too small. The quilt rows on the back don't come up high enough either, I don't think.

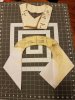
Shirt - Meeeeh. I like the color, but it's made out of a slightly stiff material and I had to safety pin the bib down in the front to get the desired look because it wouldn't stay down on its own. Ironing could fix that, though. The sleeves are a smidge too long. The horizontal front seam is incorrect and the yoke itself I think is too small and doesn't come down quite far enough. There's also an invisible zipper running almost the entire length of the back.

Pants - Feels like it's made out of almost the same material as the shirt, but slightly heavier. Fits fine and is constructed nice at the waist, but they are a few inches too long, need to be taken in below the knee, and I don't know what the hell they were thinking for the webbing. It actually loops around the back of the knee, back through the metal loop, and fastens via velcro. It's not tight at all. Color is a very dark blue.

Holster - Absolute piece of crap, but I was expecting that. Party City level. I've already ordered a nice one from Legendary Costume Works.

Gloves - Ehhhhhh? Thin faux leather, stitching looks alright, very loose and large around the wrist. Not sure if it's supposed to be that way. I'd probably weather them to make the stitching fade a bit.

Overall, I'm not incredibly impressed, but I don't mind having been the guinea pig on this to let you guys know what to expect if anyone else decides to go down this route. If anything, I think they'll be helpful to take apart and learn from--as someone only just starting to learn to sew and with no experience drafting and modifying patterns, I think it'll be good to have a sorta close baseline.

If anyone has any questions about it or would like to see more detailed photos, just let me know! I'm happy to help.

20170109_181134.jpg20170109_175434.jpg20170109_173456.jpg20170109_181203.jpg20170109_180334.jpg20170109_174432.jpg20170109_181456.jpg20170109_180401.jpg20170109_174707.jpg
 
Last edited:
Just had a brainwave for the scarf material after I made a "fast fashion" purchase today - I think it could be Lyocell/Tencel! It has that same "brushed"/washed quality, is a woven fabric, and has the right amount of drape and crumple. I'm going to see if I can find any in the right colour and will report back.
In the meantime here's a shot of my new Cotton On jumpsuit (haha):
IMG_1600.JPG
 
Well I started working on Jyn's shirt bib and I came up with this. I can fit it over my head but it's still a little small, so I'm about to cut a larger one (edit: just kidding, all I had to do was add an inch to the neckline). I know I added top stitching in the wrong places, but this is my first draft. If anybody was wondering what the pattern could look like, I hope this helps. I used the McCall's M7360 collar, piece 13, as a base.
 

Attachments

  • 20170110_170912.jpg
    20170110_170912.jpg
    1.8 MB · Views: 692
Last edited:
McCall Pattern M7360 Modifications
The first modification I made was to “reset” the pattern’s “Forward Shoulder”
Proper fit at the shoulder is the first thing to get right for the blouse to drape correctly, so that was the first change I made. The pattern clearly identifies itself as having a “forward shoulder” design element which is not a part of Jyn’s blouse. To remove this I needed to “reset” the shoulder seams.

McCall’s has made this easy for us. The apex of the shoulder at the sleeve provides a line of large circles. These are positioned at the seam allowance for each size on the multi-size Back Yoke pattern (piece #6) to align with the Upper Sleeve (piece #10). At the neckline there is also a triangle at the side of the neck which is used in the original pattern to align with the Neck Band (piece #13). Select the specific size you are using (in my case size 12) from the multi-size pattern, draw a (RED) line through the centers of these two symbols to provide us with the new shoulder seam. For the yoke all that is necessary is to locate a new 5/8” seam allowance (BLUE line) above the new seam line. This shortens the Back Yoke by about 1 1/2” for the size 12 example.

The amount we remove from the Back Yoke we must add to the Front (piece #1). First I add a new seam allowance reminder 5/8” below the new seam line on the yoke. This will be the new cut line when transferred to the Front. Next I add the old (GREEN) seam line onto the Front (again 5/8” from old cut line for the specific size). Then I traced the top section of the Back Yoke adding the new Front reminder cut line (BLUE), new seam line (RED), and old seam line (GREEN). As a check I aligned all three pieces; Back Yoke, Front, new traced Front Extension.

To modify the Back Yoke I just fold under the pattern piece at the new Back Yoke cut line. To modify the Front I tape the new “extension” matching the old seam lines.

Here is a photo of the work in progress.
M7360_Seam_Reset.jpg
 
obsessed with how helpful this thread is! I really really want to buy the columbia jacket but now they're on ebay for soooo much I feel like maybe I can make it work.
 
Have any of you seen these Jyn gloves on Amazon? It says they're made of real leather (even though the color is awfully dark), and if nothing else, they have what looks like nice stitching guides. Speaking of which, how the heck did you guys stitch your Black Diamond gloves? I dyed mine ages ago and have been having trouble sticking leather needles through the leather.
 
Have any of you seen these Jyn gloves on Amazon? It says they're made of real leather (even though the color is awfully dark), and if nothing else, they have what looks like nice stitching guides. Speaking of which, how the heck did you guys stitch your Black Diamond gloves? I dyed mine ages ago and have been having trouble sticking leather needles through the leather.

If you use a stitching awl it makes it 1000x easier.
 
Just a basic electric drill with a drill bit that was a touch smaller than the rivet we were drilling off.

Hey all, while waiting for new shirt fabric to arrive I've been working on my boot lace covers and picked up some Lange boots for the buckles. I've tried every method mentioned in this thread: drilling, screwdriver prying, and: nothing. When I try to drill, the bit just slides across the domed rivet, scratching the buckle and making zero progress actually drilling into the rivet. I have a pretty good DeWalt drill too and was using a metal drill bit. One of my bits even bent in half unsuccessfully trying to chew into the metal. Am I missing something? How did you all get the drill to bite into the rivet?
 
I had a good deal of trouble drilling out the rivets and in the end cut them in half (and in the process destroyed the boots) with a hacksaw. If you want to try drilling them out I can make two suggestions, First use a center punch and hammer to put a dimple into the rivet to help hold the drill bit on target. (Wear safety glasses to do this and when drilling). Then start with a small metal drill bit. These were thick rivets and cannot be easily drilled out in one go. Once you drill through with one bit, increase the size and drill through again. You may need to do this three times or so.
 
Hey all, while waiting for new shirt fabric to arrive I've been working on my boot lace covers and picked up some Lange boots for the buckles. I've tried every method mentioned in this thread: drilling, screwdriver prying, and: nothing. When I try to drill, the bit just slides across the domed rivet, scratching the buckle and making zero progress actually drilling into the rivet. I have a pretty good DeWalt drill too and was using a metal drill bit. One of my bits even bent in half unsuccessfully trying to chew into the metal. Am I missing something? How did you all get the drill to bite into the rivet?

I just wedged a screwdriver underneath the buckle itself and cranked on it to pry the buckle up. It took a few tries from a few different angles to slide it in there (and I bent one of the screwdrivers). Once I had it loosened up, it weakened the boot plastic enough to pull the rivet right through the boot. I cut it off with a nipper pliers that I stuck in a workbench vise (couldn't find the right power tools, haha).
 
Hey all, while waiting for new shirt fabric to arrive I've been working on my boot lace covers and picked up some Lange boots for the buckles. I've tried every method mentioned in this thread: drilling, screwdriver prying, and: nothing. When I try to drill, the bit just slides across the domed rivet, scratching the buckle and making zero progress actually drilling into the rivet. I have a pretty good DeWalt drill too and was using a metal drill bit. One of my bits even bent in half unsuccessfully trying to chew into the metal. Am I missing something? How did you all get the drill to bite into the rivet?

Why not grind the rivets either off or at least flat with a dremel? that way you can either have them off entirely, or if you grind them flat it will give you a steady place to drill into.
 
Why not grind the rivets either off or at least flat with a dremel? that way you can either have them off entirely, or if you grind them flat it will give you a steady place to drill into.

Good call, Kristen, my Dremel was going to be my next tool, I just don't have any Dremel attachments for use on metal so that'll be on my Lowe's shopping list along with a metal punch as @smithjohnj suggested, which I also read as a tip on a message board about removing aircraft rivets. (!!)
@Chrononaut, I remember reading your post and I tried prying the buckles loose with a screwdriver, but all that did was start to bend the buckles. Maybe I shouldn't be worried about that, but I sort of overpaid for these ski boots and would like to try first a method that doesn't do any damage to these precious buckles.

Don't judge me, but if I can't get any farther with pre-drilling and then drilling, I'm also considering just taking them to a ski repair shop where they have the equipment to replace/remove buckles. Throwing that out there as a tip for anyone who may not have power tools at their disposal and doesn't mind throwing some money at the problem. Also, a ski shop near a family member offers a $200 trade-in on ski boots in ANY condition! So anyone not sure of what to do with the ski boots they're destroying for their Jyn costumes? Check your local ski shops for trade-in deals.
 
What do you do if you have about zero construction skill but really want to cosplay as Jyn?
Are there any costumer's who have good replicas?
My main worry is just the vest really? Is anybody working on any vests to sell?
 

Your message may be considered spam for the following reasons:

If you wish to reply despite these issues, check the box below before replying.
Be aware that malicious compliance may result in more severe penalties.
Back
Top