brutuswayne
Active Member
Re: Captain American Civil War Build (Planning/Reference Gathering)
Man if aything it's still gorgeous to look at! And it actually helped me confirm one thing I hadn't sussed out yet, the star's different! Looks like they changed the lines that are cut into it. Might need to make a quick mold and cast of my AoU star that I can modify unless someone else makes one in the next few months haha Where'd you get that picture btw?
Edit: I just realized, you created the Avengers fabric texture thread and mentioned in there you were part of the team who printed the suit's texture! So let me just take a moment to say well done, you all created some gorgeous work that I'm sure will be driving me mad for weeks as I try to match it with non-printed fabrics
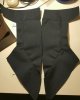
This build is looking great so far...I'm sure you won't need this since you're using cordura but here's an up close photo of the fabric texture
http://i.imgur.com/N1HqxFT.jpg
Man if aything it's still gorgeous to look at! And it actually helped me confirm one thing I hadn't sussed out yet, the star's different! Looks like they changed the lines that are cut into it. Might need to make a quick mold and cast of my AoU star that I can modify unless someone else makes one in the next few months haha Where'd you get that picture btw?
Edit: I just realized, you created the Avengers fabric texture thread and mentioned in there you were part of the team who printed the suit's texture! So let me just take a moment to say well done, you all created some gorgeous work that I'm sure will be driving me mad for weeks as I try to match it with non-printed fabrics
Last edited: