INDUSTRY MECHANIC Calum Watt's Freaky Gothic 1/8 Scale

Nm1cciola

Active Member
So I received this in the mail today was very happy once I saw the box just starting out assessing figure and planning. I already ordered blue enamel paint for this guy's skin coat , I just I am really enjoying the prep work on the figure itself. See attached pictures of the said kit. I planning on lightning this kit with an old toy model train lamps. As for now back to work.
2016-02-13 23.23.01.jpg2016-02-13 22.08.08.jpg2016-02-13 22.08.03.jpg2016-02-13 22.07.58.jpg2016-02-13 22.07.45.jpg
 
So just a little update he's primed and I ordered paint for him which should be coming in the mail by end of this month (which sucks Balls), anyway I plan on making him a blue skinned alien so I did some research and found a few ways to paint skin and am plan on using this technique. I know that it's on miniatures and what i'm painting on is an 8" model figure and all but i'm gonna test that out, with a little bit of modification of knowing the color wheel and warm and cool colors. If anyone has experience that is different than the technique i've linked to please feel free to comment as i've stated on my other threads i'm pretty much still a noob at this, especially painting skin (even if it's blue).

Also one other thing what is the best way to paint leather on a model, I have done a extensive amount of research and have only come up with this (an article on just how to paint cloth on a model) or this, and this (but those videos are to paint it on miniatures). Is there a difference painting leather on miniatures than on 1/8 scale models b/c all of the miniature painting seems quick and dirty. Once again if anyone seeing this thread has experience painting cloth or old leather on models then any comment would be greatly appreciated being as how i'm still new to this. Looking forward to people's responses.
 
So I primed 3 styrene spoons in order to practice a blue skin coat, 1st spoon is will be a black base, 2nd will be a gray base coat, and 3rd as i've seen in many miniature eating videos will the a darks base coat of the main skin color. Wish me luck, still waiting on the paint I ordered to be rec'd
2016-02-18 04.25.39.jpg
 
Base coated (Dark Grey, Black, and Dark Blue) each spoon still waiting on all of the Blue Paint I ordered to test out the skin tone. I am using COBLAT BLUE (Mid Tone), SKY BLUE (Highlight Tone), and BLUE SEA (Shade Tone) all flat. Is it easier to air brush a skin tone or brush it on. See attached image

2016-02-21 13.37.15.jpg
 
So there is a little bit of an update in regards to this figure I bought a G scale LGB 5050 victorian street lamp to light this figure. Thinking of going for a erie gaslight victorian era feeling with this lighting not so much dramatic but moody.
2016-03-01 22.08.21.jpg
So here is the light against the figure:
2016-03-01 22.09.47.jpg2016-03-01 22.09.13.jpg

Now this figure is obviously too small against the figure but it the base of this can taken off and the main pole of the body can extend there about an 2 to 3" gap where I plan on getting a wooden down and creating a smoother transition between the base if the lamp post. See attached pictures:
2016-03-01 22.17.16.jpg2016-03-01 22.17.04.jpg

Also as a Nice added bonus checked to see if the lighting work and to my surprise it did YAY first image is with the 12 volts 2nd is with the 16 volts. Very happy with the way the lightning is looking it gives it that broody dark feeling i'm a fan of.
IMAGE#1 IMAGE#2
2016-03-01 22.14.35.jpg2016-03-01 22.14.15.jpg
 
Last edited:
UPDATE TIME: so I've worked on this a little more and i've since learned about magnetization. I've magnetized the hat for this figure head since he can be displayed with or without it. Also had to reworked this guys musket because the resin would get straight no matter how hard I tried to remold it so I decided to cut the barrel off and replace it with a metal barrel. I made it out of 4MM wide aluminum barrel which I glued and then primed. I think this looks pretty good if I say so myself.

2016-07-25 08.52.40.jpg2016-07-25 08.52.45.jpg2016-07-25 08.53.04.jpg2016-07-25 08.53.24.jpg2016-07-25 08.53.30.jpg
 
UPDATE TIME:
So I was able to work on this a bit I started to tackle the Long Musket I masked off the wood parts of the musket and glossed blacked the metal parts to make sure the gold and silver as the top coat sing. after that I used the Model Master oxidizing iron paint w/ the rust activator on the parts where the gun segment connect. Giving it a sense that some areas were unable to cleaned. I brushed on the gold and silver in a dry brushing technique the gloss coated and well as you will see in the pictures it came out looking pretty nice All that I have left to do is paint the wood on the gun and weather it. PICTURE TIME:

2016-08-10 19.33.52.jpg2016-08-10 19.33.48.jpg2016-08-10 19.33.58.jpg2016-08-15 10.40.32.jpg2016-08-15 10.40.14.jpg2016-08-15 10.39.58.jpg2016-08-15 10.40.20.jpg2016-08-15 10.40.04.jpg2016-08-15 10.40.23.jpg2016-08-15 10.40.08.jpg
 
UPDATE TIME:
I haven't been here in a long time and was able to get some work into the base that came with this kit, This kit came with a cobble stone streets a base. I plan on getting and 1/8 scale lamplight for this base to light him and I decided on getting a round junction box and gluing the base to the top of the junction box while, I tried to create a brick texture for this side of this kit to mimic a sewer, See attached pictures.
2016-11-01 17.02.09.jpg
I created a wooden base for this and screwed it into the base so that it hides the hole I created on the bottom side of this kit so I could always reach the hidden switch and wires I plan to put.

2016-11-23 22.46.29.jpg2016-11-23 23.16.24.jpg
PIC#1: I decided to create my own brick molds and well to say the least this was was a giant mold everything was casted but a lot of clean up work was needed, also needed to cut up the mold into different pieces/c it was too big.
2016-11-23 22.46.40.jpg
PIC#2: my failures I have tried for the past 2-3 weeks to get a rounded brick pattern around this base that and I don't trust myself with the randomness that I need for this Brick pattern. I used Perfectcast and I have to say that it might be more brittle at high heights but it is pretty strong.
2016-11-23 22.46.48.jpg2016-11-23 22.47.00.jpg2016-11-23 22.47.08.jpg
PIC#3,4,5: these are the final results of failures I've tried cutting into the plaster with drills and hole drill bits all have broken so that was a bust then tried to drill into smooth cast 300 pigmentable which I found that unlike the fabricant resin and the smooth cast 325 I can take out of the mold and wrap around a piece while it was still curing but it eats up the resin if cut through.
2016-11-23 22.47.20.jpg2016-11-23 22.47.35.jpg
Lastly you see that I bought miniature bricks that are around the same size as the ones on the base and I tried my hand at laying down the brick I assumed that this would be easy, NO WAY once the non-watereed down version of the mortar didn't fill the gap between the bricks. I need to hit this again with some more mortar that needs to be watered down. If anyone reading this has any idea of how to lay miniature brick would be appreciated.

2016-11-23 23.15.39.jpg2016-11-23 23.15.16-1.jpg2016-11-23 23.15.59.jpg2016-11-23 23.15.32.jpg
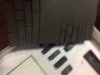
Another method I am trying to use is create bricks through eva foam and just heating it up and then rounding the cut eva foam around the junction box as you can see I experimented with different way of doing this, first I tried to cut through the eva foam with pencils it didn't work I tried multiple times with pencil and then tried with an xacto knife and well that seemed to work but still need to make up my mind whether I want to use multiple cuts or a pen to imitate a brick wall then hit it with a heat gun.

LASTLY
What I did was actually paint the resin head piece mold that I created and I gotta say that it looks pretty darn good. Hope everyone likes
2016-11-23 22.48.31.jpg
 

Attachments

  • 2016-11-23 23.15.16-2.jpg
    2016-11-23 23.15.16-2.jpg
    874.5 KB · Views: 111
Last edited:
So i'm starting on this project again but what I did want to know if anyone is reading this thread is, is there a place that a 1/8 scale Victorian lamppost can be bought or what scale would work close with this 1/8 figure because with the 1/6 scale I know that it might dwarf it. Anyone's advice is welcome. The G scale train lamp light I bought is just too out of scale and too small.
 
This thread is more than 7 years old.

Your message may be considered spam for the following reasons:

  1. This thread hasn't been active in some time. A new post in this thread might not contribute constructively to this discussion after so long.
If you wish to reply despite these issues, check the box below before replying.
Be aware that malicious compliance may result in more severe penalties.
Back
Top