DARKSEID DC Universe classics WAVE 12 BUILD A FIGURE

Nm1cciola

Active Member
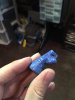
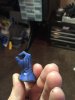
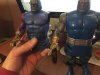
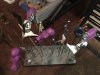
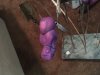
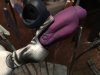
So while my 1/6 scale C3PO figure is moving along I am planning on repainting this guy, (wasn't sure where to post this since he's really not a model).

2016-02-07 09.45.53.jpg2016-02-07 09.46.11.jpg
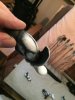
Now I was trying to take him apart so it's easier to paint him theres no way that's happening I've seen videos on people putting it together and they have a hard enough time just doing that with putting the joints and pieces together so with that realization what would be the best way to repaint this figure?. I do enjoy the paint job done on him but to me I wanted to paint him more to what he looks like in the comics with the purple arms and legs with only the head being grey, as well as his tunic being a darker shade of blue. Now i've looked up some things on youtube and here, and I have some what a general idea but just like my Screamin' 1/6 model I'm new at this as well. Was thinking about making a resin casting of the figure so I could treat that as an actual statue since there's really no good full figure statue's of him as well as a way of not ruining the figure, also there's a lot of areas where there's holes for the figure to be attached and there's no way that paint would be able to reach into those areas. Any advice would be greatly appreciated.
 
Since most action figures are made from PVC vinyl, you can heat up the joints with a hair dryer or hot tap water, then gently pop out the parts. It won't hurt the figure. Just don't use anything hotter, like a candle or heat gun!
 
Since most action figures are made from PVC vinyl, you can heat up the joints with a hair dryer or hot tap water, then gently pop out the parts. It won't hurt the figure. Just don't use anything hotter, like a candle or heat gun!

Thanks for that was afraid I was going to break to figure seeing as how it came fully assembled and most videos online most people had trouble just putting it together.

- - - Updated - - -

So now that i'm able to take apart the figure if anyone whose viewed this has done this in the past what would be the next step do I treat this like a model figure and clean the figure then prime it? also want to inquire as to what paints would be best suited for a figure like him?. Any advice is greatly appreciated.
 
You can treat the figure like a vinyl figure kit, it will accept superglue or epoxy putty. Use the heat trick for popping the parts in / out BUT Don't spray him with enamel or lacquer based primer / paint without testing it on a small area, like the bottom of his foot, ect. If you repaint him including the joints and you plan on keeping him movable, you might , want to sand or scrape the joints so they fit a bit looser, that way it doesn't wear away the paint when you mover or re-pose him. I know my son, who does action figure customs has had that request from some customers, but it is a pain in the .......s to do. As far as paints go, I would recommend acrylics like Apple Barrel or Folk-Art, or Vallejo, ect but I'd hesitate to use enamels.....I made this mistake on a Horizon Robocop 20 years ago - And the paint is STILL sticky!!! He's a two bagger unfortunatly :(
 
You can treat the figure like a vinyl figure kit, it will accept superglue or epoxy putty. Use the heat trick for popping the parts in / out BUT Don't spray him with enamel or lacquer based primer / paint without testing it on a small area, like the bottom of his foot, ect. If you repaint him including the joints and you plan on keeping him movable, you might , want to sand or scrape the joints so they fit a bit looser, that way it doesn't wear away the paint when you mover or re-pose him. I know my son, who does action figure customs has had that request from some customers, but it is a pain in the .......s to do. As far as paints go, I would recommend acrylics like Apple Barrel or Folk-Art, or Vallejo, ect but I'd hesitate to use enamels.....I made this mistake on a Horizon Robocop 20 years ago - And the paint is STILL sticky!!! He's a two bagger unfortunatly :(

sorry to hear about the Robobcop figure sounds rough i'm sure it'll dry one day in the near future, anyway I was looking around online and I did see that people we saying to use acrylic not lacquer or enamel as he will be sticky forever in the case with your Robocop figure. Will see if I can pick up loose piece to test paint sometime in the near future have a few other planned figures I would like to complete this might be something I revisit once and awhile in between waiting for paint to dry. If you could expand on the joint a little bit more so to keep him moveable I need to sand or scare the joints, so what your saying is that while i'm moving the joint to sand down where the pins are and the joint is all the way through the full motion of the arm or leg, or whatever in order to keep it movable? didn't see that while I was doing my research on the web. that Sounds cool that your sons customizes figures for people.
 
So did more research on this an wow does this seem somewhat intense Fun but intense and time consuming so I'll just have to wait to acquire a new figure so that I can at least work on that one while the display figure I have can just hang around. planning on priming him and painting him the way I see him in the comics so I'll just have to wait till I have some money but this is something that I'll be doing .
 
Yeah, it can be a lot of work! Sanding the joints is a pain, but if you want the parts to have the full range of motion without wearing away the paint, it works great. What it boils down to is , say in the case of a ball and socket shoulder, you'd be reducing the diameter of the ball a little bit, and increasing the dia. of the socket, to compensate for the thickness of the paint. Or, you could match up the color of the paint to the color of the plastic, and leave the part that would be affected unpainted. This works great, unless you're changing the color scheme altogether! Sealing the paint with a clear coat also helps.
 
UPDATE TIME:
So I am using this "kit" as a base to learn how to airbrush, Well on to pictures and then an explanation on where i'm at.
2016-11-23 23.33.15.jpg2016-11-23 23.33.19.jpg2016-11-23 23.33.22.jpg2016-11-23 23.33.25.jpg2016-11-23 23.34.49.jpg2016-11-23 23.34.15.jpg2016-11-23 23.34.01.jpg2016-11-23 23.34.17.jpg2016-11-23 23.34.03.jpg2016-11-23 23.33.44.jpg2016-11-23 23.33.48.jpg2016-11-23 23.36.01.jpg2016-11-23 23.35.28.jpg2016-11-23 23.34.49.jpg2016-11-23 23.36.10.jpg2016-11-23 23.35.53.jpg2016-11-23 23.35.05.jpg2016-11-23 23.35.56.jpg2016-11-23 23.35.10.jpg
I purchased a tamiya clear yellow and blue. I used the yellow on the mirror chrome and as seen in the picture above it created a gold metallic look. also I tried the clear blue, I painted the blue on a piece of scrap and to my surprise it came out great with just a hint of the blue which is what I wanted. although that being said I do believe that I might've gone overboard with the painting of clear blue as seen in pictures. I can say that
after doing research Darkseid's belt color it keeps changing from creator to creator.

Till next time
 

Attachments

  • 2016-11-23 23.34.06.jpg
    2016-11-23 23.34.06.jpg
    926.5 KB · Views: 110
  • 2016-11-23 23.34.19.jpg
    2016-11-23 23.34.19.jpg
    965.5 KB · Views: 110
Last edited:
UPDATE TIME:
I got some headway into this guy see attached pictures, I painted his body with vallejo paints, then painted the creases at the end of the tunic as well as were the arms are with model master enamel gloss black and then had to touch up some pieces of this guy but aside from that he looks great in my option the metal paint that I used for the head looks great with the tunic repainted it doesn't clash which I assumed would happen.

2016-11-24 20.27.58-1.jpg2016-11-24 20.25.47-1.jpg2016-11-24 20.28.24-1.jpg2016-11-24 20.26.40-1.jpg2016-11-24 20.27.32-1.jpg
As you can see in the pictures I put him next to the Darkseid I display and I gotta say that i'm liking the one I painted myself so far.
 
Last edited:
That looks GREAT!!! You're doing a superb job painting him! It's hard to believe it's the same figure, amazing what a good repaint can do.
 
UPDATE TIME:
So I have been away for some time but I was bus all the while I was able to finally finish repainting this figure but before I get to unveiling him I will show a few in progress shot.
IMG_2228 2.jpgIMG_2229 2.jpgIMG_2230 2.jpgIMG_2244 2.jpgIMG_2245 2.jpgIMG_2246 2.jpgIMG_2247 2.jpgIMG_2248 2.jpgIMG_2249 2.jpgIMG_2250 2.jpgIMG_2233 2.jpgIMG_2234 2.jpgIMG_2235 2.jpgIMG_2236 2.jpgIMG_2242 2.jpgIMG_2241 2.jpgIMG_2240 2.jpgIMG_2239 2.jpgIMG_2238 2.jpgIMG_2237 2.jpgIMG_2236 2.jpgIMG_2235 2.jpgIMG_2234 2.jpgIMG_2243 2.jpg
I have more of the figure looking under shaded but the sampling here gives a pretty much understanding of what I was going for in this figure. See more in Part 2.
 

Attachments

  • IMG_2232 2.jpg
    IMG_2232 2.jpg
    1.2 MB · Views: 98
UPDATE TIME Part 2:
I am just posting some more work in progress shots as to show my process of relating this figure. Keep in mind this is my first time airbrushing and using the technique underpainting I used him as a template and practice run for airbrushing and I believe that it's not too shabby. See attached pictures.
IMG_2253 2.jpgIMG_2252 2.jpgIMG_2254 2.jpgIMG_2255 2.jpg
This last picture seen here I gloss coated so as it would make it easier to mash the black detail wash filter through the stone like cracks on the figures arms, I know that the gloss coast is an unnecessary part b/c some people have dull coated a repainted figure and still used wash with great results.
IMG_2261 2.jpgIMG_2258 2.jpgIMG_2259 2.jpgIMG_2256 2.jpgIMG_2260 2.jpgIMG_2257 2.jpg
I was also gave Darkseid's Killing Glove a punch up, I don't have too many in progress shots of this but what I can say is that what I did was prime the arm with and acrylic primer and them used a semi-glosss enamel paint till there was a mirror like surface so as when I lightly misted the black with a gold chrome it gave the gold armor was way to shine. Also as you can see I used the black detail was in areas to fade some detail and helps bring out the lines scored into the figure glove. I went with artist representation on this one since there is really no color reference for the killing glove.
 

Attachments

  • IMG_2262 2.jpg
    IMG_2262 2.jpg
    1.1 MB · Views: 106
Last edited:
UPDATE TIME Final part 3:
SO here is the final unveiling of this paint job complete with a fully repainted mother box I believe that for my first time airbrushing I think I did a pretty good job and i'm partial to the repainted figure I did rather than the factory paint. I will say that there is some paint rub happening in areas but I don't mind that too much I don't plan on posing him too much from the position I placed him in anyway nor do I plan on changing out his Killing Glove hand for there hand holding the mother box. Hope you like Now on to painting my Kits that I purchased. Before I do go I am also on planning on creating a base for him that is in the guise of one of the apokoliptian fire pits.
IMG_2269 2.jpgIMG_2270 2.jpgIMG_2271 2.jpgIMG_2277 2.jpgIMG_2278 2.jpgIMG_2288 2.jpgIMG_2287 2.jpgIMG_2286 2.jpgIMG_2285 2.jpgIMG_2284 2.jpgIMG_2283 2.jpgIMG_2282 2.jpgIMG_2281 2.jpgIMG_2280 2.jpgIMG_2289 2.jpgIMG_2290 2.jpgIMG_2291 2.jpgIMG_2292 2.jpg
 

Attachments

  • IMG_2252 2.jpg
    IMG_2252 2.jpg
    1.4 MB · Views: 98
  • IMG_2253 2.jpg
    IMG_2253 2.jpg
    1.4 MB · Views: 90
  • IMG_2254 2.jpg
    IMG_2254 2.jpg
    1.2 MB · Views: 99
Last edited:
I haven't prototyped this base yet, but What I plan on recreating is a Apokolips Fire/Energy Pit this is the diagram I plan on copying If anyone has any advice on the best way to replicate this base aside from using Hole Saws, Thanks in advance to whomever responds. I plan on trying to light this base to give it fiery hue to help pronounce the paint job.
IMG_2348.jpg
 
Last edited:
This thread is more than 7 years old.

Your message may be considered spam for the following reasons:

  1. This thread hasn't been active in some time. A new post in this thread might not contribute constructively to this discussion after so long.
If you wish to reply despite these issues, check the box below before replying.
Be aware that malicious compliance may result in more severe penalties.
Back
Top