So let's talk Graflite. I have mentioned elsewhere (everywhere), that I HATE this flashgun. Why? Mostly because they are cheap, kinda worthless, and it's impossible to go looking for a Graflex without somebody waving one of these in your face thinking they've found gold to sell to the nerds. These things go for ridiculous prices on eBay-- sold by and bought by people who don't know what they are looking for.
I mean, unless you are one of those sick puppies who WANT to make Luke's lightsaber from the Holiday Special, or you are ambitious enough to make a 1:1 X-Wing cockpit-- there's no point to these things.
BUT THEN... I saw this:
Panaflex scored an awesome looking Graflite that was super cool looking to start, then made it even cooler. That inspired me to challenge myself (or anyone else) to make a decent saber out of one of these.
Luckily, I found one for $25 (which is the MOST they are worth) and decided to see if I could un-suck it for a custom saber.
I didn't take a before picture, but you've all seen them. First thing I did was wet-sand off the grimy tape scum and dingy aluminum surface. That made it shiny at least.

As it was sitting there, inspiration hit. With the cap to the right of the top I realized I'd never seen anyone do the ports at the bottom. They are generally at the top. I've seen some cool 2 cell extensions in play that put them in the middle-- but I haven't seen the bottom. So I cooked up a little story in my head.
This lightsaber is a trophy. It belongs to a pirate or bounty hunter that scavenged it off a dead Jedi. As such, he likes to wave it around to look badass, but he's not THAT good. More importantly, to keep it operational he's had to get creative when it comes to maintenance cause he has no idea how the thing works.
The ports near a big endcap says to me that he's had to hack the powercell. Since I'm not going to waste a good clamp on this thing, maybe I can rework the existing Graflite control box justifying it's non-traditional look to the fact a not-Jedi installed it at some point. Overall, I want it to be simple and lean (mainly because i'm not using good parts on it") ) but with the aesthetic that it is used in the most simplistic of ways.
) but with the aesthetic that it is used in the most simplistic of ways.
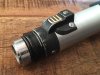
First task-- kill the threads in the end cap so I can snap it down on the top instead.

Which worked perfectly:

As for those ports-- two ideas.
1. Obviously, wire work will fit my story and help hide the English words.
2. I want to put more black on this thing. Obviously, inspired by Panaflex-- but I can't just go and steal his thunder. So I'm going to do a band of black instead tinting the whole thing.
Here it is painted, distressed/weathered and wired.

I am using the guts to help craft an emitter on the other end, so right now this angle favors the fact that you can see right through the holes when you look at it dead on. So I'll need to put something in there.
That is in the back of my brain whilst I attack the other end next...
I mean, unless you are one of those sick puppies who WANT to make Luke's lightsaber from the Holiday Special, or you are ambitious enough to make a 1:1 X-Wing cockpit-- there's no point to these things.
BUT THEN... I saw this:
Panaflex scored an awesome looking Graflite that was super cool looking to start, then made it even cooler. That inspired me to challenge myself (or anyone else) to make a decent saber out of one of these.
Luckily, I found one for $25 (which is the MOST they are worth) and decided to see if I could un-suck it for a custom saber.
I didn't take a before picture, but you've all seen them. First thing I did was wet-sand off the grimy tape scum and dingy aluminum surface. That made it shiny at least.
As it was sitting there, inspiration hit. With the cap to the right of the top I realized I'd never seen anyone do the ports at the bottom. They are generally at the top. I've seen some cool 2 cell extensions in play that put them in the middle-- but I haven't seen the bottom. So I cooked up a little story in my head.
This lightsaber is a trophy. It belongs to a pirate or bounty hunter that scavenged it off a dead Jedi. As such, he likes to wave it around to look badass, but he's not THAT good. More importantly, to keep it operational he's had to get creative when it comes to maintenance cause he has no idea how the thing works.
The ports near a big endcap says to me that he's had to hack the powercell. Since I'm not going to waste a good clamp on this thing, maybe I can rework the existing Graflite control box justifying it's non-traditional look to the fact a not-Jedi installed it at some point. Overall, I want it to be simple and lean (mainly because i'm not using good parts on it
) but with the aesthetic that it is used in the most simplistic of ways.First task-- kill the threads in the end cap so I can snap it down on the top instead.
Which worked perfectly:
As for those ports-- two ideas.
1. Obviously, wire work will fit my story and help hide the English words.
2. I want to put more black on this thing. Obviously, inspired by Panaflex-- but I can't just go and steal his thunder.
So I'm going to do a band of black instead tinting the whole thing.Here it is painted, distressed/weathered and wired.
I am using the guts to help craft an emitter on the other end, so right now this angle favors the fact that you can see right through the holes when you look at it dead on. So I'll need to put something in there.
That is in the back of my brain whilst I attack the other end next...