You are using an out of date browser. It may not display this or other websites correctly.
You should upgrade or use an alternative browser.
You should upgrade or use an alternative browser.
Revell Colonial Viper Mk2 Photoetch Cockpit
- Thread starter XS Hster
- Start date
PHArchivist
Master Member
Nice work! And welcome!
mcusanelli
Well-Known Member
That looks fantastic! And what's really great about this kit, is the canopy is super clear so you'll be able to see all your hard work ")
newmagrathea
Sr Member
Whoa, that's awesome.


I'm loving the work.
Fiber Optics are no joy either. Still gotta deal with light leaks and possibly light bleed between strands of different colors. Then there's the whole "don't get any type of plastic cement or Cyano glue on them or they WILL break". I found that out the hard way when I had to crack open wings a couple of times to fix broken strands.
Fiber Optics are no joy either. Still gotta deal with light leaks and possibly light bleed between strands of different colors. Then there's the whole "don't get any type of plastic cement or Cyano glue on them or they WILL break". I found that out the hard way when I had to crack open wings a couple of times to fix broken strands.
Vim Fuego
Well-Known Member
A macro lens is used for extreme closeups - if all you have at hand is a phone camera you can achieve closer photos with a carefully positioned magnifying lens

i shot this one with my iPhone 5s and the lupe i happen to have sitting on my desk - excuse the splodge in the middle, I probably should have cleaned it first - the depth of field isn't great, but what you do get in focus is sharp as.
if you have a bit of spare cash you could get something like the Olloclip clip-on macro lens. if you have a bit more cash, you could go for something like the Schneider iPro. The lens itself isn't so expensive, but the case for the camera has the mount built in.
I've never owned a macro lens myself, as it turns out you can do quite a lot with hand-held magnifying glasses.
XS Hster
New Member
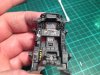
This is the now fully lit cockpit with 10 LED's driving the whole deal. 20 leads to conceal. I want to merge these into a 12v Regulated Transformer (i.e plug in 240v - 12v) - and have a much lower profile cable exiting the Viper with a floor mounted foot pedestal switch (a la ikea).
Does anyone have any experience with this? The only reference I can find is for battery packs.
Any ideas greatly appreciated. Before I hurt myself or the Viper.....


PS. Don't anyone tell Bill Adama I rigged up one of his babies to a Swedish lamp....
Does anyone have any experience with this? The only reference I can find is for battery packs.
Any ideas greatly appreciated. Before I hurt myself or the Viper.....
PS. Don't anyone tell Bill Adama I rigged up one of his babies to a Swedish lamp....
19narvik40
Sr Member
XS Hster,
Fantastic work in the cockpit, really like the little extras you add to the pilot as well. Gives me some ideas.
Fantastic work in the cockpit, really like the little extras you add to the pilot as well. Gives me some ideas.
Viper Pilot completed, ready for war! Revell really need to clean up their act as far as proportions/details are concerned. Having said that, rezzy little decals on the arms kinda made me forgive. A little.
View attachment 584985View attachment 584986View attachment 584983View attachment 584984
XS Hster
New Member


Update on the Viper...fuselage day was fun! Light bleed all eliminated. Cockpit in situ and finished, Now masked off to protect through seam removal, spraying and weathering.
Revell fuselage has a pronounced skirt on each fuselage half that results in one mother of a seam to remove. No big deal.
Cockpits as Canon as I can get it, and I think (in my opinion) the darker grey colour is more in keeping with the original than my peers' choice of a lighter grey. That being said, the darker Humbrol 67 I used with a Humbrol Black Wash, wont be as sympathetic to the cockpit details when the lights are on,
Big steps for the Viper these next few weeks, I'll keep the posts coming.
19narvik40
Sr Member
Really great progress sir, well done!!
View attachment 594929View attachment 594930
View attachment 594931View attachment 594932View attachment 594934View attachment 594935View attachment 594936View attachment 594937
Update on the Viper...fuselage day was fun! Light bleed all eliminated. Cockpit in situ and finished, Now masked off to protect through seam removal, spraying and weathering.
Revell fuselage has a pronounced skirt on each fuselage half that results in one mother of a seam to remove. No big deal.
Cockpits as Canon as I can get it, and I think (in my opinion) the darker grey colour is more in keeping with the original than my peers' choice of a lighter grey. That being said, the darker Humbrol 67 I used with a Humbrol Black Wash, wont be as sympathetic to the cockpit details when the lights are on,
Big steps for the Viper these next few weeks, I'll keep the posts coming.
XS Hster
New Member


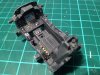
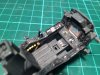
RCS thruster ports (of differing sizes) drilled out over the whole Viper. Avionics bay showing Photo Etch 2 piece insert (had to remove a bunch of styrene for this!) in situ and looking much better than the stock kit, Also the Avionics Bay has vanes that reach up to the fuselage. This is factually incorrect so I had to remove a bunch of material and shape the remainder to achieve the correct effect.
JCS Miniature Lights Blue and White flickering LED's make the engine cluster look badass.

Lots of light bleed to take care of and then onto paint. Wiring sucks.
Last edited:
19narvik40
Sr Member
Thanks for the heads up on the vanes, will be sure to deal with it on mine. She sure looks a tangled mess in the last photo but otherwise coming along very nicely.
XS Hster
New Member


Update on the Viper. Tamiya surface leveller really can't be beaten for a uniform, stable easily flattable platform for base colour. Super good. Decal phase now (on top of clear cote).
Rear panel shows seam filling to finish rear end and masking on photo etch engine cans. I modified the underside at the rear to have the cabling per studio Vipers. i.e original ****e moulding on lower rear panel removed, two boxes scratched an dropped in situ to run cables out of to power rail.
Gloss cote next and weathering. Detail painting after that.
19narvik40
Sr Member
Very frakkin' spanky sir !!! How did you apply the Tamiya? If it's the same stuff I think it is, it spreads like tar, can't argue with the results though.
View attachment 608962View attachment 608963View attachment 608964View attachment 608965
Update on the Viper. Tamiya surface leveller really can't be beaten for a uniform, stable easily flattable platform for base colour. Super good. Decal phase now (on top of clear cote).
Rear panel shows seam filling to finish rear end and masking on photo etch engine cans. I modified the underside at the rear to have the cabling per studio Vipers. i.e original ****e moulding on lower rear panel removed, two boxes scratched an dropped in situ to run cables out of to power rail.
Gloss cote next and weathering. Detail painting after that.
Similar threads
- Replies
- 43
- Views
- 1,766