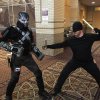
I Will Find You. All of You: Crossbones Civil War WIP.

Malibu139

Sr Member
RPF PREMIUM MEMBER
I was inspired by member iamseanfields crossbones build thread. I am a huge winter soldier fan ( arm build thread here http://www.therpf.com/showthread.php?t=239100. ) and cant wait for Civil War. I am going for a Crossbones Civil War build from the leaked set pics.

My plan:
build the upper body armor with cloth and craft foam: base body armor with collar, outer body armor that has the x painted on it, back armor plate, and then the "triangle vest" with mole straps.
Going to do the accessories in craft foam: knives,beacon, mags, mag holders, shotgun shells, drop leg glock holster, knee pads, shin guards.
Found a 3d file for the helmet and am getting it 3d printed. I plan to clean it prime it and paint it.
I have boots and pants already
I also plan to make the gauntlets in craft foam,pvc pipe, and wooden dowels.

I might even try some facial prosthetics for the facial scarring
Anyway that's the plan so here are some progress pics.
2015-12-05_10-43-52_472.jpg2015-12-07_16-41-15_261.jpg2015-12-04_17-36-41_369.jpg

I patterned the armor for the base with the collar in 5mm craft foam and sewed the black material over it. Then sewed all the individual pieces together to make whole base.
I tried to make the collar screen accurate but made up the rest cause you cant see from the pics...
I hope to have it done in a few weeks time.
Thanks!
 
Last edited:
Helmet:
I found a file on etsy that I thought was pretty close. I got it printed by one of the members in project runs that provide 3d printing services.
Once I received it and made sure it fit fairly well I started the sanding priming process.
Then I painted a flat black and my wife helped with the white "skull" detail.
I don't have good pic of the back right now but I velcroed an elastic strap the goes through the slot in the back and holds the 2 halves together.
I am really happy with the way it turned out.
helemet white 3.jpghelmet white.jpghelmet base.jpghelmet detail 2.jpghelmet detail.jpghelemet final.jpg

helemet white 3.jpg


helmet white.jpg


helmet base.jpg


helmet detail 2.jpg


helmet detail.jpg


helemet final.jpg
 
Dude.... what do you do for a living? Your build skills are amazing on the gauntlets.

Keep up the great work.

kcail1
 
Dude.... what do you do for a living? Your build skills are amazing on the gauntlets.
Keep up the great work.
kcail1

Thanks, really appreciate it.! I wont bore you with the details of what I do but unfortunately its not this. I could not find a tutorial for these and really didn't feel like sculpting and molding them. So I watched a couple basic foam gauntlet tutorials and used that as a base, looked for pics of them for detail and used a lot of contact cement and the dremel.

Made the tactical vest that has the molle straps. Patterned it to fit around the back armor and made it out of two 5mm craft foam pieces B/c it looks thick in the set pcs.. I riveted the straps between the layers before I glued. them together making sure to leave excess for adjustments. I also used elastic so it would have some give but could still be snug. on the outer layer I made that from a single layer of black material and the molle straps sewed on. Then riveted that to the top 5 mm layer in 3 spots before I glued it all up.
didn't get progress on that but here it is before heat molding. I also made the shoulder gear platforms the same way.

triangle mole vest.jpg
 
You *MADE* a Molle vest? Or is that a modified Molle vest? Also, how do you rivet? one of those punch tools with the brass couplings? That may be useful someday.

Anyway... you have a serious creative streak and skill level off the charts. Jealous. :)

Kcail1
 
You *MADE* a Molle vest?
Kcail1
Thanks again
I made the one in the pic: 4 pieces of 5 mm craft foam, one 2 inch buckle, two 1.5 inch buckles, 1.5 inch elastic, and 2 inch elastic, 2 pieces of black fabric , blue jean rivets and basic rivet kit from the craft store.


I sized/patterend the triangular shape. cut 2 pieces of foam per side for 4 pieces total. I made 2 pieces out of black cloth that were the same size as the foam.
I patterned the cloth to be the same size as the foam. then I just sewed the molle straps on every 2 or 2.5 inches. I think I have 6 straps per side..

Once had the molle piece I riveted that to the outside of one piece of foam and riveted the buckles and straps to the inside of the other foam piece. then I used contact cement to glue the 2 foam pieces together to make 10 mm thick vest that gives the illusion of armor but its foam with cloth riveted to the outside. Then I repeated for the other side.

Then I dremeled the edges smooth and then heat shaped them to curve around the other armor.

I am not sure if I explained it well but I could take some closer pics.
 
Never thought about a dremel... I use a really stiff nail file (for artificial nails) and a buffing motion. You have more work to do however, so that makes more sense. I'll have to remember that next time.

Great work. Keep it up.

Kcail1
 
mags and mag holders made (including the 3 short mags on the front with the buckles) foam.
Shotgun shells from pvc and foam.
knife and sheath from foam
also have the waffle mag from the steyer if think.
and the beacon.

Also I made the drop leg holster for a toy glock. just have to add straps

Working on the shin guards and pushing to get this wrapped up this weekend

holster.jpg foam parts.jpg
 
Last edited:
Shin guards , knee pads and toe guards completed
2 layers of 5 mm foam laminated together and patterned after a set of baseball guards I had.
elastic bands riveted in place and velco attaches in the back
plasti dipped black
shinguards 2.jpgshinguards.jpg

Also painted and attached all the accessories for the shoulder holders.
attached the mags and everything pretty much with elastic

mags and knives.jpg

Also finished up the cut down glock mags and buckles.
small mag belt.jpg

hoping to paint he armor and finish up a few sewing spots and finish up over the weekend
 
Power gauntlets are done. They are craft foam, pvc, wooden dowel, screws etc. I plasti- dipped then painted with flat metallic nickel
Got the helmet and will be working on that next.
Will get back to the armor soon.


.View attachment 585276
View attachment 585266View attachment 585267View attachment 585268View attachment 585270View attachment 585271View attachment 585273

This is great sir,

Thanks for the inspired pictures, just can't wait to make mine. Helmet foam is done on me. May i ask, the pvc pipe and dowel size?
 
This is great sir,

Thanks for the inspired pictures, just can't wait to make mine. Helmet foam is done on me. May i ask, the pvc pipe and dowel size?
Thank you. For the smaller outside pistons I used 7/16 inch wooden dowels and 1/2 inch pex pipe. The dowel slides in and is not a tight fit.
For the top piston over the hand I used the 1/2 inch pex pipe inserted into 1/2 inch pvc sch 40. I had to dermal and sand these 2 to get them to fit. They fit tight with no give.

However after seeing them in a couple pics this weekend I think I am going to go up in size on the over the hand one to: 1/2 inch pvc sch40 inserted into 3/4 inch pvc sch 40 for a little bit beefier look.

Here are a couple pics from this weekend. Couldn't find Cap....
1389571_222424101442011_1163301277_n.jpg12328241_198297990531281_1106822526_n.jpgunspecified8QDEOINO.jpg

I also tried the facial scarring for when I have the helmet off/. Sculpted the scars in clay. got the general look from the set pic.
molded with smoothcast 300
then poured them with dragon skin.
painted with some alcohol activated makeup.
I am happy with it for my first try at facial prosthetic.
CAP-CW-29.png2016-02-20_21-55-11_922.jpg2016-02-20_21-57-48_874.jpgunspecified782Z0IVF.jpg

1389571_222424101442011_1163301277_n.jpg


12328241_198297990531281_1106822526_n.jpg


CAP-CW-29.png


2016-02-20_21-55-11_922.jpg


2016-02-20_21-57-48_874.jpg


unspecified782Z0IVF.jpg


unspecified7N6V739J.jpg


unspecified8QDEOINO.jpg
 
Last edited:
wow,

Thanks for the explanation. Perhaps i will try using dowel and roll outer dowel using 2mm eva foam. Due in my place pvc pipe may got various price :facepalm ( not to cheap).
Will try making it this week :)

Is any template for the armor (sewing pattern)?
And gauntlet you making it by scratch build?

Good idea on the foam. I thought of that but pvc turned out of for me.
There was no pattern. I did the front armor that is painted in 3 pieces.
1. I cut out a piece of fabric about an inch or so bigger than the armor piece. I hemmed it so the edge wrapped around the lip of the amor.
This allows for a few black push pins to secure the foam to the fabric. and it makes it look "set in". I also sewed velco to inside of the fabric and suck it the back of the armor so it is secured with the pins and Velcro. This allows me to change the armor if it gets messed up
2. I riveted the side armor that pieces into the chest plate to rectangular pieces of fabric. this wraps around the back and Velcros together.
3. I did the shoulder straps. figured the size and angel and sewed them up.

Once I had all these pieces I sewed them all together . then patterned the back and sewed it to the front piece..
My sewing skills leave a lot to be desired.... I patterned everything on paper to fit me. I started with the base armor that has the collar and worked ourtward so everything fit the way I wanted it to.

The to pieces of armor on the shoulders Velcro to the shoulder straps and the strap that holds the shoulder molle pieces secures it as well.
As for the gauntlets. I watched a tutorial on foam gauntlets and used that as a base to build all the details around.
The pics in this thread should give you good references.
Here is mine with the upgraded "pistons"
2016-02-29_07-55-41_668.jpg2016-02-29_08-03-06_667.jpg
 
WOW nice upgrade pistons,

adding foam right?

i mean the vest base for the armor, you sew it your self?

Sry many asking but till now i haven't get any progress because too little time and many work to do at office till night :(
 
adding foam right?

i mean the vest base for the armor, you sew it your self?

I made them bigger with larger diameter PVC.
I sewed the base myself: all the upper body stuff except the shirt really.
its in 3 separate pieces. I will take some better pics later.
 
This thread is more than 6 years old.

Your message may be considered spam for the following reasons:

  1. This thread hasn't been active in some time. A new post in this thread might not contribute constructively to this discussion after so long.
If you wish to reply despite these issues, check the box below before replying.
Be aware that malicious compliance may result in more severe penalties.
Back
Top