Tron: Legacy Rinzler helmet build

Crimson490

Well-Known Member
RPF PREMIUM MEMBER
I said I'd never make one of these, but I'm at the point now where it just makes sense.

Hey, better late than never, right?

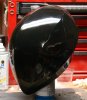
Unlike previous builds, I decided to 3D model this and 3D print it. The shape is so subtle, I was afraid I'd never get it right eyeballing it like before. Over the past year I did a lot of finish work on 3D printed parts for my LEGO minifigure clock adventure, that I felt it was time to try it out on something life-size.

So, here goes!

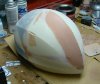
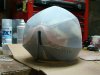
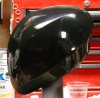
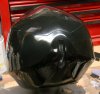
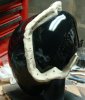
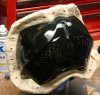
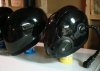
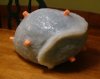
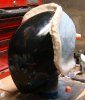
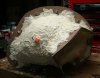
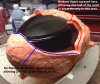
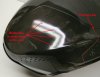
The helmet is 8 parts glued together (the pad I can print on is only 8"x8"). As you can see, bondo helps in the not-so-perfect reassembly of the pieces. It's no wonder Humpty Dumpty was permanently derezzed.

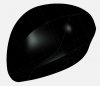
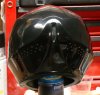
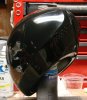
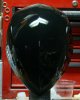
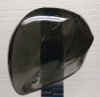
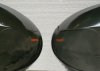
I found it difficult to find good source images of the back of Rinzler's helmet, though there are some spots in the movie where some light is shed on this area. What I've come up with is probably not 100% accurate, but I think it's believable enough.

Stay tuned!
 

Attachments

  • Rinzler-CAD.jpg
    Rinzler-CAD.jpg
    71.1 KB · Views: 628
  • R-01.jpg
    R-01.jpg
    281.2 KB · Views: 600
  • R-02.jpg
    R-02.jpg
    241.2 KB · Views: 586
  • R-03.jpg
    R-03.jpg
    260.8 KB · Views: 542
Still sanding and priming... I'll start clear coat/wet sand/polishing soon. Can't wait to show you guys what this will look like!

Meanwhile, here's how I plan to do the lighting.

For all my helmets (except CLU - no getting around that one), I've tried to use simple and cheap EL wiring. Rinzler will use the fat 5mm wiring for the 4 side lights, and the back. Since the back is a wider light, I'm going to try a clear diffuser to help spread the EL wire's light into a wider lens. It will probably be a compromise between brightness vs. even light distribution. This is the least expensive option, and yet it will allow for a large selection of colors if people don't want the standard red/orange.

If this completely fails, I'll probably have some combination of EL light for the sides, and LED lights for the back, or all LEDs.
 

Attachments

  • Rear light1.jpg
    Rear light1.jpg
    125.3 KB · Views: 269
Gotten a lot of work done in the past day or two, and I think I'm finally out of the woods! Now I'm at the wet-sand/polishing stage. Almost finished polishing one side! I hope to have more pics of the whole helmet sometime next week.
 

Attachments

  • R-08.jpg
    R-08.jpg
    306.5 KB · Views: 393
Radical, man! Do you plan to light up your suit? If you haven't already, you need to post your work on THE tron costume thread here.

If everything turns out with the mold and the lighting, it will be for sale. =)
 
I finally have everything about 95% polished. I'll touch up a few spots that are a little hazy, then give it a quick carnuba wax for that little extra pop. It's always a gamble...at this point, I've put so much time into it, I'd hate to rub through whatever clear coat is left.

Here's some better views of how I ended up doing the detail in the back. I don't even care if it's screen-accurate - I love how it turned out.
 

Attachments

  • R-13.jpg
    R-13.jpg
    287.3 KB · Views: 418
  • R-12.jpg
    R-12.jpg
    300.8 KB · Views: 363
  • R-11.jpg
    R-11.jpg
    362.1 KB · Views: 446
  • R-10.jpg
    R-10.jpg
    356.9 KB · Views: 608
  • R-09.jpg
    R-09.jpg
    290.5 KB · Views: 458
Working on the mold now. Because this helmet is bigger than the others, with more of an undercut/taper at the neck, I didn't feel comfortable doing a 1-pc silicon mold. That stuff stretches great, but I don't think it would work in this application. So, I just decided to split the helmet at the faux seam that runs from side to side over the top.

Crossing fingers it works!

Also, here's a pic showing relative size of Rinzler vs. the other helmets. I landed on this scale based on the photos from Ironhead studios. When I overlaid the side shots of Rinzler and Black Guard, I used the cylindrical post that the helmets rest on as a common reference. This makes Rinzler a little longer front to back than the Black Guard, but basically just as tall.
 

Attachments

  • R-20.jpg
    R-20.jpg
    341.6 KB · Views: 446
  • R-21.jpg
    R-21.jpg
    293.1 KB · Views: 523
  • Lineup1.jpg
    Lineup1.jpg
    142.3 KB · Views: 1,119
  • Lineup1a.jpg
    Lineup1a.jpg
    207.1 KB · Views: 480
Looking awesome!

Haven't gotten progress done on the sub dye, currently working on some closer deadlines and commissions for earlier cons, but I'm excited about all the great work I'm seeing. The 2 part mold is a great idea, placing the mold seam along an existing edge should make it so that there's minimal work needed to clean up the seam between the two halves of the cast. Scale looks great too!

I looked back through the RPF and realized I'd seen your other Tron helmets before as I was doing Rinzler/Tron research. All of them look pretty amazing. Can't wait to see this one finished and get my hands on one. Do you think a kit would be available before March? I'm anticipating the Rinzler sub dye to be complete sometime in February, and would love to put together a full cosplay before WonderCon at the end of March. Not too sure about lighting since the suit will be just spandex, for now I was gonna go with the reflective safety tape trick for the time being. Lighting might possibly come later once I can figure out how to hide wiring under the spandex.
 
Thanks, rjsosongco!
Yes, if all goes well, I will start a For Sale thread in the next couple weeks - assuming I can get the mold done and I've worked out any kinks with the finishing.
 
Mold is done, and I'm working on the shell now. I have a bad feeling about the mold parting line going perpendicular to the shell parting line.

I suppose if things don't go back together nicely, I'll split the shell along the mold's parting line, and end up with a 4-pc shell.
 

Attachments

  • R-18.jpg
    R-18.jpg
    241.1 KB · Views: 339
  • R-16.jpg
    R-16.jpg
    343.3 KB · Views: 275
The suspense is killing me! So I put that energy into finishing up the sub dye today. A few hours of Photoshop painting later and the arms and legs are done!

Rinzler Preview.png

Gonna get it printed and sewn up soon. I know with your helmet it's gonna look radical!
 
As I feared, trying to reassemble the silicone one way, while the shell goes together another way, proved to be impossible (for me). I added a new parting flange to the shell that closely matches the parting line of the silicone. This is still a bit tough to reassemble, but at least I can do it!

Now I can finally cast something!
 

Attachments

  • R-20.jpg
    R-20.jpg
    286.2 KB · Views: 284
  • R-19.jpg
    R-19.jpg
    233.8 KB · Views: 274
I got my test swatch for the Rinzler suit and aside from printing it 2x the size, everything looks good. Just need to send the whole suit file over and make sure they print it the right size.

TestSwatch.jpg

EDIT: Made the necessary adjustments and ordered the entire suit! On top of adjusting some brightness in a few spots, I added an extra set of gloves to the print as well as some swatches of the hex pattern in case I need to patch some areas later. You're paying to print on the entire yard anyway, so it's in your best interest to use as much of the printable area as possible. Should be here in a week or two, can't wait!

Screen Shot 2016-02-10 at 10.52.14 PM.png
 
Last edited:
Great job! I can't wait to see it donned.

BTW, I haven't posted in awhile because the 2pc mold was just causing more issues than I wanted to deal with. So, I did the whole mold over again, but this time, instead of splitting it into two separate pieces, I only separate it down at the bottom - enough to be able to demold. This will make cleaning off flash a whole lot easier, and the two halves won't have a step or mismatch where they come together. This not only looked weird, but it created a lot of hassle to clean up on the cast.

I am hoping to cast a helmet in the new mold tonight or tomorrow.
 
Finally got around to making a cast in the new mold, and I'm very happy with the quality and the relative ease to clean up the flash. You can easily see the difference in the parts made from each mold. The old mold was too hard to align, and I got a big step. The new mold only has a short section that separates, so it's almost impossible to mis-align.

The Rebound 25 is also a stiffer silicon than the Dragon Skin, which I think helped with the quality of the surface finish, as well as minimized any waviness in the surfaces. I did have one weird area with a few blemishes - I think spots in the print coat weren't mixed well enough and didn't set up. It's minimal and towards the back. Don't tell CLU, but nobody's perfect.
 

Attachments

  • R-21a.jpg
    R-21a.jpg
    597.8 KB · Views: 425
  • R-22.JPG
    R-22.JPG
    290.1 KB · Views: 504
  • R-23.JPG
    R-23.JPG
    284.7 KB · Views: 1,133
  • R-24a.jpg
    R-24a.jpg
    432.1 KB · Views: 410
  • R-25a.jpg
    R-25a.jpg
    380 KB · Views: 445
  • R-26a.jpg
    R-26a.jpg
    494 KB · Views: 460
Looking good. What is that clear helmet made of? I want to make a Rinzler costume for this summer's comic con here and I am trying to figure out what to make the helmet out of.
 
This thread is more than 7 years old.

Your message may be considered spam for the following reasons:

  1. This thread hasn't been active in some time. A new post in this thread might not contribute constructively to this discussion after so long.
If you wish to reply despite these issues, check the box below before replying.
Be aware that malicious compliance may result in more severe penalties.
Back
Top