Revell SnapTite Max Falcon - TFA

Ktaylor

Sr Member
So I grabbed this kit against my better judgement the other day while at the hobby store, its not terrible if you don't mind rebuilding some of the areas, but it certainly isn't as detailed as the Bandai stuff, but overall it has a pretty decent frame to work off of. I had planned on just building it as is and using it as painting practice, lol yeah right! I am pretty much rebuilding the entire thing now lol because I guess there is something wrong with me and I need help!

the one good thing abut this kit is the size, its 15 inches long which is about as small as I would want this ( but man the detail on the new 144 scale TFA falcon looks amazing so I might have to grab that next!)

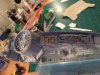
Here is the packaging and basic spru layout, the detail is pretty good, there are just some areas that are lacking and need some attention, I'll go through those next.

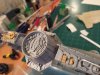
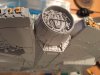
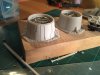
worth noting is that comes with the new and the old radar dish so you can choose which version to build, although there are LOT of differences besides that this new TFA model so it wouldnt really be the old falcon just by putting the round dish on..still cool they added it.


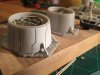
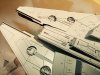
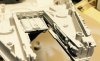
In the top and bottom halves of the ship a LOT of modifications have already been done, i forgot to take pics of them as they were OOTB.

Photo Dec 09, 9 23 50 AM.jpgPhoto Dec 05, 3 47 53 PM (1).jpg81kXmsnS76L._SL1500_.jpg
 
Last edited:
One of the first really plain areas was the detail on the bottom by the back near the engine, there are lots of little detail there and this was pretty flat with just a few pieces molded in, I kit bashed a few parts that looked close and scratch built the rest, not really accurate ( been using the studio 32" model as ref) but close enough, worth noting there are a lot of little details and stuff that are new to this model, I guess they are on the new updated TFA falcon so things dont really line up most places anyways, just trying to get something closer in detail to the studio models. Really just something that when painted will look decent enough for a desktop model :)

I also added some detail and modified some of the shapes of the stuff up by the turret, and center mandible, I jumped right in and didn't take and "before" shots but you can see the white styrene parts that were added on pretty easily. Bashed a bunch of parts from a Matilda Mk3 tamiya kit as well, which is all the Yellow stuff.

scraped all those little piston rod things on the engine flaps a built some beefier ones out of styrene rod, nothing fancy but looks much better IMO

the main thing I see different about the new Falcon ( and confirmed this through some shots of it in the new trailers) are those bays on each side of the landing gear boxes are shaped different, at first I thought it was just an in accuracy of the model, but I looked at the trailer and you can clearly see this new shape to the uncovered bays, interesting...


Photo Dec 04, 9 44 24 PM.jpgPhoto Dec 04, 9 36 23 PM.jpgPhoto Dec 04, 9 36 00 PM.jpgPhoto Dec 01, 3 38 37 PM.jpg


Here is the final bottom primed with all the mods- its looking pretty go to me with all the additional parts added, starting to feel better about this kits potential!

Photo Dec 05, 3 45 24 PM.jpgPhoto Dec 05, 3 35 56 PM.jpgPhoto Dec 05, 3 35 47 PM.jpgPhoto Dec 05, 3 35 27 PM.jpg
 
Last edited:
If you cut the the plastic on the top hull where the sidewalls go, it makes the sidewall thickness perfect. The sidewall detail pieces will have to be trimmed too. I can upload pictures of mine tomorrow night if you want
 
Hey MD7789, I have been doing just that! As of now I have about 1/8" of the sidewalk left on the top piece and have been using hoe much the cockpit tube sticks through the lower hull as a depth gauge, as well as how the escape pods line up on the sides. Looks like a I have just a bit more to go and yeah wouldn't be surprised if I end up taking it all the way down on the top piece, I'll post pics when I get to my PC ( I can post pics from my phone which is weird, which is code for really annoying!) :)

Please post your pics when you get time I'd love to see them.

- - - Updated - - -

Sqb, thanks! It's fun I just hadn't planned on doing this much model work on this, in hindsight I should have at least bought the new master series falcon revel is releasing!
 
MD7789, Great advice on the sidewall height, I have been taking it down little by little but sure enough just removing the rim on the top half got it perfect, lines up great with the escape pods on the side, and the cockpit goes through the bottom hull correctly as well, had to extend the cockpit tube a bit, will add some panels over it later and cover the seam-Looks SOOOOO much better, best mod so far!

Did and engine glow test using El Tape, its the perfect width and fits right in! Going old school, im not a fan of that new grill that was added around the time of the special editions.

Photo Dec 10, 9 02 15 PM.jpgPhoto Dec 10, 8 41 14 PM.jpgPhoto Dec 10, 8 40 10 PM.jpgPhoto Dec 10, 8 27 52 PM.jpgPhoto Dec 10, 8 23 50 PM.jpg
 
Yeah its just a strip of EL Tape, works great, I want to do the full engine glow and not put the grating that came in later versions of the Falcon, I think it was the Mos Isley escape shot for the special editions where they added that, but I could be wrong. its cool I just perfer the old school look of the full engine glow :)
 
Here is the setup, cut a notch on one side to feed the tape through, will glue it to the back eventually and run the wiring down the support tube I plan to mount this with going through the lower turret window. gonna run some basic cockpit fiber and the little lights on the front mandibles as well.

Photo Dec 11, 5 06 16 PM.jpgPhoto Dec 11, 5 07 45 PM(1).jpg

- - - Updated - - -

Did some work on the lower mandibles, I couldn't keep it the way it came on the left with the mandibles molded right into the body like that!

lowerMandibleCompare.jpg

Cut them out with about 10-15 passes using a panel etcher, worked great, nice clean cuts with minimal sanding clean up!
Photo Dec 11, 10 43 50 AM.jpg


Did some hull damage work with the dremel as well ;D

Photo Dec 10, 11 38 48 PM.jpg
 
Thinned the plate overhang around the edges and added some notching, have some clean up to do but overall they are in there.

Photo Dec 14, 11 44 22 AM.jpgPhoto Dec 14, 11 44 08 AM.jpgPhoto Dec 14, 11 43 53 AM.jpg


Redid the front of the top mandibles, there was some really oversized clunkly looking pieces there on the front, this isn't very accurate but the these are thinner than the studio model and would pretty much require rebuilding them so I just kinda did what I could, much happier with the overall proportions of things now. Replaced all the piping as well and added a few other details that were missing.
Photo Dec 14, 11 48 31 AM.jpgPhoto Dec 14, 11 48 13 AM.jpgPhoto Dec 13, 11 36 32 PM.jpg

Also built up a little detail on the inside area as well.
Photo Dec 14, 12 04 20 AM.jpgPhoto Dec 14, 12 05 12 AM.jpg
 
added the panel details to the docking rings as well as some approximated piping detail on the inset, the original piece can be seen on the right. cleaned up all the lines and primed, looks much better IMO, those panel lines really help define that area! those things are a pain though to cut out and make fit on that tapered cone!

Photo Dec 27, 12 51 39 PM.jpgPhoto Dec 27, 12 51 52 PM.jpgPhoto Dec 27, 1 14 50 AM.jpgPhoto Dec 27, 1 14 31 AM.jpgPhoto Dec 27, 12 51 23 PM.jpgPhoto Dec 27, 1 14 13 AM.jpgPhoto Dec 27, 12 51 39 PM.jpg
 

Attachments

  • Photo Dec 27, 12 51 52 PM.jpg
    Photo Dec 27, 12 51 52 PM.jpg
    1.4 MB · Views: 116
  • Photo Dec 27, 12 51 39 PM.jpg
    Photo Dec 27, 12 51 39 PM.jpg
    1.4 MB · Views: 80
  • Photo Dec 27, 12 51 23 PM.jpg
    Photo Dec 27, 12 51 23 PM.jpg
    1.4 MB · Views: 113
  • Photo Dec 27, 1 14 50 AM.jpg
    Photo Dec 27, 1 14 50 AM.jpg
    1.8 MB · Views: 111
  • Photo Dec 27, 1 14 31 AM.jpg
    Photo Dec 27, 1 14 31 AM.jpg
    1.8 MB · Views: 89
  • Photo Dec 14, 11 18 37 PM.jpg
    Photo Dec 14, 11 18 37 PM.jpg
    446.2 KB · Views: 85
  • Photo Dec 14, 11 20 44 PM.jpg
    Photo Dec 14, 11 20 44 PM.jpg
    216.7 KB · Views: 104
cut down the sidewalls to the correct height, adding and modifying the details there now, looking at TFA falcon for ideas, lots of piping seems to be added to the sidewalls on that one which looks cool, in the end this will get the new rectangular dish so kinda leaning towards the new model for ref pics, lots left to add.

Photo Dec 27, 4 38 08 PM.jpgPhoto Dec 27, 4 38 32 PM.jpgPhoto Dec 27, 4 38 42 PM.jpgPhoto Dec 27, 4 38 56 PM.jpgPhoto Dec 27, 4 39 02 PM.jpgPhoto Dec 27, 4 39 07 PM.jpg
 
Thanks! Been a fun kit to mod! Lol looking at that last pic is see I left the toothpick in there that was holding down the pipe I was glueing in haha, those toothpicks make great wedges for holding stuff in place BTW!
 
Ktaylor,
You're doing a great job on this model! For me, it was on of the most enjoyable models i've ever worked on, and a challenge because I'd heard that it was a real dog, but it isn't true, and while it does need some tlc, it can be a really fine model - as you're proving!
 
Thanks! I went to check out your model, found the thread but don't see any pics? I get that on a lot of threads do you know why?
 
Ktaylor, I don't know why, but, if you don't mind, here are a couple of pics for you....It's not as accurate as what you are doing, I wasn't out to replicate the studio models, just a nice Falcon for my collection. After seeing yours, I definetly want to build this new version too!IMG_6128.JPGIMG_6129.JPGIMG_6136.JPGIMG_6137.JPGIMG_6141.JPG

- - - Updated - - -

Ktaylor, I don't know why, but, if you don't mind, here are a couple of pics for you....It's not as accurate as what you are doing, I wasn't out to replicate the studio models, just a nice Falcon for my collection. After seeing yours, I definetly want to build this new version too!IMG_6128.JPGIMG_6129.JPGIMG_6136.JPGIMG_6137.JPGIMG_6141.JPG
 
This thread is more than 8 years old.

Your message may be considered spam for the following reasons:

  1. This thread hasn't been active in some time. A new post in this thread might not contribute constructively to this discussion after so long.
If you wish to reply despite these issues, check the box below before replying.
Be aware that malicious compliance may result in more severe penalties.
Back
Top