Hasbro BMF = Aluminium Falcon - Update #6

Master Blaster

Active Member
Hi guys, on May 7, 2015. I posted my first thread here on the RPF showing a couple of my models, including the very beggining of the customization of BMF.
Instead of resurrect that thread I will start a new one dedicated to the Falcon only.


May 7, 2015, 6:15 AM - Re: FIRST POST (BTTF 1 - DMC DELOREAN CUSTOM) and DISNEY R2-D2 LIGHTS) ALSO HSB M FAL

And for the last.
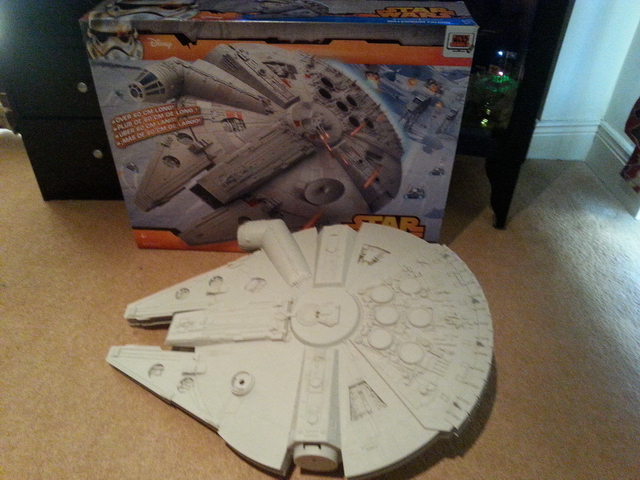
The Hasbro Hero (Edition) 60cm Millennium Falcon - I got mine a few days ago (ordered and waited 5 days for collection) from Argos for €38.00


I did nothing so far, tonight I just started opening the cockpit windows and I adapted a Studio lighting tripod, so I will use this set-up for working on the Falcon and for display as well. as I can put it in almost any position I want and also as high as I want (up to 2.5 metres) so when all done it will looks like flying into the sky..lol.. Also I can use as a mood-light-stand-lamp.


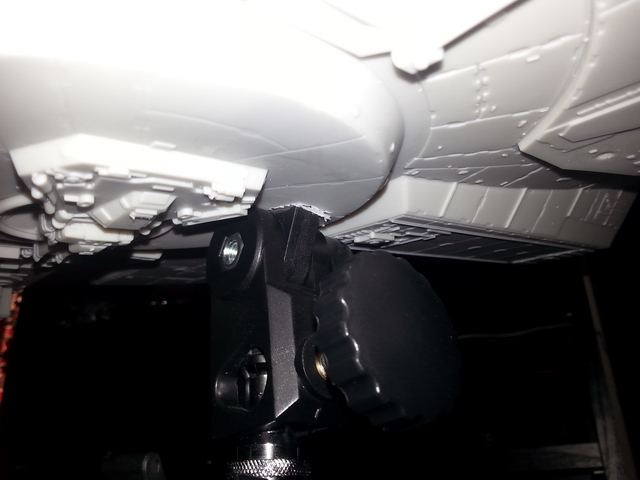
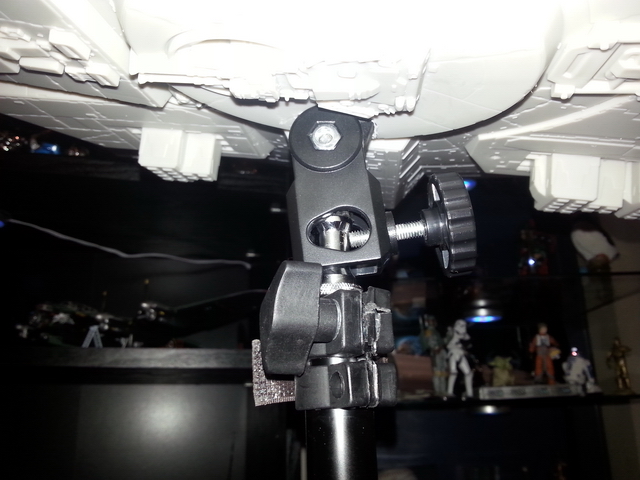
Yes, I know the tighther is cracked/broken... because that I can't use for heavy spot-lights.. but for the Falcon, no problema, Also I'll fix to looks better at the end.


Well folks, hope you like my "toys" any comments are more than appreciate.

Thanks for looking.
M.​
 
Last edited by a moderator:
Re: Hasbro bmf

LATE UPDATE #1

I did the electronics / lights, I did plan to do more FX effects but as I'm building the DeAgostini MF, I will leave them to that. With which I plan to build an interactive touchscreen display to turn on/off lights/sounds and effects.. but it will be another thread...lol..

Also, I did plan to paint this one as much as accurate as a replica.. but again I will leave it to DeAgostini MF.
Instead, I decided a very different approach... what about a brand new shinning Corelian YT-1300, just picked from manufacturing? Not aged, not weathered, not battle damaged! cool?
So that will be my attempt.

As per reference I'm using this:
Painting Design:
28c8fe426506c68f498a36cd45a80d07.jpg

Colour Pattern: Aluminium / Silver / metallic red (where is blue on the paint design)
144hifinlftfrt1.jpg

Also I did already (almost complete) a decal sheet to be applied, including the nose art:
A BIG THANK YOU TO retiredadguy and his thread http://www.therpf.com/showthread.php?t=233543
DECALS SHEET sample.jpg
(low resolution sheet, if you interested in a high resolution ask me)

I have already named this spaceship ALUMINIUM FALCON :p

So, here is a few pics, where I'm now:
20151203_145630.jpg
The electronics / lights / fiber optics.
The small fan is a smoke machine (a video will be made when the AF (Aluminium Falcon) is complete)
The big fan covers a step-down circuit, as I'm using different voltage components from a 12v DC adapter, it get very hot burning the unused energy.

The cockpit windows glasses:
20151203_152954.jpg20151203_164614.jpg
If you interested this is the perfect cut to fit in.
Applied a layer of very dark car tint film and fitted it in place.
I gave up building the cockpit details, instead the dark windows with only one light inside will be suffice.

So tomorrow I will finish all details and get ready to primer and painting job.

Hope you like the Idea!

Thanks for Looking!
MB

28c8fe426506c68f498a36cd45a80d07.jpg


144hifinlftfrt1.jpg


DECALS SHEET sample.jpg


20151203_145630.jpg


20151203_152954.jpg


20151203_164614.jpg
 
Last edited by a moderator:
Re: Hasbro BMF = Aluminium Falcon

UPDATE #2

Welcome back to "what the heel is an Aluminium Falcon?"
Well, now its too late, I can't change the name of my baby... stays as it is..lol..


Tonight I did, the turret windows, opening and fitting the "glass".
20151204_192423.jpg

Working on details.
Added some grilles. for to do: paint inside bottom in black.
20151204_194321.jpg20151204_192405.jpg20151204_192348.jpg


Detailing the exhausts.
I had planned to use real micro (from PC parts) fans.. but will leave it to the DeAgo MF.
I used the idea (sorry but I really can't remember whose!) using bottle caps.
From this:
20151204_205802.jpg

To this:
20151204_205703.jpg

Ok... hold your horses! before you say: "what a crap of paint job!"... plz see the next pic.

20151204_211601.jpghjmv7jps-1387149928.jpg
I intentionally left "bad" painted to get this nice IMO effect of RED HOT METAL.
I think, usually exhaust are very hot..so eventually get reddish. plz correct me if I'm wrong and this is a bad idea!
My pic is a test only.. I will correct the amount of light when installing the proper LEDs.

And finished today by fitting the gills to it. For to do: get a better finish on the edges, maybe fitting an ring on the top of them.
20151204_230921.jpg20151204_211517.jpg20151204_230858.jpg

Hope you guys like it :$

More work tomorrow.

Thanks for looking again.
MB.
 
Last edited:
Re: Hasbro BMF = Aluminium Falcon

UPDATE #3

Adding the side walls details.

Grabbed some random stuff:
20151205_181126.jpg

Made a layer wall from FIMO (polymer clay):
20151205_185252.jpg

Then added some greeble and "sculpted" the clay:
20151205_221644.jpg20151208_162345.jpg20151208_162238.jpg20151207_214759.jpg20151207_172532.jpg20151207_161803.jpg

The position of the stuff is not the final.. Its just a preview of the design.
I will put them right/straight after cooking the FIMO and assembling/fixing/gluing definitively.

Suggestions are more than welcome.. plz!

20151205_181126.jpg


20151205_185252.jpg


20151205_221644.jpg


20151207_161803.jpg


20151207_172532.jpg


20151207_214759.jpg


20151208_162238.jpg


20151208_162345.jpg
 
Last edited by a moderator:
Re: Hasbro BMF = Aluminium Falcon

UPDATE #4

I'm exited today.. last final steps to get to the painting work :D

I've painted inside the AL (Aluminium Falcon).
First to prevent light bleeding.

Secondly to test the best base coat.
Procedure that worked well for me, and I use outside as base for paint work.
1-Clean the surface with white-spirit on a cloth.
2-One coat of Adhesion Promoter
3-Plastic Bumper Paint. (black)
20151220_164610.jpg
The photo looks rubbish.. but in person this black coat is very nice.. I liked it very much!

FINALLY CLOSED THE AL...
One problem.. after closing the BLOODY SMOKE MACHINE is not working anymore :cry and I do not have the guts to open it again to find the problem to fix.
So.. unfortunately It will not have the smoking effect.. I plan a Smoke Machine Version 2.0 for the DeAgo MF.

Light testing.
20151220_193722.jpg20151220_195631.jpg20151220_193810.jpg20151220_193859.jpg20151220_194512.jpg
20151220_194216.jpg20151220_194707.jpg20151220_194315.jpg20151220_194610.jpg

Sorry for the mobile photos :rolleyes:facepalm

Well, hope you like... and hopefully tomorrow more updates...

MB.
 
Re: Hasbro BMF = Aluminium Falcon

UPDATE #5

Happy New Year Everybody!!

VERRRRY EXITED! First coat of base black done last night!
Tonight, hopefully, I'll apply the first coat of aluminium!
DSC_8276.JPGDSC_8219.JPG

Details.
DSC_8245.JPGDSC_8208.JPGDSC_8230.JPGDSC_8233.JPGDSC_8234.JPGDSC_8244.JPGDSC_8163.JPGDSC_8262.JPG

Added a couple of pipes integrating with the new starboard back wall details.
DSC_8267.JPGDSC_8206.JPG

The joint between the original side walls and mine:
DSC_8254.JPGDSC_8258.JPG


I've managed to get this shot, this is what I expect she looks like when I'm done with aluminium layers.
DSC_8212.JPG

And this is how my bath looks like after painting session.. :( a mess to clean up :(((
DSC_8149.JPG


Tonight more pics.

Any Comments are welcome.

MB
 
Re: Hasbro BMF = Aluminium Falcon - Update #5

UPDATE 5.a

Hi peps,

I was about to apply the glossy black and then the first coat of aluminium... but then I noticed the broken pipes.. so last minute fixes / additions...

Scraps from an e-cigarette...
20160115_201854.jpg

A watch pointer .lol..
20160115_201901.jpg

I dont know from where this thing came from...
20160115_201912.jpg


Also decided to keep lots of details, mainly all pipes in black, so a verrry hard work masking them. Bus it's all done now.. I cant believe..lol..
20160116_023216.jpg20160116_010849.jpg20160116_010835.jpg20160115_231032.jpg

Tomorrow, gloss black and aluminum coats! aha!

THANKS FOR THE LIKES: @ Axlotl and Vacformedhero, very appreciated!

MB
 
Re: Hasbro BMF = Aluminium Falcon - Update #5

UPDATE 5.c

Thanks again Axlotl!

Slowly but almost there... :D.

Well, I was airbrushing the first pass of metals (I'm using three shades: Chrome to have an overlay of clear red, Aluminium (darker) and Polished Aluminium) but then....... My Air cylinder got empty :cry:facepalm F#!K S%!T

Here is where I'm now:

With Flash
DSC_8298_resize.JPG

No Flash
DSC_8339_resize.JPGDSC_8335_resize.JPG

Some details: (Still the masking liquid (Hunbrol Maskol) to be removed to reveal the black underneath)
DSC_8296_resize.JPGDSC_8314_resize.JPG

I had forgotten how unforgiving the Alclad stuff is... all the defects of the plastic mold are showing.. but.. hey... I think its ok! I'll think in something yo minimize this.. like a decal?
I dont know yet... Any suggestions please?
DSC_8334_resize.JPG

Tomorrow finish the first pass and start the second pass... after taking the O2 cylinder to top-up.

MB

DSC_8296_resize.JPG


DSC_8298_resize.JPG


DSC_8314_resize.JPG


DSC_8334_resize.JPG


DSC_8335_resize.JPG


DSC_8339_resize.JPG
 
Last edited by a moderator:
Re: Hasbro BMF = Aluminium Falcon - Update #5

UPDATE 5.e

Hello boys and girls,

@Wolfy
Thanks a lot Wolfy, I'm glad you liked... unfortunately seems not many here likes variations due to so little feedback in my thread.. or my skills are so bad like that... so no one is interested...lol..
Anyway "just keep swimming swimming swimming,"
Thanks a lot again.


After 3 jars of Tamya Clear Red excessively thinned; 2 mist coats, then I've lost my patience and went for a mid-wet layer and then another one mist coat.

My hands (holding airbrush) and my finger (pulling the trigger) are hurt, this process is painful :p

Lessons to be noted:
The Technic to achieve candy/metallic color with a coat of chrome (Alclad) and then a coat o clear paint, works like a charm for small parts, for large flat surfaces this is a PITA to the color build correctly and to get the same shades all around... at the end the result is nice but not sooo nice, for instance like on a sphere.

I would never do this again! ("never say never".. but.. stills...haha!).

Well, here is what I got.
20160122_194805_resize.jpg20160122_194712_resize.jpg20160122_194448_resize.jpg20160121_210317_resize.jpg

Photographing this thing is also a PITA... when its is finished I will take proper shots!

Next steps... Wait it to dry overnight, remove the masking, work on painting fixes.

Hope you guys like.

Thanks for looking.
MB.
 
Re: Hasbro BMF = Aluminium Falcon - Update #5

Hey again peps. Update #6


She is pretty much done, the main painting is over.. All masking removed, a bit of work to do to fix and clean up some paint bleeding and stuff.


Lots of photos:


360 rotation:
360-640-1sec.gif

Edited:
DSC_8507 a.jpgDSC_8378 a.jpgDSC_8459a.jpgDSC_8491 a.jpg

Overview:
DSC_8515.JPGDSC_8346.JPGDSC_8354.JPGDSC_8398.JPGDSC_8429.JPGDSC_8430.JPG

Low light:
DSC_8368.JPGDSC_8426.JPGDSC_8406.JPGDSC_8408.JPGDSC_8409.JPGDSC_8410.JPGDSC_8418.JPG
 
Last edited:
Re: Hasbro BMF = Aluminium Falcon - Update #5

Continue...

Details:
The Chrome Rectenna:
DSC_8519.JPG

The "pits" and pipe lines (a bit of clean-up needed here):
DSC_8478.JPGDSC_8476.JPGDSC_8480.JPGDSC_8483.JPGDSC_8479.JPG

The Cockpit window frame waiting to be hand painted:
DSC_8486.JPG

Other:
DSC_8441.JPGDSC_8471.JPGDSC_8404.JPG


Accident:
I was polishing the hull when the cloth got tangled on the grill and this happened :unsure
DSC_8529 a.jpg

Thanks for looking again,
MB.
 
Re: Hasbro BMF = Aluminium Falcon - Update #5

I really like the build. The paint job is very stark (red isn't my favorite color anyway) but you did a really nice job with it (who cares what color I like!). I enjoyed watching this unfold, MB. I meant to post sooner...your shiny new Corellian idea gave me inspiration for my next Falcon build. I want to do a "stealth" version. Sharpen the lines, make the ship a bit more aerodynamic extend the cockpit nose for aerodynamic styling, finish it with a flat dark stealth gray paint using only red and blue lights. I will probably do a Revell kit for that.

All in all splendid work and thanks for sharing!

Lee
 
This thread is more than 8 years old.

Your message may be considered spam for the following reasons:

  1. This thread hasn't been active in some time. A new post in this thread might not contribute constructively to this discussion after so long.
If you wish to reply despite these issues, check the box below before replying.
Be aware that malicious compliance may result in more severe penalties.
Back
Top