Tie Fighter Hasbro Mod Sci-Fi Airshow Style

CAPTAINCOX

Sr Member
IMG_0568.JPG

Hi Guys

After finishing Randy Coopers Tantive IV (will post pics soon...forgot somehow
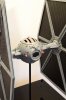
 :) ) I thought lets have a break from modeling for a bit, but then stumbled upon the awesome work from Bill Georg (Sci-Fi Airshow) Sci-Fi Airshow Tie Build from Sci-Fi Airshow and thought DAM! How awesome does that look!!!.

Anyhow had this Hasbro Tie Fighter still unboxed in the basement so I thought what the heck I have time for one more kit before X-mass.

Started collecting pics from books, online sources and some good advice from MAAX REPLICAS Kudos to him for pointing me in the right direction as how to crack that ol Tie open!. By the way MAAX has done A LOT of Hasbro Tie conversions so I also used some of his builds as a inspiration!.

It sorta all started HERE


IMG_2647.JPG
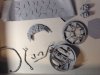
Rods, Styrene sheets, paint of all sorts and Kits for bashing

IMG_2684.jpg
Cracked it open and went in hard with the Dremel to make space for the new Cockpit

IMG_2586.JPG
Starting the basic shape for the Cockpit using Styrene sheets and Kit Bash parts

IMG_2602.JPG
Trying to get that back wall to look like the Original (four red LED's will be installed later)

IMG_2640.JPG
Scratched build of those "Tubes" placed in the upper front part of the cockpit

IMG_2642.JPG
Fitting to the main body

IMG_2645.JPG
You can see the "Hasbro" Original Cockpit here.

IMG_2649.JPG
Scratched built Pilot seat using Kit Bashed parts, Styrene and Strings from my Ol E-Bass as Tubing

IMG_2650.JPG
Pretty small hey.

IMG_2667.JPG
Fitting the Steering Yoke with the seat

IMG_2665.JPG
Those Triangular holes will later be fitted with Panels back lid with Red LED's

IMG_2668.JPG
That wierd "Disc" fittet in front of the Steering Yoke

IMG_2673.JPG
Some detail added to the Side Panels that also serves as cover for some holes where clips held the parts together (as a Toy).
Again Kudos to MAAX Replicas for he's awesome work on those Hasbro Tie Builds.

IMG_2682.JPG
Added Styrene parts to get that Three layer look from the original.

IMG_2586.JPG


IMG_2602.JPG


IMG_2640.JPG


IMG_2642.JPG


IMG_2645.JPG


IMG_2647.JPG


IMG_2649.JPG


IMG_2650.JPG


IMG_2657.JPG


IMG_2667.JPG


IMG_2668.JPG


IMG_2673.JPG


IMG_2682.JPG


IMG_2684.jpg


IMG_0568.JPG


IMG_2665.JPG
 
Last edited by a moderator:
IMG_2683.jpg
As the Original Hasbro Tie Fighter Pilot is to big "for this build" I looked for a alternative and found this...
Again TOYS!!!! Love it. I thought the Tie Pilot from Hasbro's Star Wars Command series would do the trick.

IMG_2678.JPG
Put the figure in some boiling water and started to bend him in to the right pose.

IMG_2677.JPG

IMG_2679.JPG


IMG_2681.jpg
Top hatch, tubing (those good ol Base Strings again), front window frame filed clean (what a crap job that was) and some other parts base coated.

IMG_2671.JPG
Did the Graphics for the Computer panels in Adobe Illustrator and send them of to a Decal print shop, the result is super crisp and precise.
Put them on semi transparent red Styrene, the LED's will shine through only where I left the Decal Transparent, I actually had to put them on as a double layer to make sure that no light will shimmer trough later from the LED's.
 

Attachments

  • IMG_2680.JPG
    IMG_2680.JPG
    835.3 KB · Views: 239
  • IMG_2676.jpg
    IMG_2676.jpg
    2.1 MB · Views: 226
Last edited:
Cheers Jaitea appreciate it!.

Stared to paint and weather the cockpit using ol school Verlinden style Drybrushing and Washing using Oil Paint
IMG_2685.JPG
IMG_2687.JPG
Decals for the Wall Panels Trimmed and painted with Matt Black around the edges to avoid light leaks.
IMG_2686.JPG
Was going to scratch build the front window but ended up using the Hasbro one with some modification...good enough :).
IMG_2692.JPG
IMG_2693.JPG
IMG_2697.jpg
thumb_IMG_2698_1024.jpg
Testing the effect from the decals by holding up the model against a Table Lamp, will mount LED's later.
thumb_IMG_2700_1024.jpg
LED's mounted in the back wall.

Will spend some time on the Exterior now, not to much work but it needs some detailing...plastic fantastic!
 
Last edited:
Cheers IzzyMel.

Small update

IMG_2706.JPG

Started to detail the exterior (as good as possible, the Hasbro molds are pretty close but a lot of detail is sorta fudged compared to the Studio Model)


IMG_2707.JPG
Engine Nozzle blacked out due to some Light leaks.

IMG_2708.JPG
Some of the Detail parts was a real pain to get right as I did not have all the "Original" Kit Bash parts and had do do them by hand.

IMG_2709.JPG
Guns in place using Evergreen Tubing and LED holders from the Hardware Store :)

IMG_2710.JPG
Not sure about the Proportion of those rear (Greebles) but over all and when painted I think they will do the job.

IMG_2711.JPG

IMG_2713.JPG
Now this is a pretty cool part. Its the Cockpit from the New Revell Snap Tite First Order Tie Fighter with sound effects :p

[video=vimeo;148710098]https://vimeo.com/148710098[/video]
Will mount it in the base next to the Light switch.
 
Cheers Sergiotron!

Slowly getting there, had a bit of time on the weekend so I gave it my best,

IMG_2723.JPG
Base Coated the Exterior...still some small scratches and stuff that has to be bonded before final paint, but thats easy.

IMG_2725.JPG

IMG_2726.JPG

IMG_2727.jpg
Painted the Pilot and added The Empire Emblems + the Chest Box Graphics
IMG_2737.JPG
Looks pretty cool!

IMG_2734.JPG
Will start wiring the LED's today as I am home HOLIDAY! YEA.

IMG_2732.JPG
Pretty satisfied with the result so far. And now on to the final finish...want this for X-Mass SO BAD :)

IMG_2739.JPG
Pilot not 100% positioned but still looks cool with the Steering Yoke.

IMG_2723.JPG


IMG_2725.JPG


IMG_2726.JPG


IMG_2727.jpg


IMG_2732.JPG


IMG_2734.JPG


IMG_2737.JPG


IMG_2739.JPG
 
Last edited by a moderator:
Wow! Insanely cool! Working on a similar project (a much smaller TIE) myself I can really relate to all the hard work you're putting down! Very cool, I'll make sure to check back for updates!

Cheers,
Steve
 
Cheers Steve!.
Another Swede can you believe it... I am from Stockholm but moved to Germany back in 1993 for a job and sorta got stuck here. :)
And yea it is a pretty fiddly project but I think the final result might be worth it.

Tack och vi hörs ;)
 
Insanely sharp and clean work! Really superb! In fact, so much so that it made me take another look at my BMF to see the work that I could do on it...

...Then I realized how much needed to be done and put it back on the bin to do later.:lol
 
OUTSTANDING conversion project :thumbsup :thumbsup For me the best Hasbro TIE-Fighter conversion that I've seen...and I've seen a lot of them ;)
 
Hi Guys, cheers for your nice comments. I actually finished the TIE just before X-Mass but did not have the time or the power to take Photos of it after a lot of good food and just hanging around with the Family and a trip to Vienna to see the SW Identities for the 2nd Time, and yea! they had a couple of SW TFA exhibits :)

Anyho, pretty satisfied with the final build but I always think I could have done this or that better I guess thats just how it is with Modeling :p

The TIE has a total of 16 LED's thats 32 Cables crammed in between the Cockpit and the outer shell, I thought that the model would pop like a Thermal Detonator when I was assembling it. 2 LED for the Engines, 4 LED for the Cockpit back wall and 10 LED for the Computer Panels on the inner walls.

I was really in agony as to what color to use...actually bought like 3 cans of Tamiya TS-32 that I personally think is to dark for a Model that will not be lit up by studio light or what have you ( I think that goes for a lot of ppl that have done TIE Builds). So I sifted through some posts here and found a thread where DanielB is using a mix of "XF-2 Flat White and XF-82 Ocean Gray 2 (RAF)" That way I could keep on mixing the color until I found it ok sorta. In the pics it looks to Bright due to light but in real it looks just right. I have a TIE Bomber painted with TS-32 and next to that it looks just a bit lighter. I also gave it a light wash with Abteilung Starship Filth...not so screen accurate but it gives it that used look and pops the panel lines and details out a bit.

The base is made out of a Wood with a lot of Sanded Bondo painted in Satin Black, On top Acrylic Glas painted from the back held down with 4 Allen Bolts with spacers. I also built in that Sound Module from the Revell Special Forces TIE...its actually just a gimmick but as I had it I did it :).


DSC_6810.jpgView attachment DSC_6806.jpgDSC_6833.jpgDSC_6835.jpgDSC_6839.jpgDSC_6815.jpgDSC_6816.jpgDSC_6817.jpgDSC_6818.jpgDSC_6825 (1).jpgDSC_6824.jpgDSC_6823.jpg

Well I am on to the next build(s) Have a Studio Scale X-Wing that I absolutely HAVE to start as the TIE needs the counterpart next to it, and I also bought the JAAKS Pacific R2-D2 that I will mod a bit with lights and a new paint job, will make new build logs as I go along.
 

Attachments

  • DSC_6850.jpg
    DSC_6850.jpg
    1.2 MB · Views: 248
Last edited:
Awesome job, I've got a Hasbro Tie Fighter I'll eventually get to working on. I keep saying I'm just going to darken the window and not detail the cockpit but then I see some like this and change my mind. Really like those decals, is the white printed on them or is it a separate layer laid over top of it?
 
This has got the Glits and Glam that will make you scream HOT DAMN!

HOT DAMN!

Simply amazing work, I love it!

Chris
 
This thread is more than 8 years old.

Your message may be considered spam for the following reasons:

  1. This thread hasn't been active in some time. A new post in this thread might not contribute constructively to this discussion after so long.
If you wish to reply despite these issues, check the box below before replying.
Be aware that malicious compliance may result in more severe penalties.
Back
Top