Carbon Fiber Iron Man Helmet

87sf

New Member
Yes it's true. I love Iron Man.
I am a grown man (I never said mature) and yet Tony Stark rocks my world.

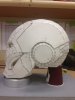
It was only about 4 months ago that I was first introduced to paper craft and the possibility that I could make my own Ironman helmet.....
So I did..... At work..... Because I could.
I even roped in other employees to help.

"But why stop there??? " I asked myself, "I have a role of carbon fiber sitting next to me".

The imagination ran wild and I ended up with the plan to take the newly build paper craft helmet, resin wipe it, back it with fiber glass, smooth up the outside, use it as a plug to make a mould, lay up that mould with carbon fiber, build a carbon fiber helmet and pretty much take over the world. I said my imagination ran wild.

Since then I found this forum, found other people with similar LEGENDARY ideas (Sandbagger and mrjbarl1 in particular) and was inspired to tell the tale of my build. It is not yet complete so some of it we can journey on together.

Please feel eel free to ask questions, add ideas, Constructive criticism or just sit back and enjoy the madness.
 
A little background on 87sf.

I am an aircraft structural technician with most of my experience in advanced composites. I want that good at sheet metal so I opted for sniffing glue. Because of this, if I post updates while at work I may be high.
I get to play with dry cloth fiber glass and carbon fiber a fair bit, but most of it is pretty simple repairs or modifications.
I am only pretty new to making moulds as you may be able to tell once I post some picks of mine.
Unfortunately some weeks get pretty busy and I am not able to work on the helmet anywhere near as much as I would like, but it is getting there. Some of the processes take quite awhile and when I have to continuous redo bits, it can seem like I've given up.

I started with a pepakura helmet design (the first one I found, which turned out to be the most difficult) and glued it all together with simple superglue.

Im pretty new to this site so give me time to learn how to add in pictures please.
 
image.jpeg
image.jpeg
If I had have known how much filler I needed to make this end up smooth, I would have taken a lot more care in the first place.
 

Attachments

  • image.jpeg
    image.jpeg
    810.1 KB · Views: 213
From there I resin wiped it and added fiber glass to the inside to make it nice and stiff.
image.jpegimage.jpegimage.jpeg

Followed by filler and sanding and filler and sanding and filler and sanding and filler and sanding and filler and sanding....
 
Last edited:
It gets in your blood doesn't it!?? Cosplay, particularly the tech characters, have the potential to skill you up in so many different crafts and trades!

Keep at it mate. Never give up, always find a way to keep going, no matter how many doors close in your face.

SB
 
Very cool idea! I really want to see how this pans out since I've also had similar thoughts of a CF Iron Man suit. Well actually I was thinking more along the lines of carbon fiber, kevlar, ceramic and maybe some honeycomb thrown in... you know, because of reasons. ;)

One thing I noticed about your build... why are you building it on a wall? I would assume that building it on a desk is too mainstream and the mark of a true innovator is building it while attached to a wall, which I can totally understand and applaud your ambition.... but for the love of all that's holy, can you start rotating the pics? hahahahaha My neck is starting to hurt and I'm not setting my screen on it's side again. :lol

I noticed a lot of what look like pinholes in the bondo. How are you mixing your putty? If you're swirling it around, stop. Try mixing the putty by drawing it out and folding it over. This will drastically cut down on the amount of air that gets trapped and subsequent pinholes. Nothing says fun like hours upon hours of filling pin holes only to have more pop up when you sand back the previous layer of putty OR the joy that one faces when you THINK you're done, get it ready for molding only to find what look like bubbles under the surface... that when scratched at uncover more pinholes. I learned about this the hard way.

Keep up the good work. :D
 
One thing I noticed about your build... why are you building it on a wall? I would assume that building it on a desk is too mainstream and the mark of a true innovator is building it while attached to a wall, which I can totally understand and applaud your ambition.... but for the love of all that's holy, can you start rotating the pics? hahahahaha My neck is starting to hurt and I'm not setting my screen on it's side again. :lol

They come up fine when I load them and as soon as I press Post, it rotates them. I'll try a couple of things and see if it fixes it.

We we unfortunately don't have any Kevlar or ceramic and I can use honeycomb, but there isn't really any need in the helmet. Maybe there would be in a full suit.
I found some better filler to use as you will see in later pictures.

Thanks
 
So its been a couple of days and to be honest I haven't gotten much done, but thankfully I am actually a few months ahead of these pictures. So heres some more progress.
This time I'm on a computer so hopefully they will come up the correct way.

IMG_9058.JPGIMG_9059.JPGIMG_9060.JPG
 
The above pictures were after I put a fairly thick primer on and sanded it smooth....Well, kind of smooth.
After I resin wiped it, I rushed a bit laying fiber glass up on the inside to strengthen it. Because of this I ended up making voids between the glass reinforcement and the resin wiped paper.
One work colleague took great pleasure in finding them and cutting them out for me to go back and fill..... Thanks Al.
Note to self, TAKE YOUR TIME AND USE THINNER GLASS!!!
 
IMG_9111.JPGIMG_9113.JPG

Unfortunately I had a couple of days off and came in to find that it had been dropped and sustained head injuries. From memory my wife had been quite unwell and so due to my sleep deprivation it didn't really bother me.

Now, I'm not exactly a brain surgeon, but i still gave it ago.

Thankfully the blue resin worked a treat and a couple of days later I was back on track.
 
So I got a bit distracted for a little while as I have been pretty busy at work and also this....IMG_9212.JPG

Not ours, just looking after the cute girl.
 
Back to the project at hand....
I really needed a bit of visual progress to keep me motivated and as I had pretty well completed the smoothing/filling/smoothing/filling....... stage I did.
IMG_9115.JPGIMG_9118.JPG

I was pretty pleased with how well it cam up actually.
 
looks good.
Just one question. Are you making your own Mark type?
I was just wondering, because you inverted the jaw. The top lining of the jaw normally good outwards, but yours is going inwards.
 
looks good.
Just one question. Are you making your own Mark type?
I was just wondering, because you inverted the jaw. The top lining of the jaw normally good outwards, but yours is going inwards.

I kind of started with the first thing I found, which was a pdf of a pepakura helmet. To be honest, I cant remember which Mark it was maybe 4 or 6.
Since then I started looking into all of the possibilities and saw so much out there, problem was I had already spent ages cutting out my pieces and didn't want to have to do it all again.
The jaw section was just a mistake in the paper build phase on my behalf. I had no issues with the look of it so didn't change it.

- - - Updated - - -

That looks great. Making my first tester helmet out of foam atm but this is another level of awesome.

Thanks mate. All the best with yours.
 
So another busy week, but I have managed to make some progress.
I have drawn up the cut lines and cut out the helmet into 4 pieces.
I figured I could do it in 4.
IMG_9120.JPG
IMG_9119.JPG
IMG_9150.JPG

It was a bit of a mission cutting it out without doing too much damage to the pieces.

I ended up using a vibrating saw and a jigsaw.

- - - Updated - - -

I spent a bit of time again doing the whole bogging and sanding on the cut lines to clean them all up again.

I was a bit scared that the whole thing would vibrate into more then 4 pieces, but it went quite well.
 
Thanks to the aircraft industry there are so many perfectly good products that come with expiry dates.... Still good, just cant use them on aircraft..... Nothing mentioned about ironman suits....


So there is the fantastic 2 part epoxy putty that we got for a small job that has now expired and placed in the Iron Man Suit Building Materials Section of the workshop. To be honest its more Ok and less fantastic, but its free!

I waxed up my newly cut out face plate 6 times - wax on, wax off, wax on, wax off,wax on, wax off, wax on, wax off,wax on, wax off, wax on, wax off-, mixed up some SUPER playdow and stuck in together.
IMG_9335.JPGIMG_9336.JPGIMG_9341.JPG

I think I waited 48hrs before attempting to pull the mask out.

It broke.

But the mould worked, kind off. There were a few voids that ended up being pretty easy to fill and sand.
Not sure if I have finished pic.

- - - Updated - - -

Oh, that grey paint I had put on for some motivation boosting visual progress came straight off when I cleaned the plug with acetone before waxing. I knew it was going to happen so all good.
 
Here is the mould for the top head section.
I realised I dont have any photos of the chin section.

IMG_9519.JPG


And although it hasnt come out quite how I want it, here is the first layup of the face section in carbon...

IMG_9518.JPGIn the vacuum bag.

IMG_9521.JPGAfter lots of fun getting it out.

IMG_9520.JPGStill with lots of release ply and breather cloth stuck to it

IMG_9524.JPGAfter a bit of a trim.

I was going to take some better photos, but on one of the sides the carbon folded back on itself and it didnt wrap all the way out to the side.
Still a pretty good first go I thought. Bonus is that the mouold is still fine so I will have a second go soon.
it is 4 plies of structural carbon fiber. Because of this its not the best looking stuff or the easiest to work with. Pretty strong though. I used an Araldite 2 part epoxy resin.
 
This thread is more than 8 years old.

Your message may be considered spam for the following reasons:

  1. This thread hasn't been active in some time. A new post in this thread might not contribute constructively to this discussion after so long.
If you wish to reply despite these issues, check the box below before replying.
Be aware that malicious compliance may result in more severe penalties.
Back
Top