You are using an out of date browser. It may not display this or other websites correctly.
You should upgrade or use an alternative browser.
You should upgrade or use an alternative browser.
The Y-Wing "Green Leader" Project - NOW OPEN SOURCE!
- Thread starter DaveG
- Start date
"No, I won't be making any further revision to the CAD files." - Dave Goldberg
Guys, I feel like this needs to be said:
The psychic and physical energy needed to make the sausage of the Y-Wing Fighter is overwhelming. Speaking for myself, I know that without Dave Goldberg's efforts most of us here wouldn't have a clue how to start, progress, or finish our Y-Wings, and so we owe a HUGE debt of gratitude to Dave who has worked tirelessly on all of our behalf. Yes, he's made his money along the way, but if you divided the money made by hours spent he's worse off than a Mexican fruit picker in terms of hourly wage earning.
Dave worked from the pictures and references and got "pretty close" to an accurate Y-Wing substructure and armature, and many of us have discovered along the way that the measurements were just slightly off. This discovery happens of course when you put the nurnies onto the actual armature/substructure and then -- and ONLY then -- can you begin the process of "reverse-engineering" the exact measurements from the nurnies fit and placement - the more nurnies you have, the more accurate you're able to reverse-engineer it. The more accurate the nurnies (and their various modifications) are, the more accurate your measurements will be. I have spent a year-plus doing this, and am now within spitting distance of some very accurate measurements, which I'll be happy to share along the way. Meanwhile, Dave Goldberg has made molds for myself and others, made huge contributions to this particular ship, and has a supremely accurate eye (down to the millimeter) for what I call the "leaves" of the project rather than the "forest." So, for instance, it was Dave who pointed out that the Roco Anti-Tank obstacles are way too big to be the ones actually used on the original Y-Wings, because you can count the number of Saturn V ridges they span (as he did) and derive a super-precise measurement that way, which Dave's trapezoids in fact do, and they are almost half the size of the Roco 1/87 antitank obstacle trapezoids. Think this doesn't matter? Without the right trapezoid, you can never know whether your wing tee-plate width is accurate, because the ILM measurement is from outermost nurnie to outermost nurnie, and the outermost nurnie on the engines is, you guessed it, the trapezoids, because they "stick out" (on the horizontal axis) further than anything else on the Saturn V cans, from T-bar to nacelle tie-downs. So without Dave's work, it would be impossible to reverse-engineer and derive the most accurate measurements ever.
So is all the expense of time and energy and money on Roco 1/87 anti-tank obstacles is wasted? Hardly. It's a lesson learned, and for only about 15 bucks. I've learned how to make the sausage, and been forced to spend thousands more than I wanted or intended to on the project, but along the way have actually LEARNED just how hard it is to make a Y-Wing and have, along the way, weirdly and amazingly, started to actually make a Y-Wing. It has been supremely satisfying, and the frustration aspect of it is simply the digital instant-gratification culture dying and giving way to the long, slow, laborious build-up of a very fine product. I think of it as similar to the return of vinyl. After the CD, the mini-CD, the MP3, iTunes, and now Spotify (to name a few), the record store has made a resurgence because people have actually discovered that certain media are aesthetically preferable and "better" than other media. So what if digital music is more convenient, easy, fast, free? If it doesn't have the large album cover to display the art, doesn't have the grooves in vinyl that produce scratchy sounds, and doesn't have that "warm" tone that vinyl gives out through your speakers (as opposed to the cold crisp sound of digital), then what's the point. Do I count all the time, money, energy spent on CD's as wasted? Certainly not. I count it as "lesson learned" and am thankful to my parents and uncle for saving their record collections so I could comb through them.
Studio Scale Models will ALWAYS be better than digitally rendered CGI models. There I said it. Does anyone on this forum actually not already know and/or believe that? If anything, digital rendering just shows you just how much time, work, energy went into making the originals. The 100 or so guys reading and practicing this art know more than the actual current Lucasfilm staff about how to do this, because like calligraphy or letter-writing, model-building has truly become a "lost art" to our digitized civilization. You will be the reason for its return, and you will be the heroes of the future who bring back its significance. So hang in there and fight the good fight, and teach this art to your children. I'm building a Y-Wing with my 12-year old right now (who's building his own), and it's the most exciting thing he's ever done.
Stay tuned to either this page or a separate thread (per Dave's preference, who I will defer to) for a lengthy tutorial on precise measurements for the Y-Wing, and for how/when/where you can make compromises or "artistic interpretations" and get away with it. As I said way back in the post #619 about the Fibonacci sequence, the key thing is proper proportionality more than any one measurement. But now that I've studied it extremely carefully over the last year, and reverse-engineered it from 99.9 percent of the original screen-used nurnies from confirmed donor kits, I'm nearly ready to share my discoveries.
Meanwhile, make your own CAD files or your own modifications to his open source files, because Dave has a life and can't let the Y-Wing be the death of him!
SK - Thanks for the kind words. My not doing further updates to the CAD is mainly because it's good enough for my "interpretation" and I want to get my model built rather than spend my life doing endless CAD revisions. Personally, I have no issues with modifying the kit parts to fit but I know for some that is heretical. I encourage anyone with dimensional corrections and that is able to do CAD to please feel free to modify the CAD files and I will post them to the repository. That's the whole point of Open Source. But in the end, if nobody does, that's okay with me too. The main goal was to share the project and encourage others to tackle Studio Scale modeling, without having to rely on a garage kit (nothing wrong with garage kits BTW, I build them too!). I am gratified by the level on interest this little project has sparked.
SK - as far as a tutorial on dimensions, etc. I would recommend/prefer that you start a separate thread. It'll make the information easier to find in the long run. I am looking to split my actual build off into a separate thread so this one can remain dedicated to the overall open source Y project as a whole.
SK - as far as a tutorial on dimensions, etc. I would recommend/prefer that you start a separate thread. It'll make the information easier to find in the long run. I am looking to split my actual build off into a separate thread so this one can remain dedicated to the overall open source Y project as a whole.
SK - Thanks for the kind words. My not doing further updates to the CAD is mainly because it's good enough for my "interpretation" and I want to get my model built rather than spend my life doing endless CAD revisions. Personally, I have no issues with modifying the kit parts to fit but I know for some that is heretical. I encourage anyone with dimensional corrections and that is able to do CAD to please feel free to modify the CAD files and I will post them to the repository. That's the whole point of Open Source. But in the end, if nobody does, that's okay with me too. The main goal was to share the project and encourage others to tackle Studio Scale modeling, without having to rely on a garage kit (nothing wrong with garage kits BTW, I build them too!). I am gratified by the level on interest this little project has sparked.
SK - as far as a tutorial on dimensions, etc. I would recommend/prefer that you start a separate thread. It'll make the information easier to find in the long run. I am looking to split my actual build off into a separate thread so this one can remain dedicated to the overall open source Y project as a whole.
Dave -- Will do. Thanks for your inspiration and help, it's been an eye-opener and (continues to be) a blast.
I've just asked because there were some chat about it some pages ago. ")
Sorry if people felt I was indelicate with Dave.
That was not the purpose of my question. I'm like a lot of us here into building my Y-wing because of Dave's great and hard work to provide us armature/CAD/ResinKit elements to make it possible. His lead on this project made me intrigued and played with CAD models for this project and I made it accessible to him anytime in case he was interested and to get his input as well if any.
Looking forward seeing your progresses on your Green leader.
Max - no worries, I did not take umbrage at your asking. I just wanted to make it clear to all that for my part at least, the CAD is done. There are a few places where I've noticed the dimensions were off a little bit once I've gone to fitting the kit parts. For example, the main fuselage is maybe 1/8" too narrow across the bottom (but not the top... go figure!) which required the two Messerschmitt BF109 parts to be trimmed down in width so there enough room for the Sealab part to fit in between them. A lot of the fuselage design was based on reverse engineering photos basing the sizing on a few key dimensions and a handful of kit parts that I had on hand when I started. As I've acquired more of the doner parts, mostly through the very kind contributions of a handful of RPF members, it has become apparent that some areas are a little tight, but also surprising (or maybe not) at how accurate other areas were. A former RPF member once made a comment that if you had not spent years and years and thousands of dollars acquiring all the original doner kits that you had no right :eek building a Y-Wing. Oy! What a narrow minded attitude! If I believed in that idea then this project never would have happened.
Now that I have most of the doner parts it would be cool to start the entire design over from scratch but I'd rather move on. I've always wanted a Snow Speeder...
Now that I have most of the doner parts it would be cool to start the entire design over from scratch but I'd rather move on. I've always wanted a Snow Speeder...
every one's ears went up on reading a snow speeder cant wait I know it will be a great project from the master
Max - no worries, I did not take umbrage at your asking. I just wanted to make it clear to all that for my part at least, the CAD is done. There are a few places where I've noticed the dimensions were off a little bit once I've gone to fitting the kit parts. For example, the main fuselage is maybe 1/8" too narrow across the bottom (but not the top... go figure!) which required the two Messerschmitt BF109 parts to be trimmed down in width so there enough room for the Sealab part to fit in between them. A lot of the fuselage design was based on reverse engineering photos basing the sizing on a few key dimensions and a handful of kit parts that I had on hand when I started. As I've acquired more of the doner parts, mostly through the very kind contributions of a handful of RPF members, it has become apparent that some areas are a little tight, but also surprising (or maybe not) at how accurate other areas were. A former RPF member once made a comment that if you had not spent years and years and thousands of dollars acquiring all the original doner kits that you had no right :eek building a Y-Wing. Oy! What a narrow minded attitude! If I believed in that idea then this project never would have happened.
Now that I have most of the doner parts it would be cool to start the entire design over from scratch but I'd rather move on. I've always wanted a Snow Speeder...
Still piling up the donner parts on my side. For a lot of them, I'd have to cry around to see if some people around will be able to help.
Thanks for the tip about the BF109 part that I'd have to cut shorter.
I'll still stay on RedJam goal.A Snow Speeder would be awesome. In 1/6th to match the coming Luke Hot Pilot....
What I love about this project and subsequently all SS projects is the problem solving aspect of it. whether is be reverse engineering or how to make certain areas more accurate. It's what I think about lying in bed at night and go back to first thing in the morning. It's been fun taking the minor inaccuracies of the neck and fuselage and making it my own. Hopefully when I've pointed out any on this thread or others, it did not offend. My intent has always to bring awareness and go from there as a group.
I stepped back from this project for a bit to work on a couple of commission builds and it helped me notice with a fresh set of eyes something that just wasn't quite right with the neck around the droid socket on mine. So I ripped off the greeblies in that area and went at it again, until I liked it. It's an insanity of sorts! Yes, we all have Dave to thank for the building blocks of this project, but we each have the opportunity to make it our own, which is great. That's what I love about this hobby.
I stepped back from this project for a bit to work on a couple of commission builds and it helped me notice with a fresh set of eyes something that just wasn't quite right with the neck around the droid socket on mine. So I ripped off the greeblies in that area and went at it again, until I liked it. It's an insanity of sorts! Yes, we all have Dave to thank for the building blocks of this project, but we each have the opportunity to make it our own, which is great. That's what I love about this hobby.
Kokkari - Yes! The creative problem solving aspects of Studio Scale modeling are one of the things I love most about it. I have nothing against building resin kits of SS models (I've built a few myself) but I do dearly love working on a model from scratch, reminds me of the good old days!
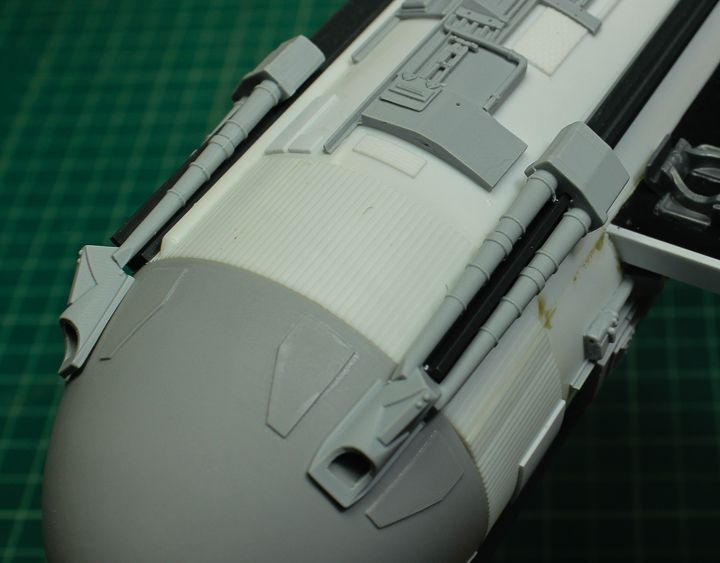
Speaking of which... this weekend I got most of the detail parts on the engine cans. Still a few little bits and bobs to go but they're mostly done.
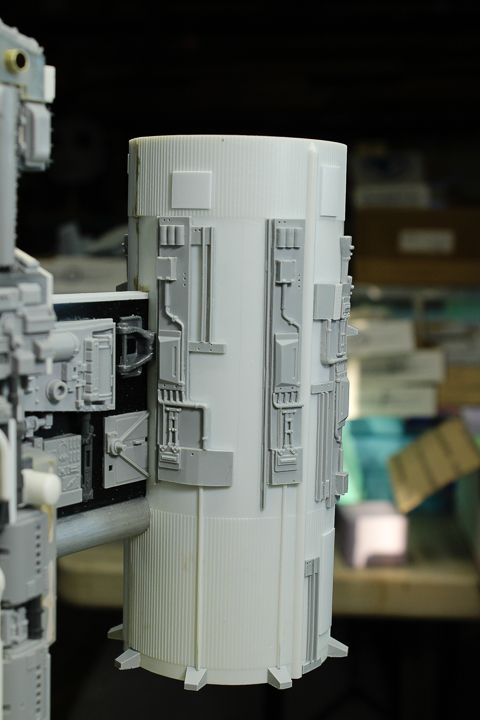
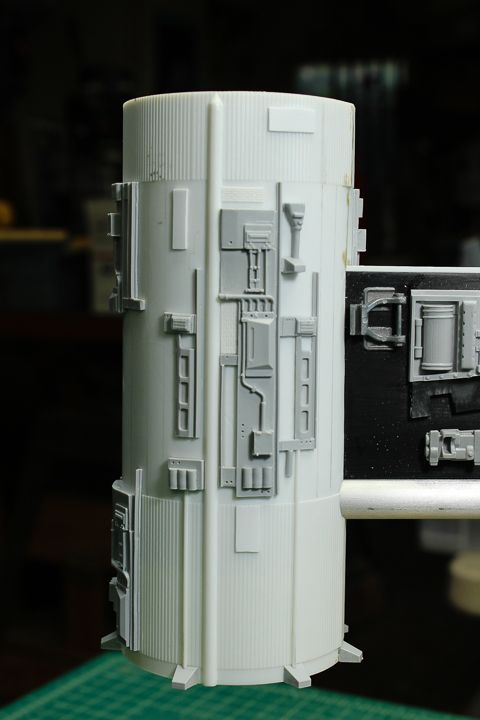

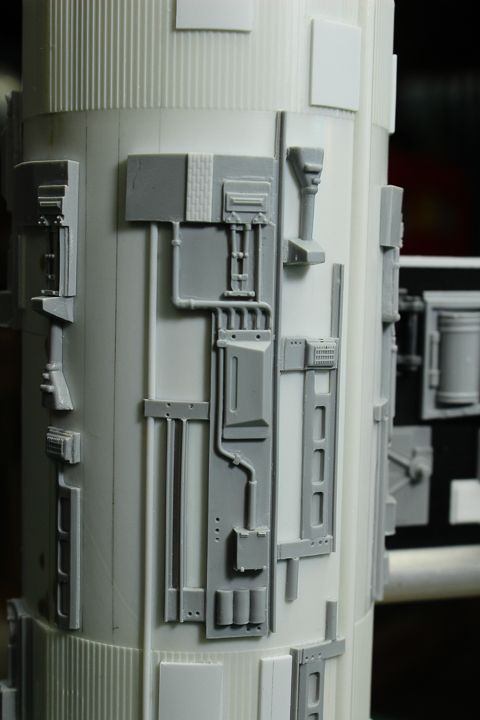
Speaking of which... this weekend I got most of the detail parts on the engine cans. Still a few little bits and bobs to go but they're mostly done.


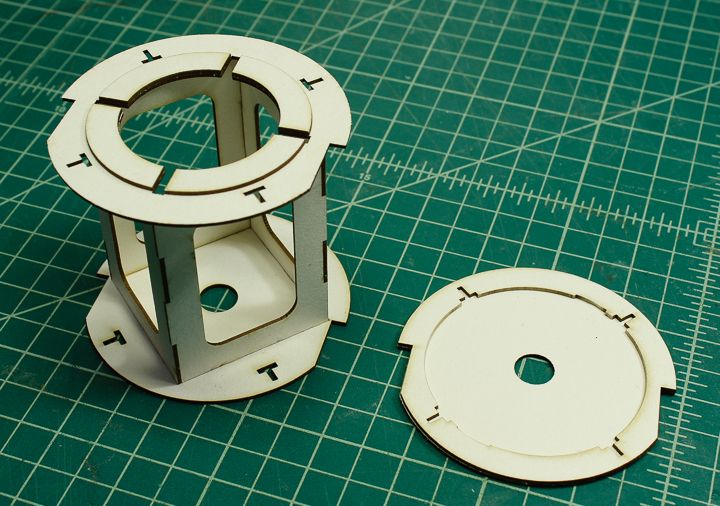
I designed a new alignment jig for installing the Tee struts, this time laser cut rather than 3D printed. I choose to go with laser cut matte board since after the struts and tail shroud are glued in place the jig will be locked in and have to be physically cut out and thrown away. The laser cut version is cheaper to make and will be easier to cut out. It was also easier to dial in the fit tolerances.
Here are the individual laser cut parts that going into making up the front and middle sections. There will also be a third section to align the tail shroud.
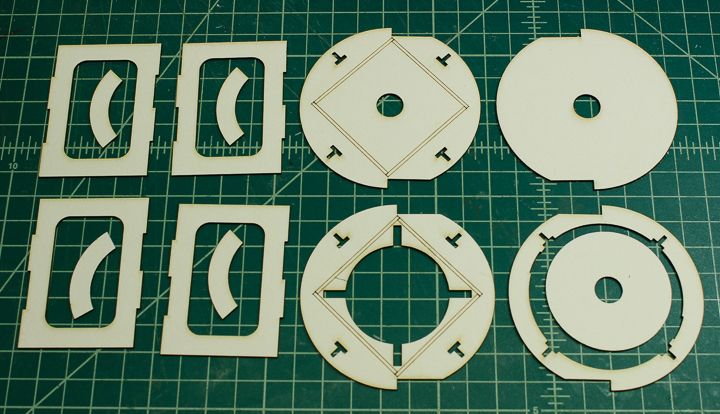
The pieces are glued together with a little bit of white glue. That way some warm water applied to the joints after the struts are installed will soften the glue and make it easier to remove the pieces of the jig.
And here is the jig in use. The main section holds the Tee struts in the correct alignment as well as keeping them parallel. Its also designed to fit around the engine nossle and fins which will need to be installed before the struts are glued in place. The front disc holds the front ends of the struts.
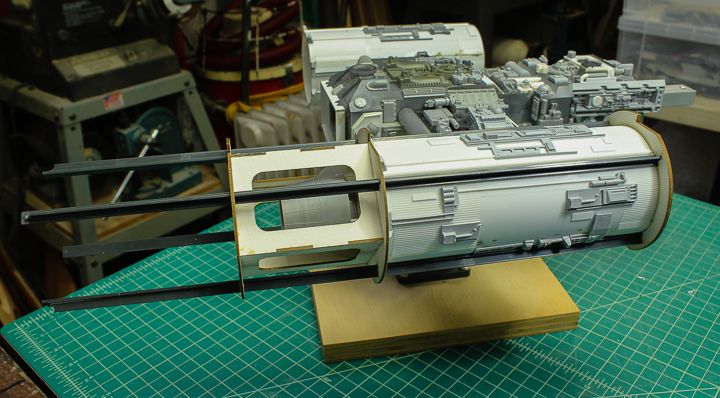
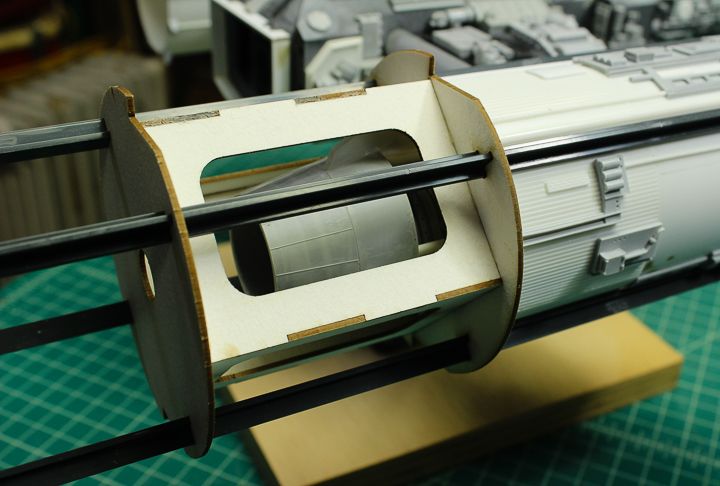
The jig might seem like a lot of trouble to go through just to align the struts but, well, I see being anal retentive as a virtue!
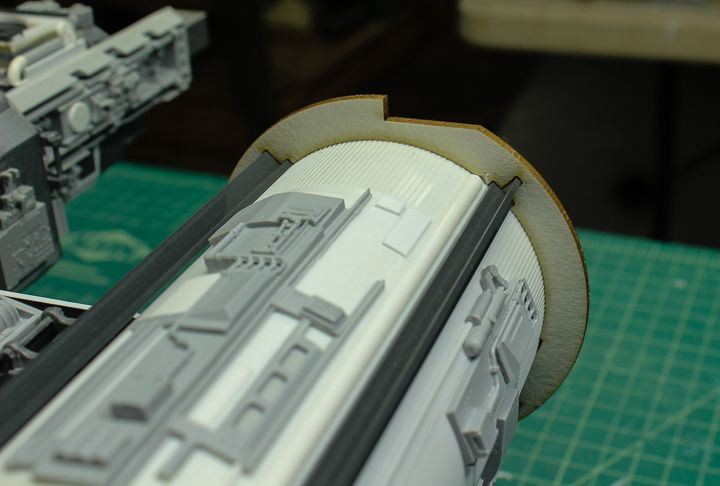
And here's a little hint of what's to come...
Here are the individual laser cut parts that going into making up the front and middle sections. There will also be a third section to align the tail shroud.

The pieces are glued together with a little bit of white glue. That way some warm water applied to the joints after the struts are installed will soften the glue and make it easier to remove the pieces of the jig.

And here is the jig in use. The main section holds the Tee struts in the correct alignment as well as keeping them parallel. Its also designed to fit around the engine nossle and fins which will need to be installed before the struts are glued in place. The front disc holds the front ends of the struts.


The jig might seem like a lot of trouble to go through just to align the struts but, well, I see being anal retentive as a virtue!
And here's a little hint of what's to come...

Last edited:
Hi Dave
Do you plan to release the jig as a pattern we can get laser cut? Or as something we can buy? Or both?
Do you plan to release the jig as a pattern we can get laser cut? Or as something we can buy? Or both?
The two man cockpit will probably be one of the last things I do, Gus76 sent me one of his beautiful 3D printed cockpits so I'll use that for now.
I'm planning to publish the jig pattern so anyone that wants to use it can have a set laser cut on their own. Just need to do a few tweaks.
I'm planning to publish the jig pattern so anyone that wants to use it can have a set laser cut on their own. Just need to do a few tweaks.
Similar threads
- Replies
- 150
- Views
- 16,720
- Replies
- 2
- Views
- 462
- Replies
- 3
- Views
- 634
- Replies
- 12
- Views
- 1,269