You are using an out of date browser. It may not display this or other websites correctly.
You should upgrade or use an alternative browser.
You should upgrade or use an alternative browser.
FINISHED (see pg 21) WIP - BTTF - Nike Air Mag


RVLF
Sr Member
Yep, that's the list but I'll try to finish this huge job first ")
Anyway, here is some new pictures of a new version:
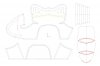
• The master that has been inspired by the one of Taff83 :

• Tracing and cutting :


• Designing and cutting the tongue:

• Placing and Adding the ribs :


• The result :


I think this is going on the good path, and after making the second shoe I'll have to find out how to cover this structure withe the fabric.
I wonder how to sew the thing and how I'll glue it to the foam... ? Then, How and when to put on the laces ? So much questions :behave
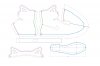
Anyway, here is some new pictures of a new version:
• The master that has been inspired by the one of Taff83 :
• Tracing and cutting :
• Designing and cutting the tongue:
• Placing and Adding the ribs :
• The result :
I think this is going on the good path, and after making the second shoe I'll have to find out how to cover this structure withe the fabric.
I wonder how to sew the thing and how I'll glue it to the foam... ? Then, How and when to put on the laces ? So much questions :behave
Last edited:
cavx
Master Member


RVLF
Sr Member
WOW !!!! Thank cavx ! I would save so much time and version if I had this ! :eek
I've made mein from scratch and I wanted to limit the sewing so there is only two parts on my Master (yes, I'm lazy)
Do you have a picture of what it looks like when everything is put together ?
I can't figure out from what Mag version it is.
Oh, and, I'm looking for the meseurements of the HC soles in size 9 (outside and inside sole) if you have them that will be the cherry on top !
TheNickFox
Sr Member
It's worth noting that Cavx's patterns are actually the fabric sections. Here's my quick labeling of the major pieces of the pattern, and as you can see, the toe box is NOT attached to the either side, but is a separate piece.
-Nick

-Nick


RVLF
Sr Member
Ok, so I did it good
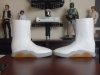
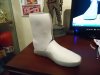
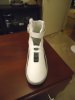
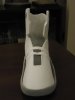
• here is a picture of the back (is this ok ?) :

• Last question about the fabric :
I saw you and @Jedifyfe and Taff83 made great models from scratch.
But how and with what did you glue the fabric to the foam ?
On my tests, I always get some wrinkles at the angles of the laces and the cuff.
is there a way to avoid that ? (pictures below)
View attachment 553338 View attachment 553339
• here is a picture of the back (is this ok ?) :
• Last question about the fabric :
I saw you and @Jedifyfe and Taff83 made great models from scratch.
But how and with what did you glue the fabric to the foam ?
On my tests, I always get some wrinkles at the angles of the laces and the cuff.
is there a way to avoid that ? (pictures below)
View attachment 553338 View attachment 553339
Last edited by a moderator:
cavx
Master Member
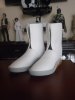
Ok, so I did it good
• here is a picture of the back (is this ok ?) :
View attachment 558693
• Last question about the fabric :
I saw you ou @Jedifyfe and @taff made great models from scratch.
But how and with what did you glue the fabric to the foam ?
On my tests, I always get some wrinkles at the angles of the laces and the cuff.
is there a way to avoid that ? (pictures below)
Yes the tongue looks good. The liner is would be tricky, but I guess the way you do that is lay the now 3D tongue on its back, pin the middle section to the material for the liner, then repeat the process for both the top and the base. This way the liner has no joins and follows the curve of the 3D part. Then you trim it with the ribbon.
As for the upper, I think they used spray adhesives first. I don't Jedifyfe's shoe has the inner seam. I am sure he just stretched the fabric over the foam frame. The former member (caloss) had had extra foam for the seams and sewed right through the lot. I guess he went back and cut that extra foam out later.
The lace area is a trick. The V2 is almost square at the end, yet the RD patterns are rounded at that end of the lace box. Not sure how you get the wrinkles out without cutting the opening more square.
RVLF
Sr Member
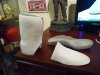
@cavx : Finally I did the tongue (It is for my HCs but I had no choice to try it on my V2 of Foam mags ^^) and I'll make the back later and give it to someone with a sewing machine to make the ribbon that follow the edges.
Here is some updates :
I've totally redesign the patern after observing the RDs and the feeling I wanted to get on this pair. It won't be "movie accurate" or "RD accurate" but I don't care, for me It's a Air Mag inspired custom project
Here is the new version :


Need to work on the Cuffs now and the heel shape ! :cool
Here is some updates :
I've totally redesign the patern after observing the RDs and the feeling I wanted to get on this pair. It won't be "movie accurate" or "RD accurate" but I don't care, for me It's a Air Mag inspired custom project
Here is the new version :
Need to work on the Cuffs now and the heel shape ! :cool
Last edited:
RVLF
Sr Member
Thanks for your comments cavx, I also think they're too thin, but I still have to work on the heels.
And by that, I mean adding extra materials on the back to push everything forward.
So that'll correct the front part and make it larger.
I will also cut everythings down to add the white upper parts (see those white strokes on the side view,
it is where I'm suppose to have the horizontal breaking line beetween the bottom and the upper)


RVLF
Sr Member
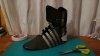
Updates of the week !
I've cut everything :

Then flattened the patern on a cardboard :


Tracing the patern :

Missing pictures for the cutting process...
Here is the layering of my shoe : Fabric > Black Foam (0.5mm) > Soft foam (1mm) > Foam (0.5mm) > Fabric

And the ribbing is glued with shoegoo under the fabric :

Now, I have to figure out how to attach the backs togethers and the side.
Then, how to make the hole for the ears
I've cut everything :
Then flattened the patern on a cardboard :
Tracing the patern :
Missing pictures for the cutting process...
Here is the layering of my shoe : Fabric > Black Foam (0.5mm) > Soft foam (1mm) > Foam (0.5mm) > Fabric
And the ribbing is glued with shoegoo under the fabric :
Now, I have to figure out how to attach the backs togethers and the side.
Then, how to make the hole for the ears
Attachments
Nice job. This reminds me of when I was making my own scratch built MAGs.


Attachments
-
 DSC03998.JPG1.8 MB · Views: 543
 -
 DSC03928.JPG1.9 MB · Views: 343
 -
 DSC03879.JPG1.9 MB · Views: 506
 -
 Dsc03485.jpg93.2 KB · Views: 364
 -
 Dsc03484.jpg80.2 KB · Views: 326
 -
 Dsc03403 (2).jpg121 KB · Views: 344
 -
 Dsc03375.jpg113.6 KB · Views: 384
 -
 Dsc03374.jpg113.4 KB · Views: 320
 -
 Dsc03319.jpg93.2 KB · Views: 344
 -
 DSC03305 (3).JPG3.2 MB · Views: 386
Last edited:
RVLF
Sr Member
Jedifyfe :
Thanks
Your ptoject is really high level in my opinion ! I should have used a shoe last too, it is a better method to get things done properly and shape the foam.
But as it is a first experience, I learn by trying and making (a lot of) mistakes... and I don't mind having to restart a new one to improve the model as I'm learning things
How did you connect the 2 parts of your design ? And what about the hole of the ears ? These are the things I'm starting to think about :behave
PS : did you have my PM ?
Last edited by a moderator:
Similar threads
- Replies
- 10
- Views
- 2,868
- Replies
- 5
- Views
- 1,278