Poison Apple - Snow White Evil Queen

Sinned

Well-Known Member
RPF PREMIUM MEMBER
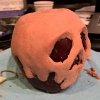
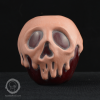
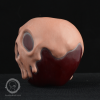
My daughter is planning to be the Evil Queen, from Snow White this year. Costume aside, she needs a couple of accessories, including a poison apple. Rather than just have her carry around an apple, we thought we'd spice it up a bit, and replicate the cool-looking one, with the skull caramel.

EvilQueen-PoisonApple-00_zpswa3kvgei.jpg

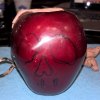
Found some fake apples on Amazon, to use as a base for sculpting. After a couple of hours, I have a decent start. The plan is to get the forms the way I want them (still have a ways to go), and then hit it with the heat gun, to hopefully get a shiny, melted look. Then mold, and cast the thing.

Turning out to be a pretty fun project, since nothing needs to really be symmetrical, and the shape can pretty much just be what it ends up being.

Using Chavant NSP Medium.

Started putting a little clay on it, and then decided it would be a good idea to draw a few guide lines, before going too far.
EvilQueen-PoisonApple-01_zpsqylchv4b.jpg

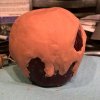
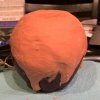
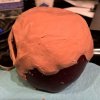
Blocked out the basic shape

EvilQueen-PoisonApple-03_zpsdxvttmjb.jpg EvilQueen-PoisonApple-06_zpsdlqppkp1.jpg EvilQueen-PoisonApple-05_zpswubxin2j.jpg EvilQueen-PoisonApple-04_zpsgovxwtb6.jpg

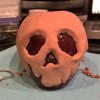
Refined a little with various rakes
EvilQueen-PoisonApple-07_zpsjoq7ccnn.jpg EvilQueen-PoisonApple-08_zpsoo9kj9ou.jpg

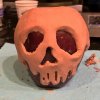
And, started working on the final form
EvilQueen-PoisonApple-09_zpsrcsyfx5w.jpg

Still much more to go, but turning out pretty decent, so far. Biggest thing next is to adjust the drips in front a bit, and then thin down most spots; I think it's a little too thick right now.
 
First of all, how awesome is it that your wants to be the evil queen? Villians are just cooler. ^_^
And second this is a great idea for an accessory. Just be careful on the melting thing, I feel like plastic apples weakness would be high heat. :p
Can't wait to see more on this!
 
That is so cool!

I definitely second what JonKross says (been a long time buddy! I used to go by SlipKnoT if you don't remember. :) ) be careful with the heat on those plastic apples! I'd suggest a hand held butane torch instead of the heat gun so you have a little more control of where the heat goes.

Planning to make it glow? You certainly have enough pigments to do it. :lol
 
Last edited by a moderator:
Thanks guys! Yeah, I love that she goes for the darker characters. Last year was Edward Scissorhands. :)

Worse than plastic, these are Styrofoam, dipped in an extremely thin plastic(?) coating. I'm probably going to have to rethink the truly melted look. I just tested heat gun, and butane torch, on one of the spare apples; it didn't care for either one. It actually withstood the heat gun for a few seconds, but the torch made it bubble almost instantly. :( Maybe if I'm extremely careful with the torch. Next test-- I'm going to put one in my clay toaster oven, and see what that does.

Planning to make it glow? You certainly have enough pigments to do it.

LOL, you got that right! Probably not though. :)
 
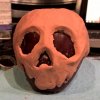
Sculpting done! It's not exact, but I like it quite a bit. Will take some better pictures tomorrow.

Decided not to even attempt putting heat on this, so just worked it by hand. First some finger polishing, then went over the whole thing with a fine brush and turpentine, and then a final finger polish, with ice water. I'll never understand how people get Chavant so smooth... this is pretty decent though. The powder makes some of the marks show up a little more than they normally would.

EvilQueen-PoisonApple-10_zpsv1nvaovg.jpg

I'll make a stem for it separately, out of Sculpey or something.

@Mr Mold Maker how would you attack this thing? It feels like I could almost get away with a jacket mold, but then I'd have to sacrifice the bottom. If I do a 2-piece block, I get the whole thing, and could also try casting it hollow.

Oh, and after further consultation from my daughter, I do believe we'll be making the sculpted part glow. :D
 
You've got the right idea. Two piece block, casting it hollow would probably be how I'd do it.

Alternatively if you wanted it light weight and "kid safe" you could prop it up on a pour spout and do a one piece block for rigid or flex foam casting. You do sacrifice the bottom, but it will also only give you one seam to worry about. Depends totally on how you want to do it. I hope that makes sense over text, if not I'll be glad to hop on Paint and attempt to draw what I mean. :lol


Awesome work on the sculpture! Glad it will glow. Been on a glow kick myself after seeing your thread. :)
 
Thanks, @Mr Mold Maker!

Decided on the 2-piece, so half of the apple is sitting under a bunch of MoldMax right now. Here are good pictures, of the final sculpt. Should have made this my September contest entry; this was pretty simple, but not sure I'm going to get my other sculpt done in time!

EvilQueen-PoisonApple-12_zpsg7jfrwzh.png EvilQueen-PoisonApple-13_zpsiiqba6in.png EvilQueen-PoisonApple-14_zpsejoo4g7i.png EvilQueen-PoisonApple-15_zpsprrjl7ie.png
EvilQueen-PoisonApple-16_zpsa5cumeh1.png
 
Whoa, I like the look of it! Looking forward to the hold process, always interesting to see. Take photos!
And Mr Mold Maker long time! Tv has gotten really good lately.:lol
i'll be asking you for advice in the near future. :)
 
Thanks guys! Pretty happy with how it's coming out.

Molding went well, although I made a major mistake with my layup, and put a key of clay on top that I shouldn't have. I had a good reason, to avoid seaming right over the little knobby bit where the stem goes, but I should have taken it the other way. Instead, there's a bad seam, across the front. Should have keyed it behind it. Oh well. Sanding takes care of it, mostly.

EvilQueen-PoisonApple-17_zpsfmg7l8iu.jpg

A bit of a bear, trying to get the cast right. In Smooth-On's tutorials, they say to mix GlowWorm with Smooth-Cast 325, and also use Ure-Fil 11, for brushing up. I planned to rotocast this (oh how I wish I had a machine), so I skipped the Urefil.

Attempt 1
Did a 1:1:1 mixture of 325 A/B/GlowWorm and roto'd it as best I could. It worked okay, but that stuff doesn't rotocast very well. I wound up with some really thin spots, and then a giant glob at the top. It broke apart a bit when I demolded it, due to the thin spots, and not letting it cure long enough. For fun, I cut the "apple" parts out, and then slipped the "caramel" part over the top of one of the original apples. Actually looks pretty good, but not what I want.

Attempt 2
Tried the same mix of 325 again, trying to be more careful about getting it even. Had the same result-- thin spots, and one big, thick spot. I then tried filling this cast with 65D, mixed with Ure-Fil 15, to make it a light-weight solid. This definitely made a solid apple, but it's still really heavy. And the color isn't very even, due to the previous globbing of the rotocast. This one actually glows the brightest, but it's actually a little too much.

After these two, I concluded that 325 is a very poor choice for this. I don't like the end look anyway, with it being somewhat clear, and really full of internal bubbles. It just looks...meh.
Done with 325, so moved on to a non-clear resin. I had some BITY Easy-Flo 120 laying around...not enough for a larger project, so used it to test here, because I know it's great for rotocasting. First mixed up just a little bit, to make sure it still glowed. It does!

Attempt 3
Easy-Flo 120 mixed 1:1:1. This worked very well, except I didn't mix up quite enough, so I had some thin spots, around all my hard edges. Also, a few bad surface bubbles in a couple of the drips. Normal casting, this is no problem, since they can just be filled, but not when doing this glow-in-the-dark stuff. :(

Attempt 4
Easy-Flo 120 mixed 1:1:1, but a little more this time, and was a little more conscious of the initial rotating, to try and avoid trapped air. Also, once that cured, I poured in some Smooth-Cast 65D, mixed 1:1:.5 with GlowWorm, and rotocast that around as well, just to be sure I had no thin spots. This worked out almost perfect. I still had a couple of small surface bubbles (sigh), but I can live with them.

The look of the white resin, mixed with the GlowWorm powder is great, I really, really like it, and very much recommend using that, over a clear resin, unless you really need it. I'll post a picture of that once it's painted.

Until then, here's what the glow looks like (left to right, attempts 1 - 4), taken with my cell phone camera... no additional light in the room. This stuff glows BRIGHT.

EvilQueen-PoisonApple-18_zpsgmefro2x.jpg
 
Thanks ultraman! I'll probably make a few more, before Halloween; will see how my schedule allows. Need to get better at casting them, so I don't keep making rejects. That Glow Worm is pricey stuff! :)
 
Last edited by a moderator:
Haven't gotten to painting yet, but did take a picture of the different trials, in normal light.

First one is Smooth-Cast 325
Second is Smooth-Cast 325 and filled with 65D
Third is one coat of EasyFlo 120
Fourth is one coat of EasyFlo 120, backed with one coat of 65D

EvilQueen-PoisonApple-19_zpsj5dxfwis.jpg

The 325 versions are much more colorful, in regular light, but I like the look of the white resin better.
 
Finally got to some paint last night. Used the "trial #3" as a tester.

Without primer, the first layer of paint didn't go on very well, which made things somewhat annoying, but livable. A second coat helped a bit.

Started out with an Apple Green, first, just because I wanted to see what a green version looked like, but also simply to give it a base color, since apples start out with a lot of green to them.

EvilQueen-PoisonApple-20_zpszyejntpu.jpg

With a third coat, it'd actually look pretty good, but the real intention is to make it red, so I stopped at 2, and moved on.

With the base green on there, red went on pretty well. Thought I might leave some bits of green showing, but in the end, decided to just cover it all up. Started with a crimson, and then followed up by streaking it some with scarlet. Can't really see that in the pictures. Might go back and do a little more streaking, with a darker color, on the final version. But calling this good for a trial. Next up is to give it a satin clear coat, and see how that looks.

EvilQueen-PoisonApple-21_zpsrnpuvzo4.jpg
 
looking good! now it needs a big fat stem to complete the look!

That's definitely the one missing piece. As it sits now, that might not make it to the top of the priority list, until closer to Halloween. We're headed to Disney on the 10th, for the Halloween festivities there, so have to get as much done as I can before then (Hatbox Ghost costume is hogging most of my time). But I'll be home with a week+ until real Halloween, so will have it before then for sure. But, currently, I don't think it's going to make the cut for Disney. Maybe I'll task my daughter with making the stem, and see how that goes. :D
 
Thanks guys! Definitely happy with how it turned out.

And on that note, final pictures!

For the final version, I ended up just using 2 coats of the Dark Scarlet color, with no base color underneath. This actually worked out really well. By allowing the color to streak a bit, it wound up with a fairly convincing "real apple" look.

I had my daughter make a stem for it, using Sculpey, but we're leaving it off for now. Don't want to risk it breaking, when traveling with it.

EvilQueen-PoisonApple-22_zps1dtwfhnt.png EvilQueen-PoisonApple-23_zpswbdgkxp3.png EvilQueen-PoisonApple-24_zpszckyy8dn.png
EvilQueen-PoisonApple-25_zpsfxeir07z.png EvilQueen-PoisonApple-26_zps9w9mty8w.png
 
This thread is more than 8 years old.

Your message may be considered spam for the following reasons:

  1. This thread hasn't been active in some time. A new post in this thread might not contribute constructively to this discussion after so long.
If you wish to reply despite these issues, check the box below before replying.
Be aware that malicious compliance may result in more severe penalties.
Back
Top