MMHNC's 2015 Halloween Costume Contest Entry Complete! Star Wars Battle Droid

mmhnc

Well-Known Member
Modifying my initial post to include the needed info for the 2015 costume contest!

So it's that time of year again, the time of year where my kids challenge me to build a very specific Holloween costume. (Actually I normally start Holloween costumes in July or August). In the past I have done the Man in the Yellow Hat from Curious George, Ninjas from Lego Ninjago, and last year my first build with foam, Transformers from Rescuebots. So this year my 5 year old asked to be a battle droid from Star Wars.

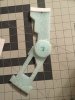
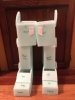
Construction of the body parts was foam my big accomplishment this year that I have never tried before and really brought this piece to life as the weathering. I really wanted to tell a story of a droid that had been assembled from left over parts of other battle droids that had reached there end in battle. I wanted lots of areas worn down to metal (rub and buff) I wanted areas that had rusted where the paint was gone, and I wanted a few spots that had clear blaster damage. I really was happy with my final result, not just happy but really amazed at how simple this step was compared to how big of an impact it had.

Next will be my finished picture and my proof picture (I only had my phone so I hope it's big enough), please read the rest of the thread for the construction process as it was a lot of fun!
image.jpgimage.jpg

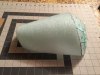
Now after a little research I found they origanly intended to use costumes in the movie and then edit with CG, but as we all know if they had the opertunity in the prequels to use CG instead of practicals they did, but I found some pictures of the "helmet" they were going to use and with that I had the start of a plan! Below are a couple of references and where I am now. The foam I got this year wasn't as dense as the anti-fatigue mat I used last year but after sealing and priming with plasti-dip I think the surface will be ok. I plan to post progress frequently as I am working on this every night!
 

Attachments

  • image.jpg
    image.jpg
    1.1 MB · Views: 281
  • image.jpg
    image.jpg
    1.7 MB · Views: 184
  • image.jpg
    image.jpg
    79.6 KB · Views: 219
  • image.jpg
    image.jpg
    1.2 MB · Views: 203
  • image.jpg
    image.jpg
    1.2 MB · Views: 218
  • image.jpg
    image.jpg
    1.3 MB · Views: 203
  • image.jpg
    image.jpg
    1.1 MB · Views: 198
  • image.jpg
    image.jpg
    995.8 KB · Views: 216
  • image.jpg
    image.jpg
    1 MB · Views: 232
Last edited:
Re: Star Wars Battle Droid Holloween costume

I forgot the picture of the "helmet" from the movieimage.jpg
 
Re: Star Wars Battle Droid Holloween costume

So I worked on the helmet section tonight, getting the back to curve down and around the back of the head required cutting several sections and joining at an angle, you can see the different sections in the first photo.
image.jpg
I then had to sand all the edges and make a templet to form the plates that make up the back of the head on the battle droid
image.jpgimage.jpg
imagepng


Thats as as far as I got tonight, tomorrow I will finish the plates and start the pony tail things that come off the back.
 
Re: Star Wars Battle Droid Holloween costume

This looks fun!

I look forward to seeing more of it.
 
Re: Star Wars Battle Droid Holloween costume

Looking good. Any ideas yet for colour scheme? Commander, security etc?

I'll be interested to see how it all comes together. I've always thought that this or the super battle droid could be good fun.
 
Re: Star Wars Battle Droid Holloween costume

It's funny I asked my son about what version he wanted to do, and he looks at me and says "how about we make it look like it was built from parts of broken battle droids". Seriously he's 5. So what we are going to do is the head from command (yellow circle), the body of a pilot (blue), the braids from a security (red) and 1 arm and 1 leg from a Geonosis infantry (rust)
 
Re: Star Wars Battle Droid Holloween costume

So I was able to make the plates on the back of the head tonight and start the braids. Going to have to do some sanding to get the edges to line up but came out pretty good. More tomorrow.image.jpgimage.jpg
 
Re: Star Wars Battle Droid Holloween costume

Had to work on another project tonight but was able to finish the braids
image.jpg
 
Re: Star Wars Battle Droid Holloween costume

Sounds like an interesting collection of parts then. It'll be interesting to see it done.

Coming along well and looking good.
 
Re: Star Wars Battle Droid Holloween costume

Tonight I was able to add "ears" and caps on the braids
image.jpg
Also added antenna and ends
image.jpg
And I think with that I'm done with building, next will be sealing and priming, but first I need to star some mods on my other sons store bought X-wing costume but that will be in another thread.
 
Re: Star Wars Battle Droid Holloween costume

Last night I was adding some more plati dip to the larger parts of the costume and notice that this foam is way more porous than I realized especially anywhere the surface was broken.
image.jpg
So here are my ideas;
1. Get some plati dip in a can for the real bad areas, it's thicker and should fill better
2. Cover as good as I can and then when weathering make the pours look like pits from rust
 
Re: Star Wars Battle Droid Holloween costume

I really enjoy the costumes for kids! So much fun!
 
Re: Star Wars Battle Droid Holloween costume

So almost everything has had atleast 1 coat of Plasti Dip, the white parts need a few more, black parts just need the bottom edges done. The smaller parts seem to have less of an issue with open pours than the head and backpack did, maybe it was just from the extra working and shaping those parts saw. I hope to have some color done this weekend.
image.jpg
 
Re: Star Wars Battle Droid Holloween costume

Well I was able to pick up some Plasti Dip to brush on, I could only get black or red so I figured red would cover easier. First off don't try to pour Plasti Dip into a plastic cup, about 5 minutes in it melted the bottom out. It seems to have covered my really bad spots well so we will go over it with some more white from the spray can and see how it looks. Also everything else has had a couple coats of color and I should be wrapped up with the base color in a day or 2.
image.jpgimage.jpg
 
Re: Star Wars Battle Droid Holloween costume

Well something strange happened. Any where I used the sand color over Plasti Dip it refuses to dry, I gave it a day and a half and even brought it inside for the whole day yesterday. The rust color (it's actually a primer) dried right away. I would expect this if If I was using an oil based and a water based paint or maybe if I hadn't let the Plasti Dip dry first but not like this. So last night I went over all the sand with a primer, and it dried right away, I then re covered in sand and left sit in front of a heater for a couple of hours. When I got up this morning it was still not dry! I just sprayed a little corner of the back pack in clear, not sure if this would help but if it doesn't I'm going to have to try a different paint.

Anyone ever run into this? I have spray painted a lot of stuff over the years and I'm at a loss here.

image.jpg
 
Re: Star Wars Battle Droid Holloween costume

Ok clear coating seams to have fixed the issue, why, no idea. But I guess I get to keep moving forward so oh well.
 
Re: Star Wars Battle Droid Holloween costume

Started making gloves, have an old sewing mechine but apparently it has some broken gears to replace :facepalm. So I guess I am doing these by hand. I started by tracing his hand with the fingers in the right position since a battle droid only has 2 fingers and a thumb. Then added some extra room for the seam. Next I traced the pattern onto some fleece, cut out and stitched around the outside. The next step will be to turn inside out so the seam is on the inside but O want to make sure they fit first. After they are done I will add some foam to make up the details of the hand.
image.jpgimage.jpgimage.jpg
 
Re: Star Wars Battle Droid Holloween costume

It's time for masking!!! Masking is one of my favorite parts, I think it's becuse adding the little details really makes a project come to life.
Here are my supplies
image.jpg
the thicker blue tape is a low adhesion automotive masking tape, the really skinny blue tape is a vinyl tape that you cand bend and curve really well. I use it on motorcycles and helmets and it won't creep from the solvents, but watch out if you get it too hot while drying. The rest are just general painters tapes in different widths.
so here we go;
image.jpgimage.jpg
I was able to get the yellow done and cleared, I like to clear over anything that will get taped, I just think it has less risk of the color layer lifting of there is a hardened clear on top.
image.jpg
I then masked everything but the braids
image.jpg
The other parts are still drying so we will see how they look in a little bit
 
Re: Star Wars Battle Droid Holloween costume

So you know that thing I said about low adhesion tape and clear coat, yeah that doesn't always work, when I unwrapped the chest piece I had some paint pealing, so I had to remask very carefully with an even lower adhesion tape and try again.
image.jpgimage.jpgimage.jpg
 
Re: Star Wars Battle Droid Holloween costume

Ok bunch of updates today;
1. I have all the base colors done
image.jpg
2. I'm finishing some detailing on the legs and back pack
image.jpgimage.jpgimage.jpg
Going to need to clean up some of these lines as I had some bleed through.
Also made a stencle for adding his name to the back of the pack, I think this is normally for droid identification
image.jpg
3. What good is a battle droid without a blaster? I picked up this broken Nerf Star Wars blaster on EBay for $5 and it came with another Nerf gun that worked so bonus. My plan is to repaint / mod to make look more like a battle droid blaster / add lights and sounds.
image.jpg
So I opened up the gun and found the trigger catch broken, that explains why it didn't work, but I don't need it to work any ways. Also I found a switch to turn on a light in the top sight area. I'm going to move this into the barrel . Also I want to move the magazine from the side to the bottom of the barrel and add a gas tube on the top. I know this isn't 100% accuret but I'm going for more of a feel here.
image.jpg
I gutted the barrel and reused the lens from the old light, I'm going to add a little clear cap to the end so it will glow red when the trigger is pulled. Also going to add a blue blinking light under the grill on the side, becuse it seamed like a good place for a blinking light.

one more addition, I hacked a recordable gift tag and recorded some blaster sounds, I think I can activate this with the trigger.
image.jpg
The. I painted everything black
image.jpg
Now just for some weathering and wiring.
 

Attachments

  • image.jpg
    image.jpg
    1.2 MB · Views: 146
Back
Top