Tom's DL-44 thread

thd9791

Master Member
RPF PREMIUM MEMBER
Hey everyone, I've been on a bit of a hiatus, life got crazy, but there's a new girl in town who will have impromptu lightsaber battles in Wal-Mart at 1 AM so id say things are going well.

This thread will, so far, document 3 blasters. Any help, advice and ideas are very welcome, I don't have the eye for blasters that I do lightsabrs :lol I want to thank Tony ( adamata ) Kyle ( chizbot ) Kevin Gosset and anyone else that helped me along the way!

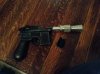
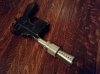
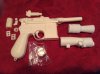
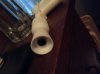
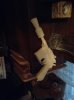
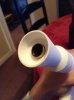
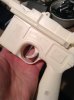
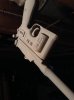
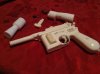
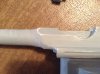
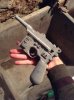
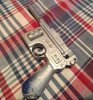
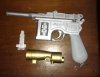
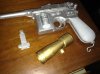
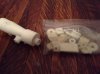
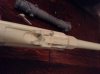
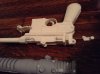
The first is a resin MGC that came from Jedifather. I knocked out and putty-ed any holes with Apoxie Sculpt. I will then sand and cut away any excess material. I have a beautiful Resin M19 from adamata, as well as a slew of extra greeblies I got from him and others. I want to turn this MGC into a stunt Hoth, as the Hoth was made with an MGC! So that means cutting up some of these motor cool greeblies when the time comes. I ALSO am waiting on a stunt flash hider from guacabe's (spelling?) Shapeways store. I've never worked with 3D prints and since this flash hider wasn't metal anyways, I think it's a great place to start. John over at Blast tech just a sold me one of this scope mounts (which are drilled lower so they sit higher on the reciever just like the Hoth) so I'm excited!

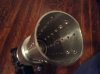
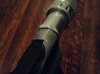
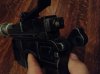
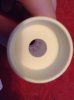
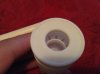
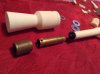
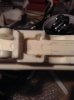
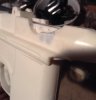
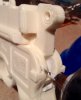
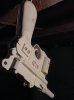
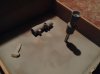
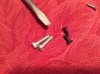
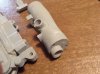
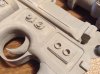
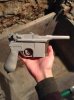
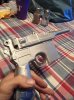
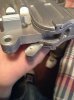
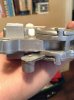
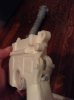
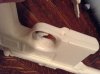
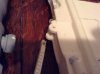
I did two things of note here: I used the side of a cutting wheel and a tiny drill bit to cut out the slot for the resin hammer. I couldn't get very deep so I snapped the hammer in half and I'll just glue it in? Also, I drilled the holes in the sight and on the gun - maybe I can stick a metal rod through and cut the ends off, making my own hinge? Anyone done this?
 

Attachments

  • image.jpg
    image.jpg
    1.3 MB · Views: 110
  • image.jpg
    image.jpg
    1 MB · Views: 154
  • image.jpg
    image.jpg
    574 KB · Views: 105
  • image.jpg
    image.jpg
    821.3 KB · Views: 109
  • image.jpg
    image.jpg
    562.8 KB · Views: 91
  • image.jpg
    image.jpg
    1,021.5 KB · Views: 94
  • image.jpg
    image.jpg
    956.8 KB · Views: 107
  • image.jpg
    image.jpg
    1.1 MB · Views: 93
  • image.jpg
    image.jpg
    1.4 MB · Views: 102
Last edited by a moderator:
The second blaster will be a casual ANH. I happened upon a Denix on the bay for 30 bucks and nabbed it. Kyle, Chizbot, traded some props with me over a beer and now I have a blast tech grill, and a dc machinist bull barrel, flash hider (that I succinctly dropped and dented a little) and the little barrel greeblies! I've never tapped anything (resin props can just be force tapped with a bolt) so once I find a scope mount and scope I'll be in for a challenge.

i spent hours filing the barrel down and couldn't get it to go any farther on so I eventually stopped. Close enough right guys? I also removed the nub on the bolt :) what's next for me?


the third blaster will be Boba Debts run going on now; I'm waiting on a Luke Bespin :)
 

Attachments

  • image.jpg
    image.jpg
    1.1 MB · Views: 103
  • image.jpg
    image.jpg
    1.2 MB · Views: 92
  • image.jpg
    image.jpg
    1 MB · Views: 90
  • image.jpg
    image.jpg
    910.5 KB · Views: 84
  • image.jpg
    image.jpg
    1.1 MB · Views: 92
Last edited:
YES, I nearly forgot, thank you again! It really does look spot on, still shooting for that hand drill tutorial?

and yea, I'm going to be a bit busy this winter :)

awesome! glad it made it. i had alittle issue this weekend. hoping to setup up some stuff this weekend to make a tutorial.
 
Tom, you are animal! I have no experience with blasters, but based on your previous work, I'm sure these will turn out stellar.

Good job on the girl, too. Just don't try that lightsaber stuff at my local Walmart at 1AM or you're likely to get shot by the police! They shoot first and see if those are the droids they're looking for second!
 
I got a couple things in the mail today! The first was a real Thorens disc, sent to me at no charge from a Thorens repair guy! He included new screws and a new grommet but I won't be needing those...

also so I got a flash hider from Shapeways, and I have mixed feelings. It's dead on accurate, and looks wonderful, but it is VERY thin and weighs only a couple ounces. I wonder how strong this is? I don't plan on throwing this around, but it feels like balsa wood!

here are all my parts (still waiting on a bracket from Yodas house) and I think I'll get hex screws for the resin scope. The bracket - I may rig something up using this spacer from adamata, upper left. Any ideas guys?
 

Attachments

  • image.jpeg
    image.jpeg
    1 MB · Views: 104
  • image.jpeg
    image.jpeg
    828.5 KB · Views: 70
  • image.jpeg
    image.jpeg
    857 KB · Views: 58
I did numerous things today, all of them quick and dirty. I sanded all the putty surfaces I could, using a cylindrical grinding stone and a ball shaped "cutter" for dremels. I did also use a few needle files as well! I decided to remove material beneath the hammer and the safety too - by drilling with very small drill bits. I'm going to wet sand this whole thing with 600 grit soon.

It turns out my barrel was too short for my liking. I wanted support through the whole flash hider and managed it by screwing a conical grommet to the tip of my barrel cut off. I then filed out the front hole and jammed a piece of brass tubing through the cone and against the grommet inside. With the support ridges in the flash hider this isn't going anywhere! ( the brass tube was from an antenna socket, I have multiple pounds of them.

i tried cutting the motor cool pieces but I did TOO nice a job and trimmed then to circular rings and rectangles like they were probably supposed to be. I might try to find another and re do them
 

Attachments

  • image.jpeg
    image.jpeg
    921.1 KB · Views: 58
  • image.jpeg
    image.jpeg
    715.8 KB · Views: 64
  • image.jpeg
    image.jpeg
    915.7 KB · Views: 54
  • image.jpeg
    image.jpeg
    1.1 MB · Views: 70
  • image.jpeg
    image.jpeg
    620.9 KB · Views: 58
  • image.jpeg
    image.jpeg
    459.5 KB · Views: 52
  • image.jpeg
    image.jpeg
    730.9 KB · Views: 56
  • image.jpeg
    image.jpeg
    602.9 KB · Views: 65
nice thinking with the barrel extension!
Thanks man! Being pressure fit, this is relatively reversible if I ever find a better one

i also super glued the hammer in that slot - smooth surfaces bond better with ca glue as opposed to epoxy.

I need to do a bit more sanding, glue on the greeblies and prime this thing!
 
I spent the day looking for screws, sanding, drilling and priming this thing.

i used two part loctite epoxy to stick on the greeblies! I re-cut the center pieces to look more like the screen picture. There were milled out sections (probably for fake retainer rings) so instead of sanding out the center, I swiped some apoxie putty across it, leaving a level area. That left enough stickiness to keep the parts in place while I drilled out for the screws. These 4 I scrounged up from my drawer of screws, I looked for flat ish ones for the center pieces and pan head screws for the Pistons. I thus used automotive primer on all the parts, including the flash hider, thinking of gunking that up and sanding that down...I think this looks great so far! I'm going to spray brass and chrome before satin black
 

Attachments

  • image.jpeg
    image.jpeg
    354 KB · Views: 58
  • image.jpeg
    image.jpeg
    410.2 KB · Views: 67
  • image.jpeg
    image.jpeg
    968.6 KB · Views: 48
  • image.jpeg
    image.jpeg
    1.7 MB · Views: 57
  • image.jpeg
    image.jpeg
    1 MB · Views: 74
I wet sanded with some 600 grit sandpaper today. I avoided sanding the scope too much, to keep that cast look. All I had to do there was flick off some Primer pieces and bubbles.

The gun was such a great cast it barely needed any sanding (Thanks Jedifather ) Just the bubbles that I puttied in. Also, being a resin stunt prop, I am keeping myself in check - trying not to fret about 1/16 inch blemishes or cuts.

Surprisingly it was hard to find brass spray paint this week. I ended up with Krylon Brass, which is easy to heavy hand. I initially sprayed too much on the scope and it began to buckle and bubble up like it had been hammered. I actually stepped back and hit it with one long light coat and that smoothed it out! Also, as a tip, there was some buildup over the words on the scope ring. I took a piece of sandpaper, turned it over and laid the smooth back on the gunked area. I then immediately peeled it up (never swipe) and it slowly began to take down the paint, leaving the words. Repeat as needed until you start to see primer, obviously stop then)

The screws on the pistons are covered while I paint. I taped up the handles of the gun before hitting it with rustoleum aluminum metallic. This way the black will look a bit dulled on the handles as opposed to the rest of the body. I don't believe the Hoth had brown handles, looking at that archives shot, but does someone have another opinion?

I'll post pics asap
 
Last edited by a moderator:
I first wanted to post what I started with today. A nice layer of primer that needed a bit of wet sanding. I went a little heavy on the scope by accident, but I tried not to sand too much to save the cast finish. The gun looks great, but the flash hider did not mesh well with the primer. I think I need to find a resin flash hider.
 

Attachments

  • image.jpeg
    image.jpeg
    1.1 MB · Views: 51
  • image.jpeg
    image.jpeg
    1.4 MB · Views: 61
  • image.jpeg
    image.jpeg
    1.1 MB · Views: 61
  • image.jpeg
    image.jpeg
    896.5 KB · Views: 56
  • image.jpeg
    image.jpeg
    828.3 KB · Views: 59
I then chromed and brass-ed the parts. I couldn't get the seam line off the scope, but those things are brass cast anyways. It really was pretty straightforward, having done this before I was pretty confident!
 

Attachments

  • image.jpeg
    image.jpeg
    995.5 KB · Views: 46
  • image.jpeg
    image.jpeg
    1.3 MB · Views: 54
  • image.jpeg
    image.jpeg
    1.4 MB · Views: 62
  • image.jpeg
    image.jpeg
    495.1 KB · Views: 57
  • image.jpeg
    image.jpeg
    1.1 MB · Views: 54
I also was a little worried at the flimsiness of the hammer. So! I took a little metal hook/plate thing that was in ou house DIY hardware buckets and cut it to shape with a dremel. A little epoxy and voila! My hammer is reinforced with an aluminum back.
 

Attachments

  • image.jpeg
    image.jpeg
    973.1 KB · Views: 56
  • image.jpeg
    image.jpeg
    999.6 KB · Views: 56
i went at it with satin black today! I'll post pics soon, I had to try really hard to not keep spraying spots I thought i missed. Don't want to gob it up...curing overnight
 
Hit a bit of a snag. I used an acryllic white paint to do the letters on the scope - and i wiped the paint away and all it did was smear and stick to the black paint! Before I ask adamata for another casting, I'll snap some pics for y'all. I sanded the white bird **** away so the scope just looks REALLY beat up now. I did wet sand/brass wash some of the parts like the lens socket which look fantastic!

The gun looks a lot like the rotj blaster, rather than a dusty black. looking at the original stock photo though, thats right I think.
 
Last edited by a moderator:
I used water-based white paint once. Worked pretty good and was easy to wipe away the excess without ruining the black. Also...try "wiping" the paint into the lettering with a squeegie or even a piece of thick index card or similar. Kinda like the way silk screening is done. It'll leave less excess paint to wipe away.
 
This thread is more than 8 years old.

Your message may be considered spam for the following reasons:

  1. This thread hasn't been active in some time. A new post in this thread might not contribute constructively to this discussion after so long.
If you wish to reply despite these issues, check the box below before replying.
Be aware that malicious compliance may result in more severe penalties.
Back
Top