McQuarrie Vader WIP Scratch Build & Research (Studio 49)

Studio 49

Sr Member
So I have started this research/build thread over of the 501st Sith Lord Detachment and I figured I may as well post all of my progress here on the RPF as there may be people interested. I will be putting up a heap of posts of the next day or so, about 2ish so what you see in this first post may not be up to date. Thats enough of that, heres the thread:


So I have began taking an interest in Ralph McQuarrie, more specifically his original concepts for Darth Vader.
As such have been exploring the possibility of building a McQuarrie Vader. At this stage it is still very early on and I am not committing to anything yet (primarily since I still have a normal Cannon Vader to finish :D) but I have just been doing quite a bit of research lately, collating images and information.

I'm not entirely sure where this may head and I know it likely will take a very long time will basically need to be a 100% custom build.
But what I do know is that during the meantime I can use what I have learnt about 3D modelling over the last 2 years (and what I will learn more about to a much greater depth studying Industrial Design) to begin producing 3D models of specific parts and components at no cost.

////////////////////////////////////////////////////////////////////////////////////////////////////////////

Master_zpsl9ghqm0h.jpg


////////////////////////////////////////////////////////////////////////////////////////////////////////////

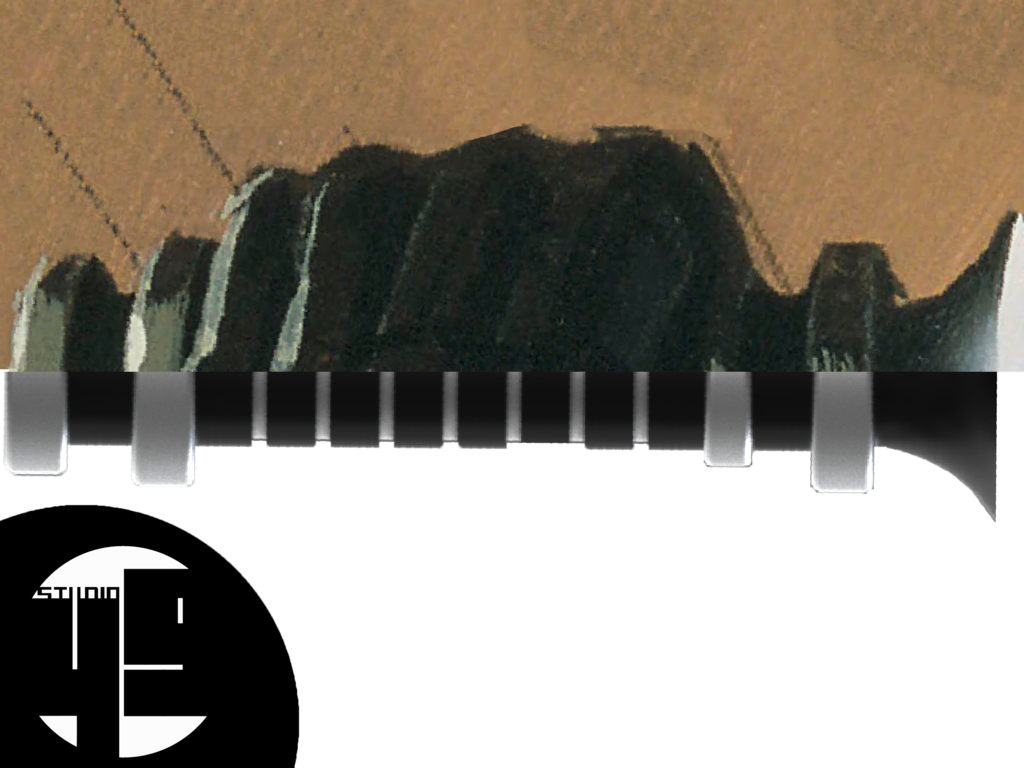
I went through what ever photos I could find to try and collate a sort of parts list (some resources include the original art work, the Kotobukiya Statues, Sideshow Collectables and the costume made by a 501st Legion member, I'm sorry I don't actually know his name).
After looking through what little I could find, this is the basic parts list I came up with and possible suppliers for anything that is actually being made.

Parts List - What I've Found So Far
Hard Parts
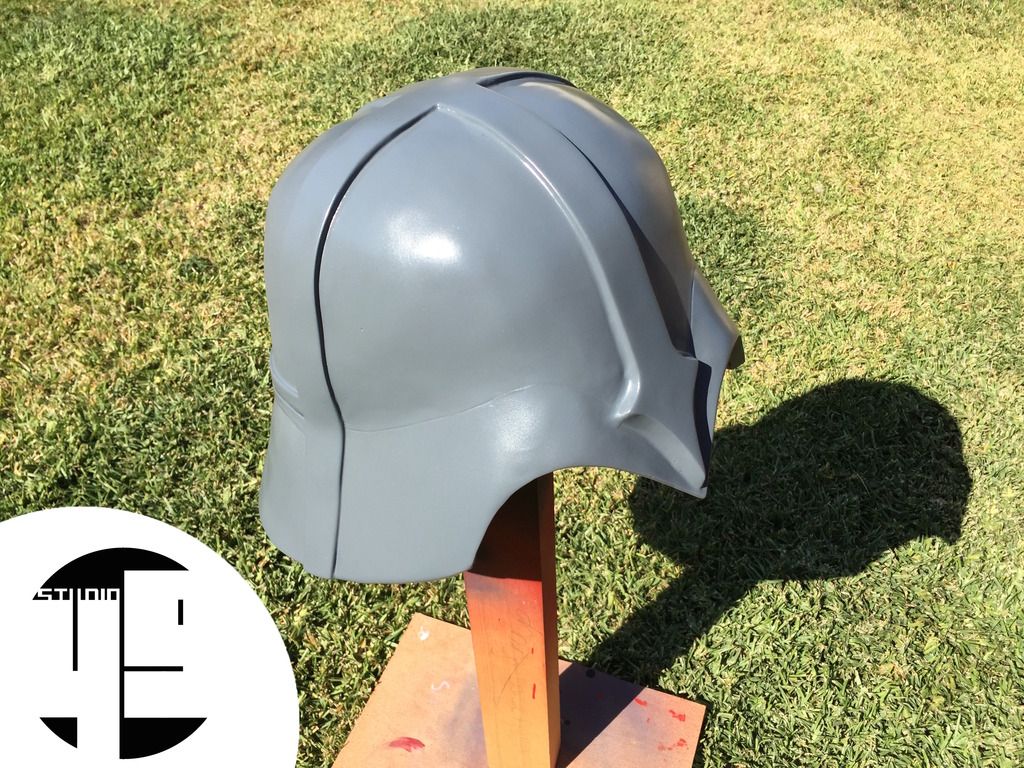
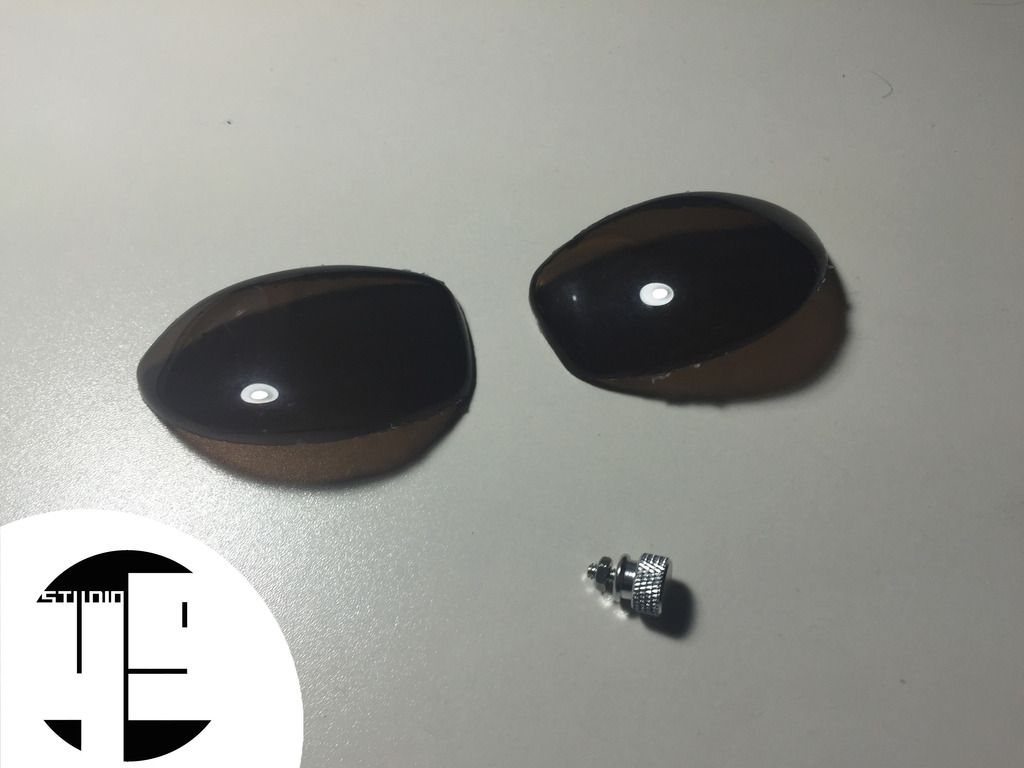
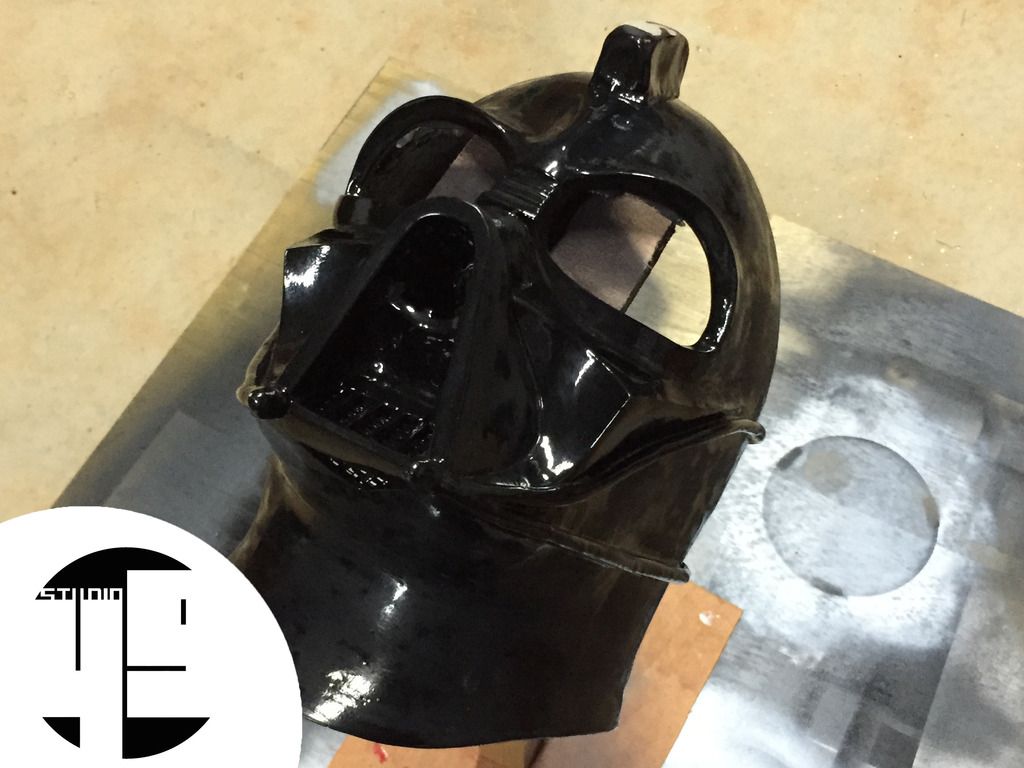
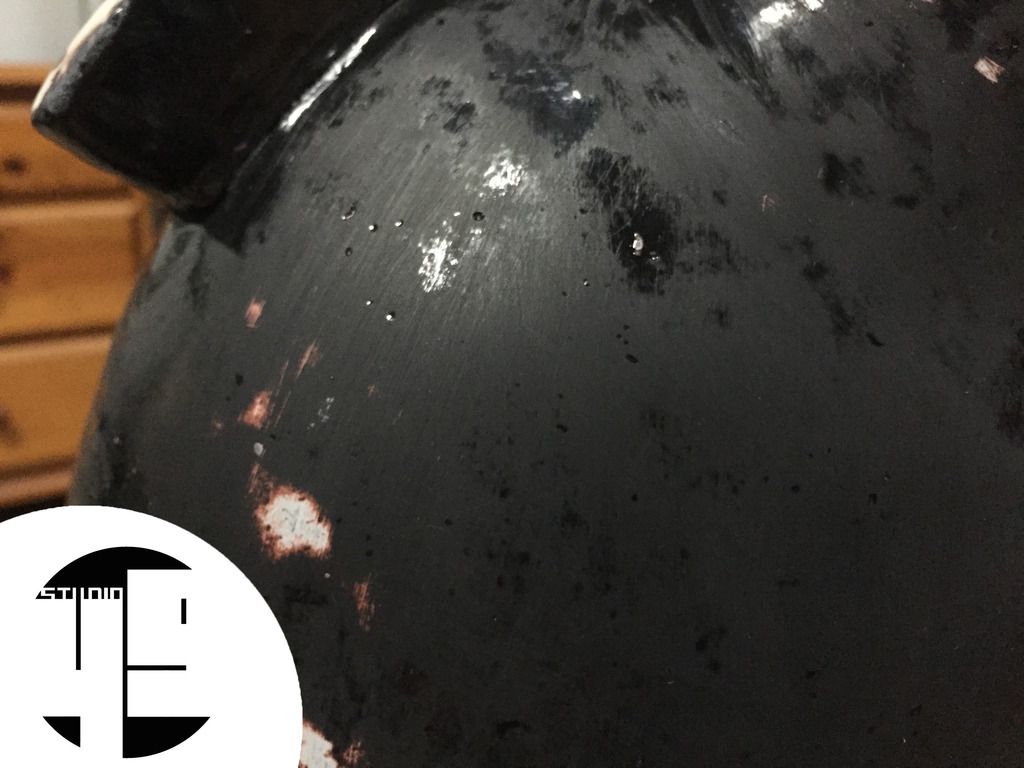
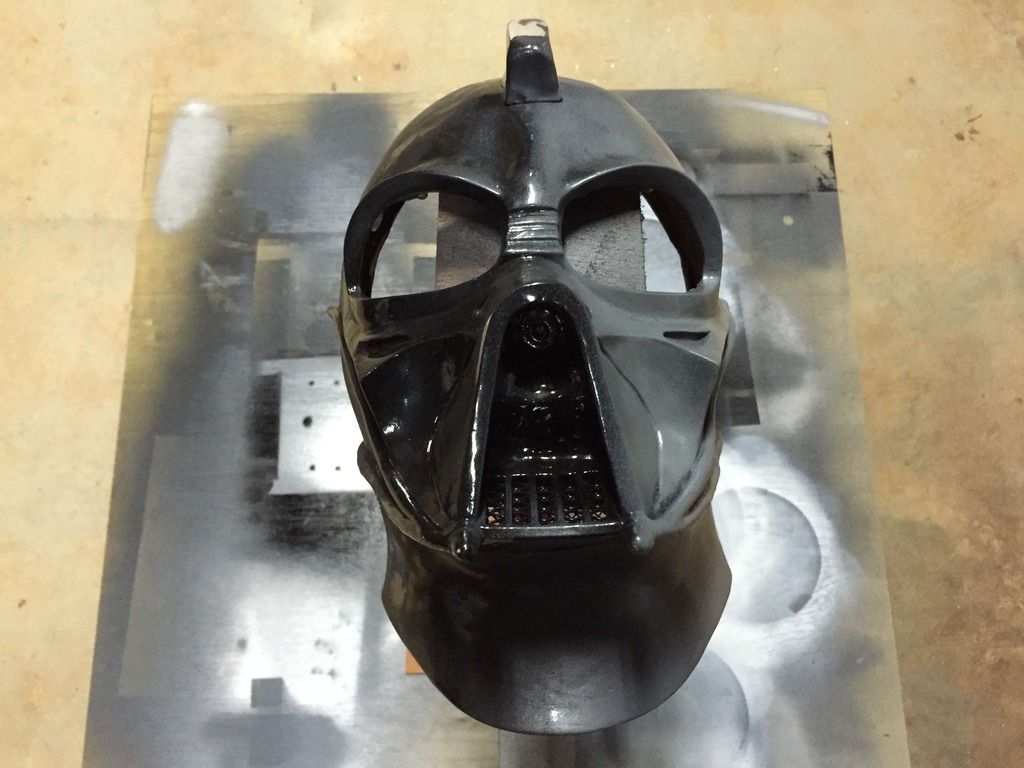
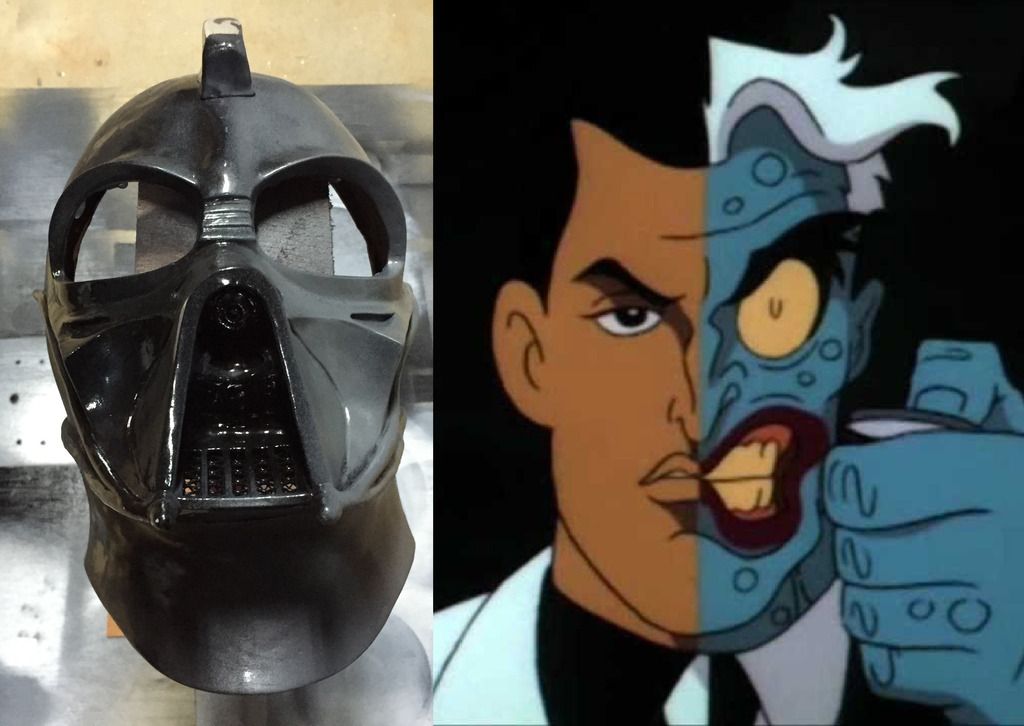
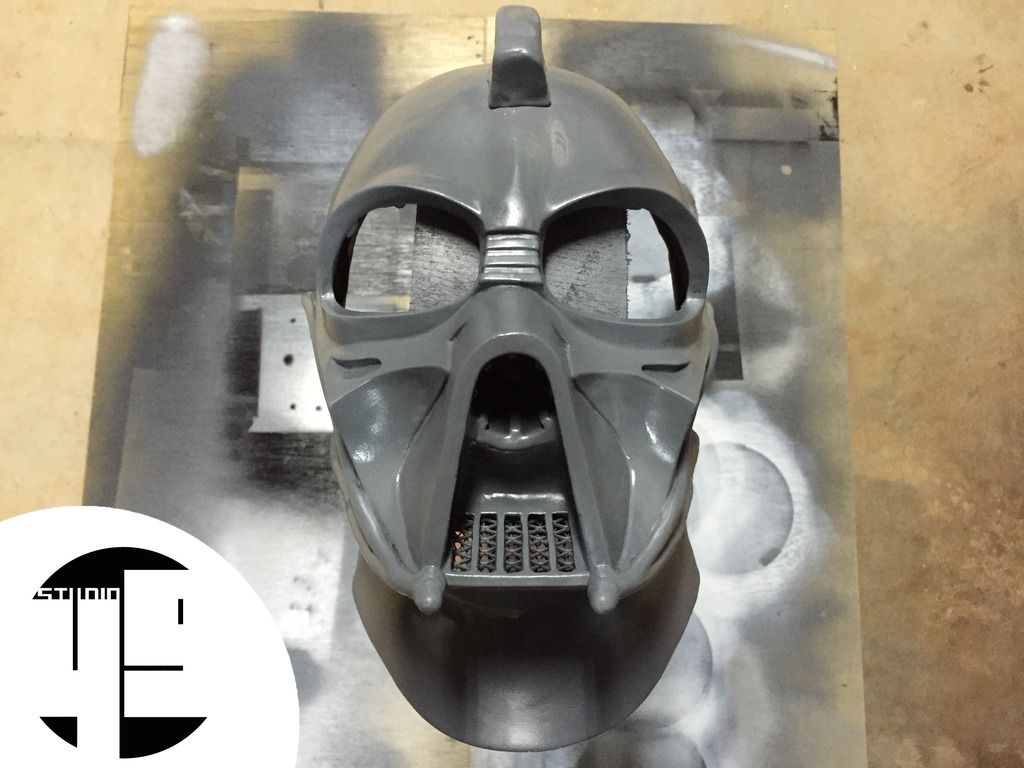
[Currently Restoring] --- Helmet --- JRX
[planned] --- Chest Armor --- Could try and build myself or purchase from Darth Stone
[planned] --- Elbow Guard --- I Would Scratch Build this Myself
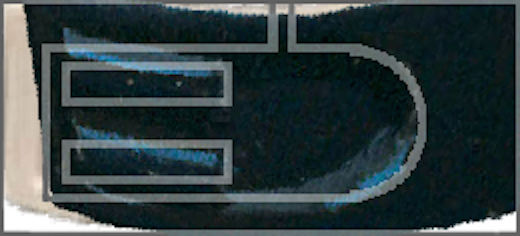
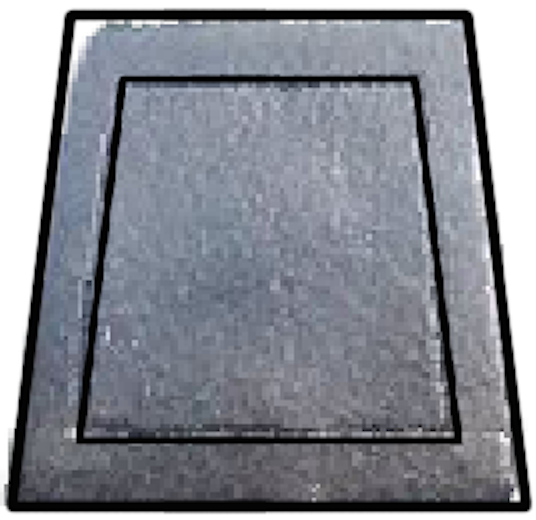
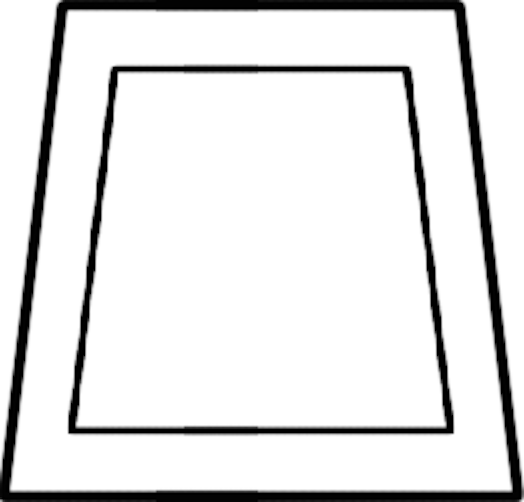
[3D Modelling Done] --- Chest box --- Modelling Currently
[planned] --- Belt --- Fleet Farm? --- Assembled by me
[planned] --- Belt Box and Pouch --- I Would Scratch Built this Myself
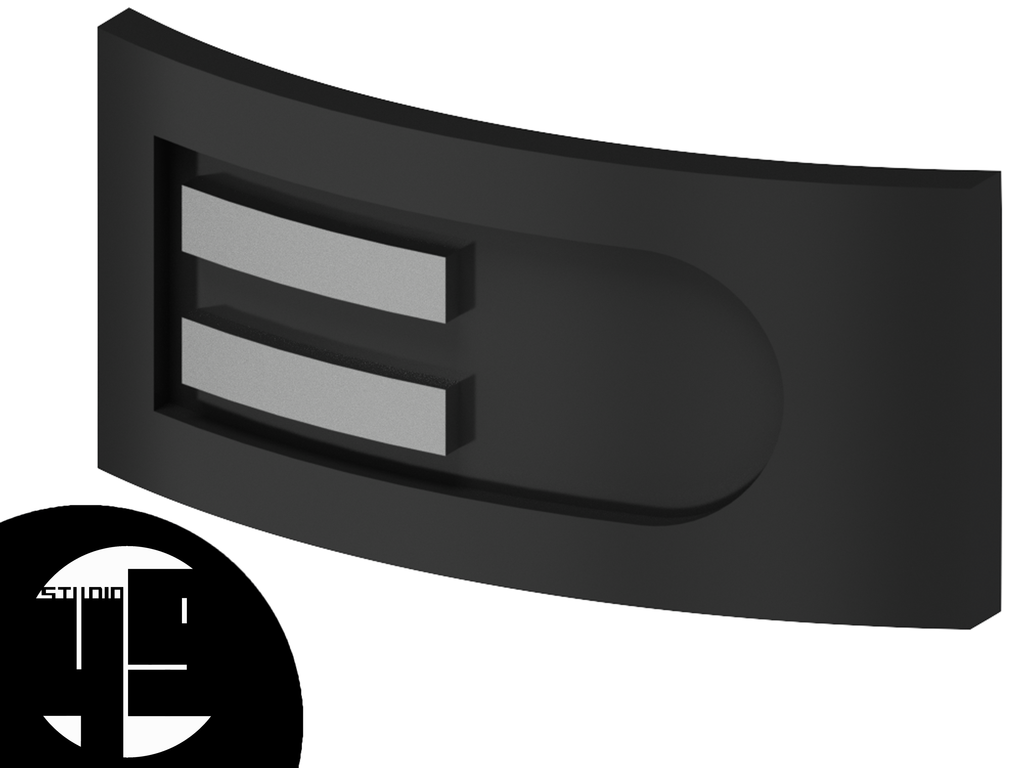
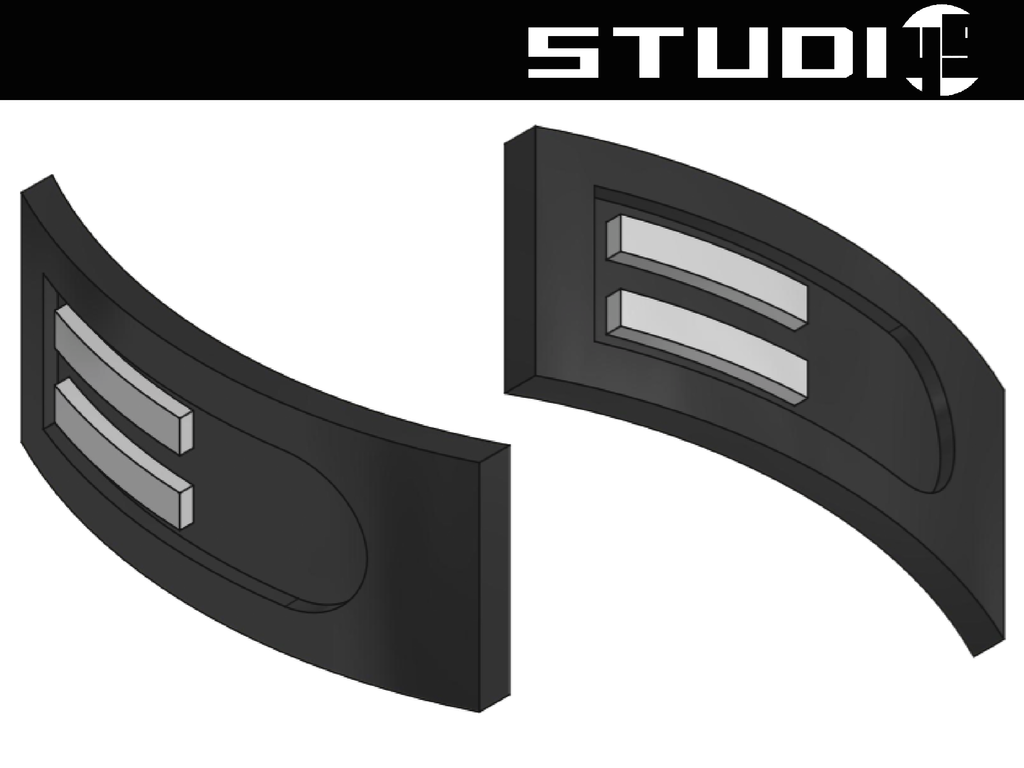
[3D Modelling Done] --- Belt Buckle --- Modelling Currently
[planned] --- Lightsaber Clasp (Hook) --- I Would Scratch Build this Myself
[planned] --- Cod Piece --- I Would Try and 3D Model this Myself
[planned] --- Shin Guards --- I Would Try and 3D Model this Myself
[Purchased for ROTJ] --- Boots --- Dublin Universal Tall Boots
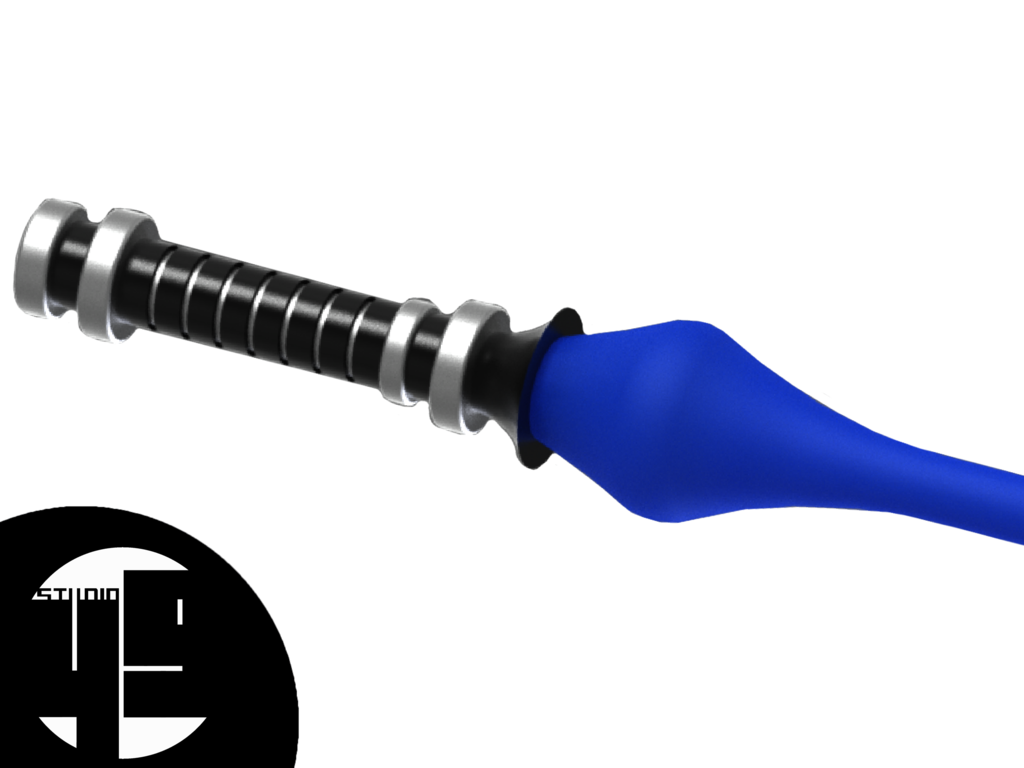
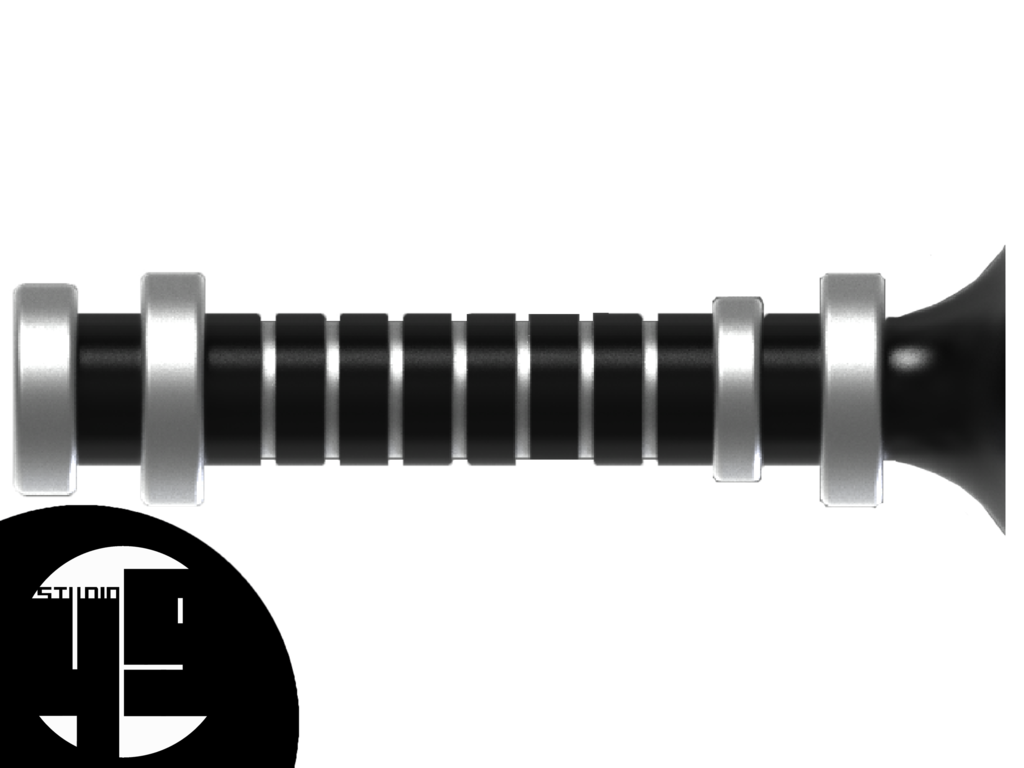
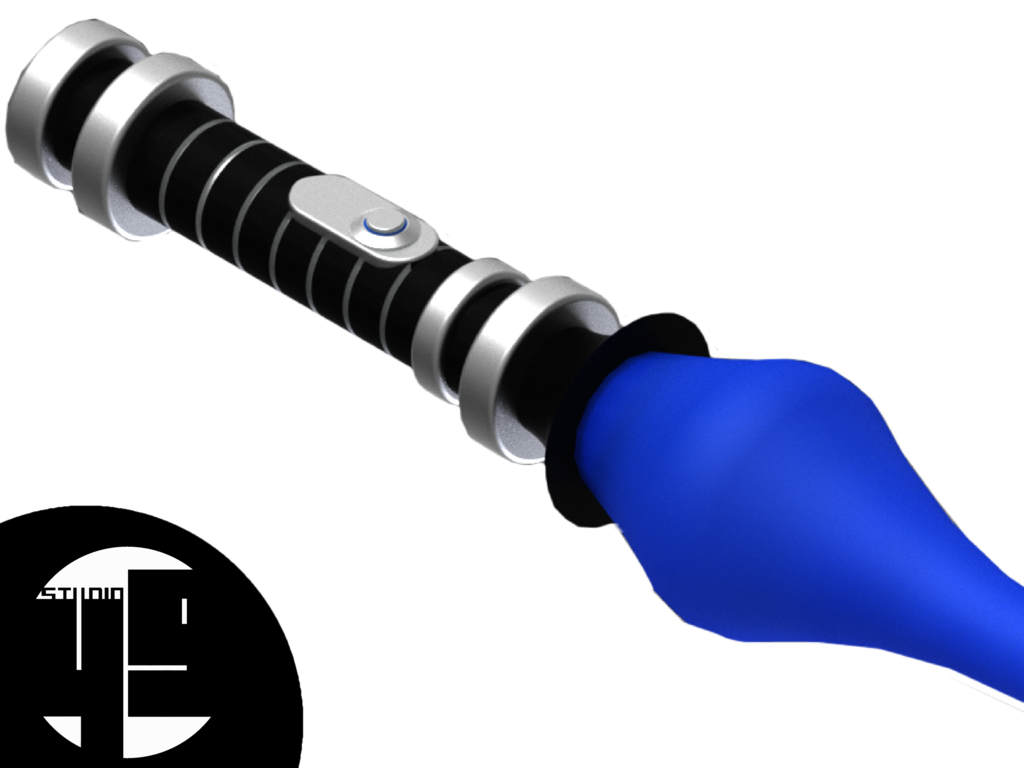
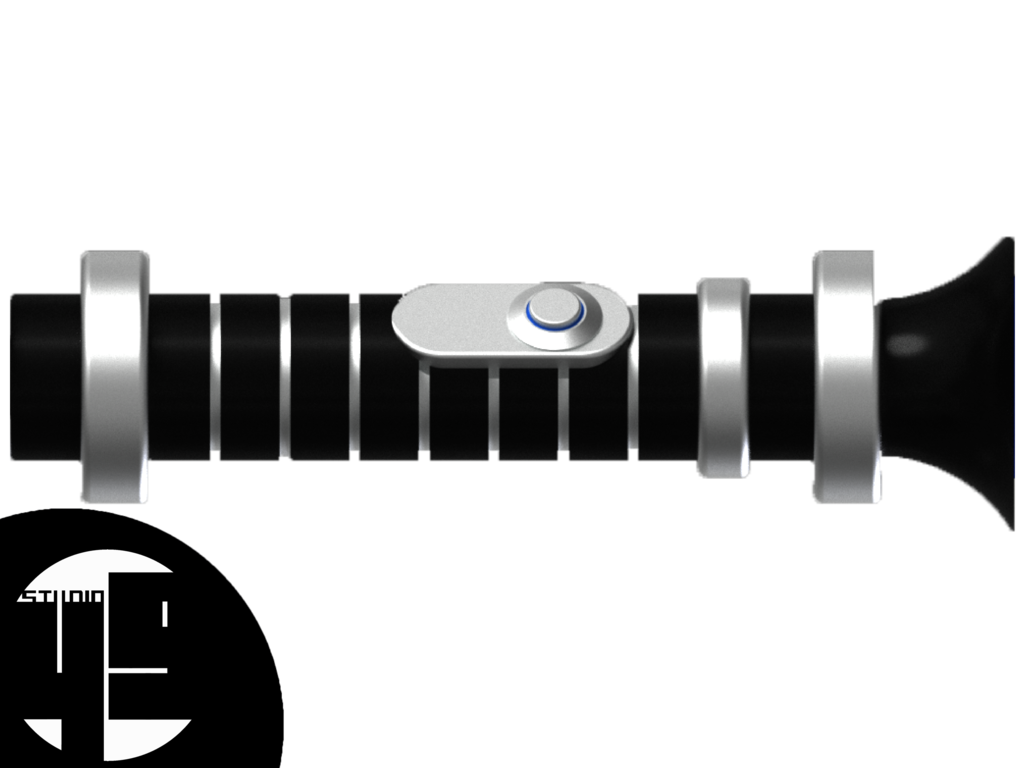
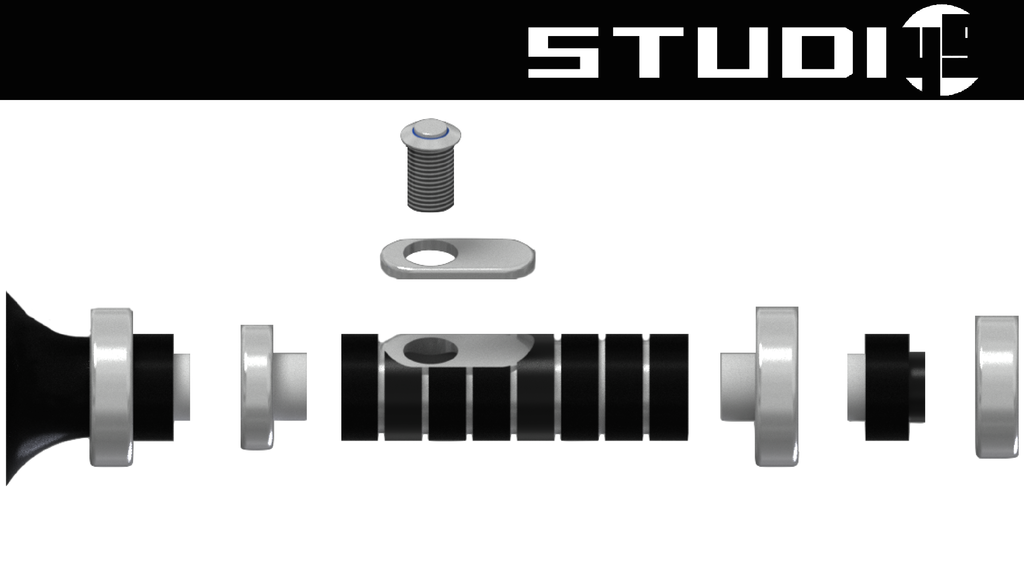
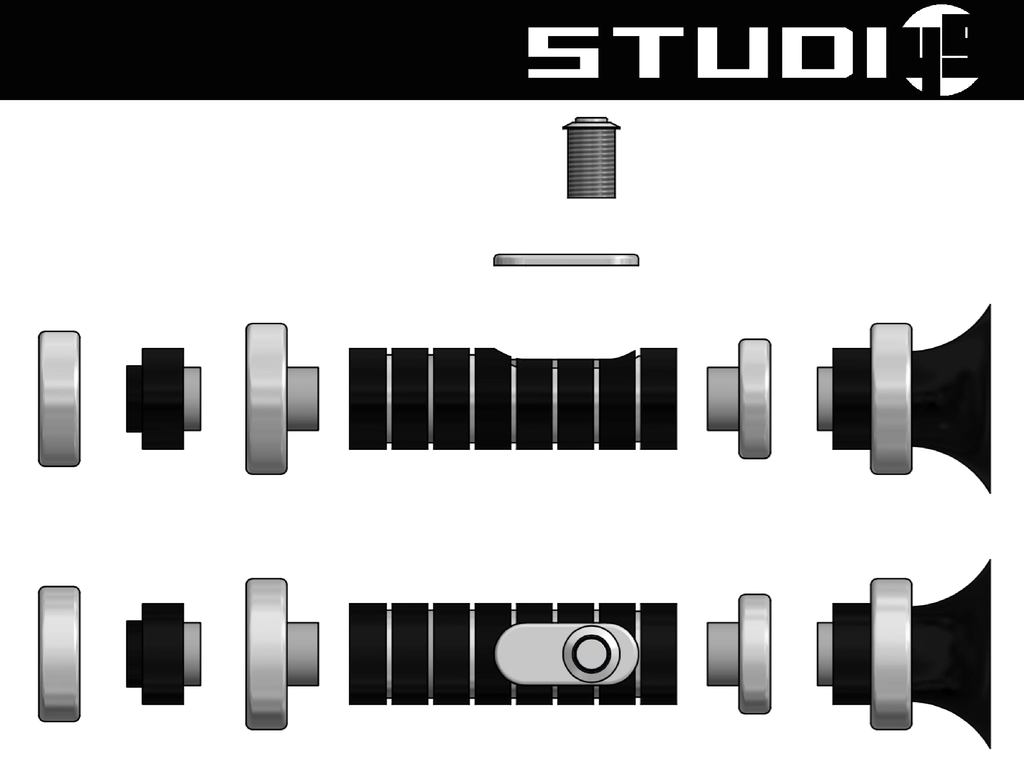
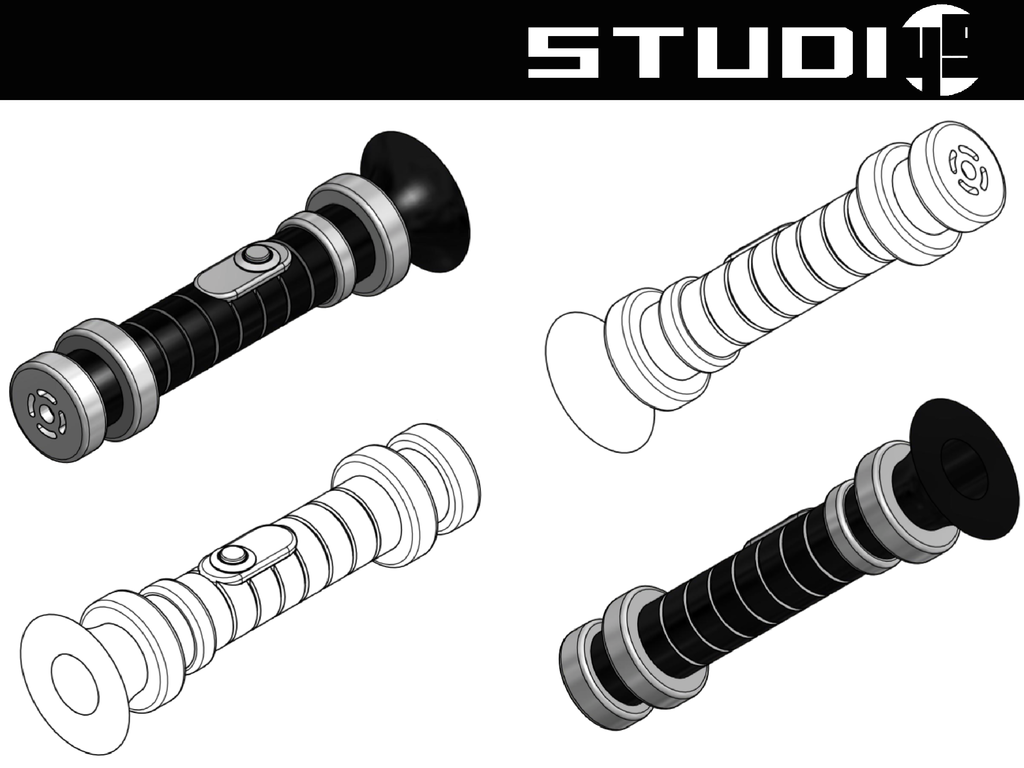
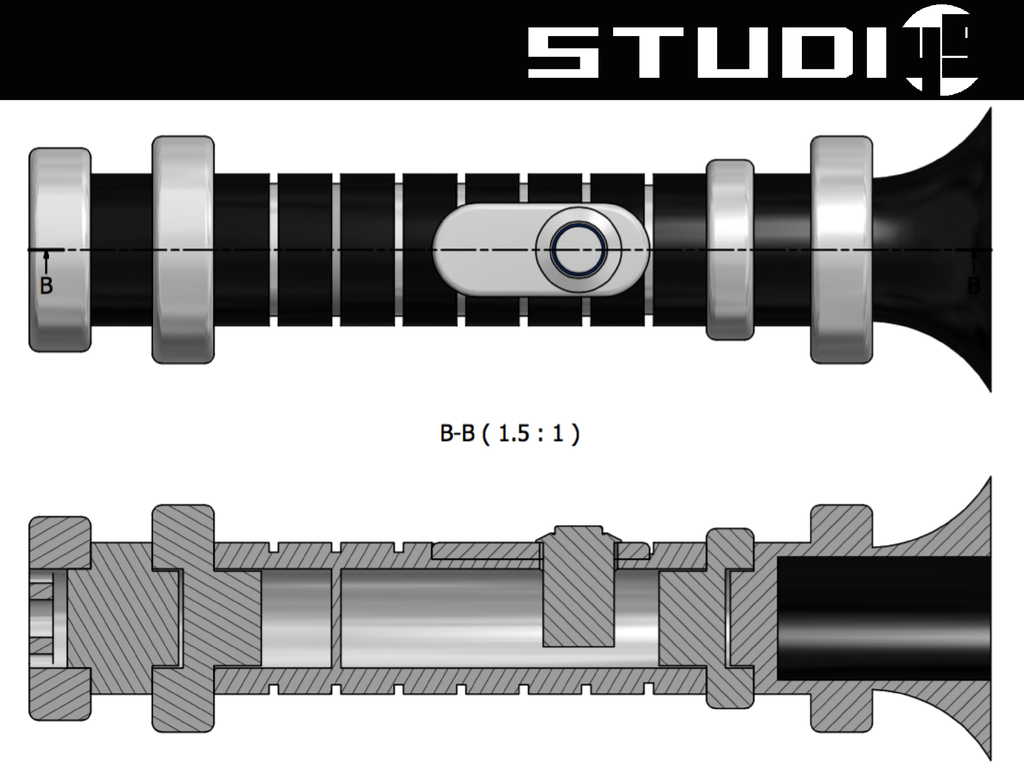
[3D Modelling Done] --- Lightsaber --- Modelling Currently
[planned] --- Blaster --- No idea


Soft Parts
[Purchased for ROTJ] --- Balaclava --- Reused from
[Purchasing for ROTJ] --- Bodysuit --- Custom Props 2 Piece OT Suit
[planned] --- Cape --- Don’t know
[Purchasing for ROTJ] --- Inner robe --- Custom Props Inner Robe
[planned] --- Gloves --- Don’t know
[planned] --- Blaster Holster/Pouch --- Don’t know


////////////////////////////////////////////////////////////////////////////////////////////////////////////

Ok so thats what I've got so far, there's no guarantee of this actually going very far, but I may as well have a crack at buying a helmet for a display next to my Ugly when it arrives and seeing where I can go from there, whether its 3D modelling/3D Printing or a complete scratch build.

Master_zpsl9ghqm0h.jpg
 
Last edited by a moderator:
Re: McQuarrie Vader WIP Scratch Build & Research (Studio 49)

​The following few posts are a compilation of the best photos of "official" sources I can find (Original Drawings, Kotobukiya & Sideshow collectables)

Helmet:
Master%202%20copy_zpsmzi5dt9w.jpg


Chest Armour
1_zpsglucuhpw.jpg


Elbow Guard
3_zpsjmtmjfq9.png


Chest box
4A_zpshx0447hb.png

4B_zpsohtzfu21.png


Belt Box + Pouch & Belt Buckle
5_zpssfistkh5.png


- - - Updated - - -

Cod Piece
6_zpswqa5sxjn.png


Shins and Boots
7A_zpsbfqaqigp.png

7B_zpsoagh6lzb.png


- - - Updated - - -

Lightsaber
1%202_zpsznkaqgr9.jpg


Blaster + Pouch
8A_zpsuohekx9r.png


- - - Updated - - -

Cape
10_zpsenzzj4qx.png
10_zpsenzzj4qx.png


Inner Robes
11A_zpsftf40vno.png

11B_zpsivpfkm2x.png


Gloves
12B_zpslgatb7ds.png

12A_zpspmedemtj.png
 
There's also a 3 3/4" action figure made . . . but I doubt how accurate it is when compared to that Kotobukiya statue :wacko

Chaim
 
Yeah I did see that but I don;t believe that it would be accurate enough for me to use as a source to get this Vader approved with the 501st Legion.
I will be posting a truckload more pictures and updates tomorrow morning so stay tuned!
 
Update 1:
This morning I decided to quickly whip up the first draft for a 3D model of the Lightsaber.
Now I had to improvise for the centre portion of the hilt as I have found zero references of that area.
Obviously I still have to model all the internals, the switch other minor things, Iv'e got the bulk of the external work done.

Anyway thats enough talking, here's a couple renders (just for fun I decided to try and make a blade reminiscent of the glowing in the original drawing)
1A_zpshzirfwqw.png


1B_zpsg2274dlp.png


Very rough mock up, this was as close as I could get it with a blurry picture with perspective verses a orthographic render:
1C_zpsltrew1jq.png
 
I just remembered that Sideshow released a Promo video for their McQuarrie statues so I had a look through and took screenshots of all the useful sketches and references and I looks like I found what they envisioned the hilt to look like as well.

Video Here:

Promo%201_zpstnh2ifd4.png


Promo%202_zpsj13fqhk0.png


Promo%203_zpswtnqjxjx.png


Promo%204_zpscbliydix.png


Promo%205_zpsbzri7r8n.png


Promo%206_zpsvrdvvter.png


Promo%207_zpsapuxdjx4.png


Promo%208_zpsoa1xwqb9.png


Promo%209_zpsp7rvrioj.png
 

Attachments

  • Promo%201_zpstnh2ifd4.png
    Promo%201_zpstnh2ifd4.png
    554.9 KB · Views: 98
  • Promo%202_zpsj13fqhk0.png
    Promo%202_zpsj13fqhk0.png
    405.6 KB · Views: 103
  • Promo%203_zpswtnqjxjx.png
    Promo%203_zpswtnqjxjx.png
    405.2 KB · Views: 157
  • Promo%204_zpscbliydix.png
    Promo%204_zpscbliydix.png
    228 KB · Views: 145
  • Promo%205_zpsbzri7r8n.png
    Promo%205_zpsbzri7r8n.png
    546.7 KB · Views: 114
  • Promo%206_zpsvrdvvter.png
    Promo%206_zpsvrdvvter.png
    359.7 KB · Views: 112
  • Promo%207_zpsapuxdjx4.png
    Promo%207_zpsapuxdjx4.png
    475.3 KB · Views: 123
  • Promo%208_zpsoa1xwqb9.png
    Promo%208_zpsoa1xwqb9.png
    499.6 KB · Views: 113
  • Promo%209_zpsp7rvrioj.png
    Promo%209_zpsp7rvrioj.png
    507.2 KB · Views: 106
Last edited by a moderator:
Re: McQuarrie Vader WIP Scratch Build & Research (Studio 49)

Update 2:
I started doing up some rough plans for Belt Buckle and Chestbox.


Belt Buckle
(Same height as ROTJ Belt Buckle)
1_zpsly2lc2ma.png


2_zpsqzh5dija.png


Chestbox
(Same Height, Widith and Depth as ROTJ Chestbox at this stage)
4_zpsen0ukcxs.png


5_zpstzw1jwzl.png


Lightsaber
I have now inserted a switch on the hilt, however the inside is quite small so I need to find a switch that would work well there
2A_zpsrja7s8kt.png


2B_zpsgl1a6jls.png
 
Update 3:
The 3D modelling is coming along nicely and have almost finished the Chestbox, Belt Buckle and Lightsaber
I have included dimensioned diagrams below in metric and imperial so anybody can read it easily

BELT BUCKLE
1A_zpsuxhc9fr6.png


1C_zpsicpiirmh.png
 
Update 4:
The 3D model for the lightsaber is now finished and ready for 3D printing, now I just need to wait until I have access to one.

3A_zps1p6ar0ai.png


3B_zpsipauopid.png


3C_zps3fm3pktq.png


3D_zpsffcrd5ys.png
 
Ok so I've been doing some thinking about parts that I can use for my ROTJ Vader and the McQuarrie Vader and this is what I've come up with thus far.

////////////////////////////////////////////////////////////////////////////////////////////////////////////////////////////////////////////////

[Purchased for ROTJ] --- Balaclava --- Reused from ---- Obviously this will work, but i shall include it here anyway!

////////////////////////////////////////////////////////////////////////////////////////////////////////////////////////////////////////////////

[Purchased for ROTJ] --- Boots --- Dublin Universal Tall Boots
No I don't see why these wouldn't work so I'm going to say that I have the boots sorted
7B_zpsoagh6lzb.png

7A_zpsbfqaqigp.png


////////////////////////////////////////////////////////////////////////////////////////////////////////////////////////////////////////////////

[I am Purchasing this for ROTJ anyway] --- Bodysuit --- Custom Props 2 Piece OT Suit
From what I am able to see on the reference pictures that I have collated I don't see anything to suggest I can't use my CP Bodysuit when it arrives, please feel free to correct me if you see differentley
9_zpsibflonmq.png


////////////////////////////////////////////////////////////////////////////////////////////////////////////////////////////////////////////////

[planned] --- Cape --- Don’t know
Now, this is a tough one for me. At this stage I just don't see it as being feasible to use the CP cape since the McQuarrie Cape looks to be mounted through the front of the armour in 2 separate spots and not by a chain
Promo%202_zpsj13fqhk0.png

Master_zpsl9ghqm0h.jpg


////////////////////////////////////////////////////////////////////////////////////////////////////////////////////////////////////////////////

[I am Purchasing this for ROTJ anyway] --- Inner robe --- Custom Props Inner Robe
The Inner aRobe also looks like It could be simulated with my CP ROTJ Robes when I get them, it looks to have the same kind of pleating as well.
11B_zpsivpfkm2x.png


////////////////////////////////////////////////////////////////////////////////////////////////////////////////////////////////////////////////

[planned] --- Blaster Holster/Pouch --- Don’t know
So these are the parts that I have absolutely no idea about.
I have no clue on what the blaster is or even if it is a real blaster design used in the movies.
But I think I might have a bit of an idea on what to do about the holster.
To me it looks to be a bit like the Leather Pouch used by TK's. Would any Stormtroopers like to chime in since I am no expert in that area.
Kinda like this one over on the FISD: http://www.whitearmor.net/forum/topic/16744-leather-e-11-holsters-35/
8A_zpsuohekx9r.png


7B_zpsoagh6lzb.png


7A_zpsbfqaqigp.png


9_zpsibflonmq.png


Promo%202_zpsj13fqhk0.png


Master_zpsl9ghqm0h.jpg


11B_zpsivpfkm2x.png


8A_zpsuohekx9r.png
 
Last edited by a moderator:
Then some feedback on my question in the previous post:

This is a it one to tackle. Let me toss out a couple of opinions on what I can see based on the reference. I wouldn't call these strongly held beliefs at this point, just what my eye is telling me.

Cape:
I think a CP cape could work with modification. The collar would likely have to be removed and then the cape would be gathered at the attach points on the armor. The neck should probably be widened. The hemline looks very graphic to me on the reference, so it's up to you how to handle that one.

Surcoat:
Agree CP should work. I don't really see pleats as much as just gathers. If you take the pleats out of the CP it should work fine.

Bodysuit:

I don't think a stock CP or FP would work here. This looks like 3/4" vertical ribs with a 1" space in between. The robs look padded and the spacing does not. You'd also want the horizontal large ribs above the knees. Maybe you can work with Claudio on doing a custom design for this?

Holster:
Doesn't look like a TK holster from here. I would think a Webley holster similar in shape to the Indiana Jones would look about right.

Sorry I can't be more help. I have a little research done on the concept Vader but Bossk has been my project for 6 months now.


Not sure if you got a response about the approval process and getting this costume approved. Really the process is that you finish a costume, submit the normal approval pictures with your reference materials and the LMO will approve the costume and Detachment Leader will finish the CRL for posting. Now my understanding is that you don't actually have to go through your local GML with this one. The person you want to get close to is LDR and stormtrooperguy/LMO.
smile.png


Unfortunately as you'd be the first, there is no bible/CRL etc. only opinions. I think the process you have been doing is great, develop the costume, post references, and when you're done, you can use those references as your backup for your costume "opinions/dissertation". I would PM LDR and make sure he's onboard with the process and in case he would advise anything different about the steps from what I listed above.

Keep up the great work. I don't disagree with any of the comments thxboy posted above.


I have been meaning to reply to this thread but it is hard from the phone.

Boots: Sounds good

Body Suit: Agree with Thx I don't think the ROTJ Vader suit is a good match.

Surcoat : Once again I agree with Thx a CP surcoat with out the pleats would work.

Holster: I looked at my figure and it does not look like a TK holster also I don't think it looks like Webley either more like a WW2 Luger minus the flap. A suggestion for the gun.

bv04227.jpg


From the Anime series Battleship Yamato or Harlocks Cosmo Dragoon. It would need some filling.

bv03907.jpg
 
Update 5:
Well well well did I receive a surprise in the mail today!
​I have just received my JRX Helmet!
It actually looks to be in even better condition than the photos suggested, a simple sand, fill and paint is all that's required.
I'm looking forward to getting down and dirty with this one and put my own stamp on it!
dance.gif
dance.gif
dance.gif

1A_zpssytzfngi.jpg


1C_zpspj1xefg9.jpg


1D_zpsopkyleg2.jpg


1E_zpshbfw1hw9.jpg


1F_zpsycltgpdn.jpg


1G_zpshnziobxu.jpg


1H_zpsueilsloa.jpg


1I_zpsmpbxykpk.jpg


1J_zpsnza1z1hr.jpg


1K_zpskqalbvwj.jpg


dance.gif


dance.gif


dance.gif


1A_zpssytzfngi.jpg


1C_zpspj1xefg9.jpg


1D_zpsopkyleg2.jpg


1E_zpshbfw1hw9.jpg


1F_zpsycltgpdn.jpg


1G_zpshnziobxu.jpg


1H_zpsueilsloa.jpg


1I_zpsmpbxykpk.jpg


1J_zpsnza1z1hr.jpg


1K_zpskqalbvwj.jpg
 
Last edited by a moderator:
I see . . . you could not resist to try it on immediately after arrival ... now could you? :lol

Chaim

Of course! What more would you expect from a Vader lovin guy!
It was a tad difficult seeing as there was no padding or hard liner in there, that's why I'm holding it up (and looking like the least threatening Vader ever in the process)!


Update 6:
So even before the end of the day I have made some progress on the Helmet. First of all I did a quick sand of the Lid and applied 2 coats of primer, this way I can see the imperfections more easily. The back of the lid is also a considerably asymmetrical. I should be able fix that though with filling and sanding in strategic areas. If in the end it is still a tad noticeable I will just say that "the OT helmet weren't symmetrical so why wouldn't this one be!"
tongue.png

So the next stage for the lid is plenty of filling, sanding and painting.
2_zps91uaug4h.jpg


I have also just prepped the face for sanding and priming by removing the eyes, velcro and knurled stud inside the nose.
So I have a question now regarding the eye for the helmet experts. The lenses that came with the helmet are lightly scratched and very difficult to see through (that is not from my breath fogging them, they are just very smudged and cannot be wiped to fix it) so I am going to buy a new set. The set that it came with installed were an amber colour and I will be installing black smoked lenses since they are more suitable and accurate to the reference material.
3A_zpsd5m8fkxg.jpg
 
Update 7:

So today I was able to give a quick sand to the face and spray a coat of primer. No I can see all the areas I need to work on. In sense much filling and sanding in my future.

Sanded and ready for paint:
4A_zpsygo0ned6.jpg


Example of the pock marks that I will be filling once primer is dry, easy fix for a nice finish
4B_zpsvwhcwsal.jpg


Applying Primer to face
4C_zps6vd3kupi.jpg


Looks a bit familiar if you ask me!
4D_zpsuzwckqw4.jpg


​First Primer coat freshly applied
4E_zpsido9neak.jpg
 

Your message may be considered spam for the following reasons:

If you wish to reply despite these issues, check the box below before replying.
Be aware that malicious compliance may result in more severe penalties.
Back
Top