Jedi Training Remote

Valor

Sr Member
RPF PREMIUM MEMBER
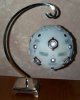
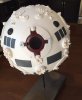
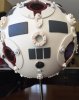
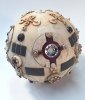
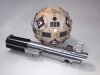
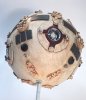
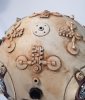
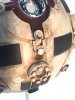
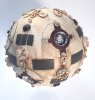
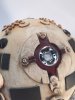
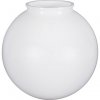
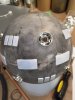
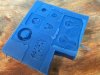
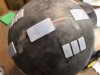
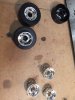
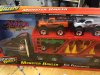
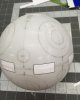
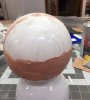
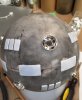
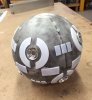
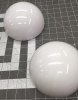
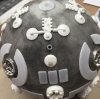
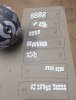
I'm actually scratch-building two of these. One for commission and one for myself. The plan is to build it as economically, yet accurately as possible. Which mostly means no actual kit parts. But I am striving to scratch build the various bits as near as I can from stuff in my shop. The main sphere is made from two 6" Acrylic light globes from Home Dept. I bought two and cut the bottom portion off and glued the two tops parts together for a perfect circle. I was able to scratch build most of the detail. The Chrome rims (that I believe come from a vintage Kenworth Semi truck model) were tricky to find. I ended up buying a cheap truck set from Walmart that had all the rims I needed. They are pretty close in style.

More soon ...
 

Attachments

  • 21q+vet6W3L.jpg
    21q+vet6W3L.jpg
    7.7 KB · Views: 126
  • IMG_4103.JPG
    IMG_4103.JPG
    179.1 KB · Views: 156
  • IMG_4102.JPG
    IMG_4102.JPG
    309.4 KB · Views: 167
  • IMG_4101.JPG
    IMG_4101.JPG
    407.9 KB · Views: 156
  • IMG_4100.JPG
    IMG_4100.JPG
    372.5 KB · Views: 163
  • IMG_4099.JPG
    IMG_4099.JPG
    237.4 KB · Views: 146
  • IMG_4098.JPG
    IMG_4098.JPG
    467.5 KB · Views: 325
  • IMG_4095.JPG
    IMG_4095.JPG
    262.7 KB · Views: 173
  • IMG_4096.JPG
    IMG_4096.JPG
    228.9 KB · Views: 146
  • IMG_4103.JPG
    IMG_4103.JPG
    347.3 KB · Views: 154
  • IMG_4104.JPG
    IMG_4104.JPG
    296.6 KB · Views: 261
  • IMG_4094.JPG
    IMG_4094.JPG
    321.8 KB · Views: 145
Casting all the bits and parts has been a major time-suck. But I now have enough to assemble two of these.
 

Attachments

  • IMG_4116B.jpg
    IMG_4116B.jpg
    496.6 KB · Views: 191
  • IMG_4114B.jpg
    IMG_4114B.jpg
    511.4 KB · Views: 120
Oh my God, I can't believe you casted all those pieces...but, of course, doing it that way makes your remote look outstanding. This looks very impressive.
 
Yeah, it is a ton of tiny pieces. In fairness, I've been cheating a bit. For the larger runs of pieces I've been using some clay to do push molds over the master. Here's 32 pieces all getting poured at once. You do loose a little of the fidelity using the clay, but for tiny pieces on a heavily weathered prop it will look just fine.
 

Attachments

  • IMG_4117.JPG
    IMG_4117.JPG
    127.4 KB · Views: 93
  • IMG_4118.JPG
    IMG_4118.JPG
    191.6 KB · Views: 103
Valor... you dirty dirty bird... looking gah damn great.

I keep eyeing some of my sons toys that I could take apart and use for project parts
 
Looking great so far. This is the RPF "can do" spirit in action. :thumbsup

The Training Remote is one of two items in my prop collection that I bought pre-made. (the MR version) II must not have been up to the challenge at that time, but it's obvious that you are. :)
 
Last edited:
That is looking really really nice.

Is there any way you can set those rims lower so that they don't stick out so far?

Also, if those rims are not permanently set in yet, you should place reflective material behind them before you do. It makes for a great affect when you use a flash to photograph it.
 
Yup, good call. I pulled the rims. They'll be more flush and have the reflector inside. Thanks for the push to do it right.
 
Last edited:
The rims are pulled again in this pic, but the base colors are down. The off white was a Rustoleum Heirloom white. The dark red is actually matte black primer with a hit of a metallic red. Just enough to add some dimension. It's tricky masking on such an irregular surface. But, I'm not letting any places where paint snuck under the tape bother me knowing I'll be weathering it. I'm off the to store to find reflective tape.
 

Attachments

  • IMG_4145.JPG
    IMG_4145.JPG
    744.7 KB · Views: 92
  • IMG_4147.JPG
    IMG_4147.JPG
    826.3 KB · Views: 103
All finished. Weathering was a blast. The entire thing really grabbed the look of the original with a couple washes. There's reflective tape int e proper holes now. It is neat how it shines with a flash. I have parts to make one more. Not sure if I'll sell off the parts or build one up for sale.
 

Attachments

  • FIMG_4168-1.jpg
    FIMG_4168-1.jpg
    428.8 KB · Views: 108
  • FIMG_4164.jpg
    FIMG_4164.jpg
    181.7 KB · Views: 116
  • FIMG_4159-1.jpg
    FIMG_4159-1.jpg
    434.2 KB · Views: 92
  • FIMG_4157-1.jpg
    FIMG_4157-1.jpg
    491.2 KB · Views: 116
  • FIMG_4156-1.jpg
    FIMG_4156-1.jpg
    362.1 KB · Views: 96
  • FIMG_4155.jpg
    FIMG_4155.jpg
    326.8 KB · Views: 109
  • FIMG_4170-1.jpg
    FIMG_4170-1.jpg
    534.1 KB · Views: 88
All finished. Weathering was a blast. The entire thing really grabbed the look of the original with a couple washes. There's reflective tape int e proper holes now. It is neat how it shines with a flash. I have parts to make one more. Not sure if I'll sell off the parts or build one up for sale.


Wow!!!!!!!!!!!!!!!!!!!!!!!!!!!!!!!!!!!!!!!!!!

That came out awesome??????????????????????

When is the run?? :) :)
 
This thread is more than 8 years old.

Your message may be considered spam for the following reasons:

  1. This thread hasn't been active in some time. A new post in this thread might not contribute constructively to this discussion after so long.
If you wish to reply despite these issues, check the box below before replying.
Be aware that malicious compliance may result in more severe penalties.
Back
Top