[FINISHED ]Bandai Y-Wing - Red Jammer

Re: Bandai Y-Wing - Red Jammer WIP [UPDATED with Blue Leader Pics]

The one thing I noticed when I saw the red jammer at the exhibit is that yes, the paint is red, but it looked as if there was a layer of dust on it

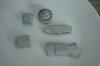
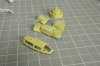
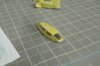
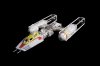
Yeah, it's hard to tell under 40 years of dust! And for that very reason, I went a bit darker with mine. Mixed red, yellow, light gray, and black. Turned out a bit dark, but I'm going to shoot the model with a very thinned down version of the base coat when everything is done, just to help unify everything. The photos make it look darker than it actually is.

P1120839.JPG

P1120841.JPG

Hope to get some more building done tomorrow!

SB
 
Re: Bandai Y-Wing - Red Jammer WIP [UPDATED with Blue Leader Pics]

Small update: I had some time this afternoon so I masked off all of the parts that needed to be yellow, like the canopy, and the front end of the engine. I used liquid mask for these parts, and I really like how it turned out (although there is salt in the first pic, it fell off before painting because I accidentally touched it whilst taping it to the cardboard backing). The yellow is about 7 parts white to 3 parts yellow. It'll get some more weathering, don't you worry.

P1120843.jpg

P1120854.jpg

P1120855.jpg


Then I fit the head together with the red markings, and laid the canopy on top just to see...

P1120851.JPG

I'm liking how it's coming so far, and then I moved onto the bottom side...

...and I about had a heart attack. You see, there is a little piece that acts as the landing gear cover that I had carefully set aside on a piece of blue tape, thinking to myself, "This sucker ain't going ANYwhere." Well, the iPad that I look at reference on was standing on the table and leaning against the wall. Well, it was at too steep of an angle, and the iPad fell over, scattering all of the little pieces onto the floor. I managed to scrounge around and find everything except for that darned landing gear cover. It's tiny. Anyway, after about 15 minutes of solid looking, I picked up the garbage, and started sifting through...

P1120845.jpg
Does anyone see it?


...


...


...


I'll give you a hint:
P1120845_Circle.jpg

I FOUND IT!!!!!! Right there in the trash, still stuck to the piece of blue tape.

So after the rescue mission, I needed to figure out how to secure the hatch solidly enough to stick, but still be able to be handled without falling off. This is where some amazing neodymium magnets come into play. These suckers are small (The ones I'm using here are 1/10" in diameter and 1/32" thick) , and strong. So I glued one into the space where the landing gear goes, and one onto the tip of the hatch, and it sticks beautifully, even though the magnets aren't touching.

P1120852.jpg

P1120850.jpg

And the best part is, that the landing gear still fits into the slot perfectly. No trimming needed or nuthin'. Worked like a charm.

That's all for now!

SB
 

Attachments

  • P1120843.JPG
    P1120843.JPG
    3.7 MB · Views: 108
  • P1120854.JPG
    P1120854.JPG
    4.5 MB · Views: 81
  • P1120855.JPG
    P1120855.JPG
    4.6 MB · Views: 118
Last edited:
Re: Bandai Y-Wing - Red Jammer WIP [UPDATED with Blue Leader Pics]

Small update: Started putting the body together, and I'm really enjoying it. This kit goes together really well!

P1120858.JPG
This is where I left off last night.

P1120860.JPG
Some of these pieces are itty-bitty!

P1120861.JPG

P1120862.JPG

Next up is the pipes on the body, which I'm not really looking forward to.

Anyway, that's all for today!

SB
 
Re: Bandai Y-Wing - Red Jammer WIP [UPDATED with Blue Leader Pics]

Be very careful with the pipes on the body; somebody else snapped a few trying to fit them on there. Maybe have some wire or stretched sprue handy.


-MJ
 
Re: Bandai Y-Wing - Red Jammer WIP [UPDATED with Blue Leader Pics]

Be very careful with the pipes on the body; somebody else snapped a few trying to fit them on there. Maybe have some wire or stretched sprue handy.


-MJ

Yes, I indeed found out that these babies are tiny, and will break if not applied carefully, fiddly little buggers! Finally finished adding the pipes to the body, and now I think I'm cross-eyed haha.

P1120869.jpg

P1120865.jpg

P1120866.jpg

P1120867.jpg

P1120864.jpg

Moving onto the engines next.

SB
 
Re: Bandai Y-Wing - Red Jammer WIP [UPDATED with Blue Leader Pics]

Woah. Turns out having a kid turns things into a time warp. This model has sat on the shelf gnawing at my brain for the last year-plus, and since that time I've stripped the paint several times because I wasn't happy with it. Also finished my basement so that I could have a dedicated hobby room, etc...

SO.

I basically started back at zero on this guy, which gave me a good opportunity to start over with Tamiya acrylic paints. So for the base coat of the body I sprayed AS-20, which is Insignia white. The red markings on the head are just straight up Tamiya red with Winsor & Newton chipping fluid to get the chips underneath. The salt just wasn't doing the chips in-scale, and I wasn't happy with them. The copper on the pipes (I know not all the pipes on Red Jammer were copper, so shoot me) is mixed with a bit of flat black to make them a bit more grungy looking.

red marking chipping.jpg

canopy chipping.jpg

copper pipes.jpg

After these photos were taken, I assembled the engines onto the body, hit it with three coats of PFM, and then let that sit overnight. Today I started applying decals as well as some basic weathering. It's hard to not be too heavy-handed with these small ships, but I think subtlety is the key here.

Also, has anyone ever heard of weathering with watercolor paints? I tried it for the slightly brown-ish looking wash on the right nacelle, and it came out better than I thought it would.

More pics tomorrow.

SB
 
Re: Bandai Y-Wing - Red Jammer WIP [UPDATED with Blue Leader Pics]

I've heard of weathering with water colors but I've never tried it. I think I'm going to try chalk pastels on my next project.
 
Re: Bandai Y-Wing - Red Jammer WIP [UPDATED with Blue Leader Pics]

Here are some more pics from where I left off last night. Forgot to snap the canopy down before I shot these, but such is life.

You can see the watercolor brown-ish wash on the right nacelle in this pic.
IMG_9226_small.jpg

KK8A0026.jpg

KK8A0030.jpg

KK8A0028.jpg

KK8A0027.jpg

KK8A0031.jpg

KK8A0029.jpg


Today it's more decals and then sealing them with a few coats of PFM. Also, just remember that this isn't strictly accurate to the Red Jammer studio model. I just loved the red and yellow color combination on that bird, so I thought I'd do an interpretation of it myself.

Thanks for looking.

SB
 
Re: Bandai Y-Wing - Red Jammer WIP [UPDATED with Blue Leader Pics]

I recently experimented doing the "oil dot filter technique" with Vallejo Model Color instead. I simply used like 3 drops of Retarder Medium with one or two drops of paint. Suddenly, the acrylics behaved like oils. It worked great.
 
Re: Bandai Y-Wing - Red Jammer WIP [UPDATED 12/30/2016]

Relatively on topic: I shot some LEGO models that my brother made today, and to test the backdrop/lighting setup/camera settings, I used my model:

camera test.jpg

And here are a few shots of his LEGO models, if anyone's interested:

IMG_4203.jpg

IMG_4217.jpg

IMG_4149.jpg

IMG_4190.jpg

SB
 
Re: Bandai Y-Wing - Red Jammer WIP [UPDATED 12/30/2016]

Looks great so far!

As far as watercolor washes, I haven't tried them simply because being water soluble, I would be afraid of it running when apply acrylic washes or even a sealant. I could be wrong though

I typically stick with oil washes/filters to achieve the same effect. I just thin the oils down with Weber Oderless Turpenoid

I also use acrylic washes. It helps to use something like rubbing alcohol to thin or, or to add just a touch of dish washing liquid if using water to thin it to help break the surface tension and avoid those "rings" when it dries
 
Love it, great subject and markings choice.

Did think it reminded me a little of Ronald McDonald with those colors! Respect, not a criticism.

Sent from my SM-G900V using Tapatalk
 
This thread is more than 7 years old.

Your message may be considered spam for the following reasons:

  1. This thread hasn't been active in some time. A new post in this thread might not contribute constructively to this discussion after so long.
If you wish to reply despite these issues, check the box below before replying.
Be aware that malicious compliance may result in more severe penalties.
Back
Top