Another Tie Fighter Pilot Costume

Nick K

Sr Member
RPF PREMIUM MEMBER
Hello again, and welcome to my latest creation. This time it is something to wear to Gala's and other events so I won't feel left out. I have always liked the Tie Pilot gear. They look a little menacing and the helmet itself looks a bit like an insects head from the side profile. COOL. So I asked Blaxmyth if he had a pep file for the X-wing helmet and he produced one which I duly made, but found that it was too big, so he resized it and that one was much better. As I didn't want to spend a lot of money on everything, I decided to make what I could, by hand.
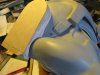
After cutting out the pieces and gluing them all together, I took it round to him and we put it against a real helicopter helmet and its sizing was pretty spot on. I applied some resin to the inside along with fibreglass cloth and more resin to the outside. Once this was left to cure for a few days, I trimmed off the excess bits around the edges and cleaned them up, so I could handle it without getting punctured by stray glass strands.Ouch!
Before I continue though, I was wondering if anyone out there, who has a Tie Pilot Helmet, could measure the width, height and thickness of the ears, so I can carve them out of MDF? Would be much appreciated. Thanks.


IMG_1723.JPG IMG_1722.JPG IMG_2065.JPG IMG_2071.JPG
 
That looks really good for an X-wing pilot helmet! Looking good so far.

However, the TIE pilot helmet is wider than the X-wing pilots' helmets.
The helmet shells in the movies were two parts of vacuformed plastic: left and right that were joined in the middle with a single flat strip of plastic over the mohawk. This mohawk is much wider on the TIE pilots' helmets than on the X-wing pilots' helmets.
The reason why it is widers is because the width of the Stormtrooper face plate that has to fit in there. The mohawk cap in the front is also different.

Polyester resin should adhere well to itself if you clean the surface with acetone before laying on more. But why not make both costumes? I think the X-wing pilot is, while not considered as "cool" as when showing your face, the X-wing pilot is more recognized and will stand out among a few imps.
The boots and gauntlets for both costumes are the same. The flight suits and comm pads are the same except for the colour / paintjob.
 
Pockets on flight suits are different.
TIE is missing the lower leg pockets and pocket flaps are chevron, where the X-Wing is flat.
 
I'm sorry, I should maybe have been more specific. That is true for most suits in ESB and ROTJ but in ANH all Rebel and Empire flight suits were of the same pattern: with rectangular pocket flaps and three pockets per leg.

The revision of the flight suit with chevron pocket flaps appeared first in ESB and is worn by Imperials in ESB and ROTJ. One black ANH-style flight suit with rectangular pocket flaps has been spotted in a production image from ROTJ though.
I would speculate that why don't see Rebels with suits of the second revision in ESB or ROTJ is because there were many left-over suits from ANH. There were many more Rebels in orange or grey suits in ANH than there were Imperials - enough suits for all Rebel pilots and techs in ESB. There were also new types of Rebel pilots in ROTJ but they got suits of completely different patterns.

The most common suits to buy are Mon Cal (Faraway Creations), Mr Bojangles (Wampa Wear) and Cosplaysky.
Mon Cal's suit is closer to the ANH version but has the chevron in the neck like the Imperial ESB/ROTJ version. I once got an orange and a black one and had to do some mods on each to make them into the ANH and Imperial ESB version respectively. Wampa Wear's flight suit is the ANH version. Cosplaysky's suit is the ESB/ROTj Imperial version and in a lighter fabric which is more accurate but may be less durable for costuming.
So... if you are doing a ANH-style costume and/or getting Mon Cal's flight suit then the difference is the colour only. ;)
 
Thanks for the input, which is greatly appreciated, but wait, there is more to come. As Darth Lars says, the helmet is wider, but I wanted to sand and fill the helmet as it is, so that I can handle it better. Mods will be show in up coming posts. As you can see in the pics, I have applied filler to the helmet and started sanding it to a smooth finish. I didn't apply any to the top of the mohawk because I will be cutting it down the middle using the pep fold lines as a guide. Ah ha.

IMG_2130.JPG IMG_2131.JPG IMG_2134.JPG
 
Last edited:
And as you are discussing the flight suit, I already have mine as well as boots. The gloves in the pic aren't the proper ones, but I had them lying round, so I put them on to get the effect. And before you say it, yes I am a bit on the short side,BUT, at least my helmet wont get knocked about as much.:lol
IMG_0592.JPG
 
Last edited:
The next step was to fill and sand, fill and sand again until I was happy with the finish. I also carefully used my Wen Mini Tool to score the parting line down the mohawk. Then I sprayed the whole thing with black primer to seal the filler and see any imperfections.

IMG_2143.JPG IMG_2146.JPG IMG_2147.JPG IMG_2148.JPG
 
Once this had dried, I sanded it down with wet 'n' dry sandpaper and then parted the two halves. I then made a cardboard template for the detail missing from the top of the ear and then I cut it out of some plastic sheet which now made the whole thing look more 'real'. I bent the plastic to shape and glued it in position.


IMG_2162.JPG IMG_2164.JPG IMG_2165.JPG IMG_2175.JPG
 
Last edited:
Next, I applied grey primer to the two halves and the face plate and then sanded them smooth.I then cut to size a strip of black styrene 82mm wide and then using Epoxy Super Strength glue, I screwed it down to the mohawk halves with surefast coarse screws and allowed this to dry for 2 days. After that, I dry fitted the face plate in to see what it would look like. I noticed that I would have to trim away a wedge shape piece of plastic from the back edge of each ' jowl ', on each side, to make it fit better.

IMG_2229.JPG IMG_2231.JPG IMG_2242.JPG IMG_2245.JPG IMG_2268.JPG
 
Last edited:
I replicated the original oxygen strap mounts, by making them out of thin MDF, shaping, sanding and gluing them into position on either side of the helmet. Next I had to increase the height of the forehead on the face-plate because when viewed from the front, there would have been a large gap inside because of the size of the mohawk, so I measured the width and height needed and glued it in the center of the face-plate. I then cut another piece of plastic and laminated this on top of the first to flush it all with the vac-formed shell.

IMG_2249.JPG IMG_2254.JPG IMG_2255.JPG
 
So. Here are some more pics of the build. Building up the front of the mowhawk and adding the tapered piece to the top. Plus, when I made the front divider, I realized that it was too short on top, so added another small piece of MDF to it and it looks a lot better.


IMG_2265.JPG IMG_2266.JPG IMG_2267.JPG IMG_2270.JPG IMG_2282.JPG IMG_2283.JPG IMG_2287.JPG IMG_2294.JPG IMG_2272.JPG
 
Step by Step pics of how I went about making the ears. I hope the pictures help to explain how I went about doing it. If there are any questions, then please feel free to ask them, and I will endeavor to answer them to the best of my ability. The main thing I was worried about was forming the profile of the helmet to the back of the ear, so I decided to use oil as a release agent on the helmet and when the ear was placed into position, I applied pressure and the filler oozed out slightly so that I could trim the excess off when it was dry. Worked a treat. I removed the oil later with paint thinners.
IMG_2296.JPG IMG_2307.JPG IMG_2310.JPG IMG_2313.JPG IMG_2315.JPG IMG_2319.JPG IMG_2377.JPG IMG_2382.JPG
 

Attachments

  • IMG_2311.JPG
    IMG_2311.JPG
    2.5 MB · Views: 69
While working on my costume, I need to know a few things about the sizes,shapes etc for the shoulder straps and bits, and was wondering if anyone could help. I know some of the bits are Storm Trooper, but how were they fastened to the shoulders? I've been on the 501st site, but mostly ST stuff there. Thanks.
 
Well, I've been busy trying to get this finished. Here is where I am up to at the moment. Once I applied the first coat of black and let it dry, I could see where the imperfections were, so I sprayed sanding primer on the areas, let it dry and sanded this. Worked well as a filler. I then applied the final coat and it looks great. Needs a cut and polish, but I am pleased with the end result.

IMG_2446.JPG IMG_2456.JPG IMG_2457.JPG IMG_2475.JPG IMG_2474.JPG
 
This thread is more than 8 years old.

Your message may be considered spam for the following reasons:

  1. This thread hasn't been active in some time. A new post in this thread might not contribute constructively to this discussion after so long.
If you wish to reply despite these issues, check the box below before replying.
Be aware that malicious compliance may result in more severe penalties.
Back
Top