Scratch Building Part of DeAg MF

Darwonka

New Member
I understand that asking this question of this community is like using a flamethrower to roast marshmallows..
(Since I'm really new to the hobby, I lurk like a creeper because I bring nothing to the table)

Scratch Building with Styrene.

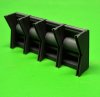
I am recreating the bulkhead, opposite the "Navigation Computer" wall in the DeAgostini Millennium Falcon. I've gotten quite a few pieces from Shapeways previously, but I wanted to actually "create" something myself so I can expand my skill-set by doing something I've never done before.

What's needed, and what is completely screwing me up, is creating 5 matched pillars/ribs with a bit of an angle at the top and bottom.
The issue is: I can't for the life of me seem to be able to work the (rather thick) styrene effectively enough to make two identical ribs-let alone 5.

Now, mind you, I'm not looking for perfection. I'm looking for a similar curve and similar height. (With a flat cut edge!)

What I've tried:
Cutting with fresh blades. (scoring as much as possible then snapping-as I said, the styrene is pretty thick)
Angle Cutter (Not very good a "cutting", it scores part of the plastic well although)
Milling the parts with the Dremel
Sanding cut pieces to try to match (using: files, sanding sticks and/or flat sanding block)


I'm frustrated because I've got everything else/done for this part, or at least, figured out-It's just these darn upright ribs that are killing the build for me.


Anyone got any sage advice?


I'm grateful for the community!


Cheers!


- Dickie
 

Attachments

  • interior11_zpsvi5f9fb5.jpg
    interior11_zpsvi5f9fb5.jpg
    418.9 KB · Views: 150
I would try to rough-cut the parts with 1mm margin, then clamp them together and use files to give them the final shape. If you clam them together strong enough, this will give you 5 identical pieces.

Nice to see someone coming from 3D-printing and doing some scratch building. It may not be as precise, but it is much more fun to do than waiting on the postman and cleaning up the prints.

Thorsten
 
Given the thickness of the pieces, I've attempted to do just that. Unfortunately, I can only manage two at once-then using one of the two as master for the following one....

I'll give your suggestion another shot. Thank you for the kind words. I really want something in this part build to be "mine".

Thank you!

-Dickie
 
Holly Hannah!

That's a steely-eyed nitro-burning cutting machine!

That, I'm sure, would fit the bill.
Although I've found that murder, when it comes to this hobby, is very rare-I'm positive my wife would devolve into sending me to "sleeping on the couch jail".

Thank you!
 
Hi Dickie

I'm certainly no expert and like your self been a fan of Shapeways or modeling in 3D and then ordering but I'm also impatient waiting on then
post man and trying to up skill. Something I'm working on at the moment has required thicker styrene and I found clamping thinner sheets together then bonding them was easier to work then trying with the tools I had and the thicker stuff, more cutting but a I'm a lot happier with the results so far :)

Andy
 
Doing a cost benefit analysis and that may be what I do, Andy.

That or hunting down some HO scale bridge pieces-which will defeat the "feel good" purpose.

Thank you!
 
HI Darwonkia, for this stuff I used to cut up one in cardboard first then use it as a template. I swap out the drill bit for a pin and then score around the styrene around the cardboard template. Go over it 20 times and you'll have a nice groove to guide your xacto knife. Lately, though, I've been a fan of printing the pattern on paper (print 5 pieces in your case) and spray-glue (repositionable glue) them onto the stryene sheet then just break out the ruler and xacto to cut them out.
 
Funny enough may want to build the same part in the not too distant future (2020 at my current build and learning rate lol) where did the picture of the bulk head come from? There's some nice square U shaped styrene available so may come in handy :)
 
I found it by doing a Google image search for this and that....

You're right: U shaped, an H shaped piece, a large half circle, a small circular and an even smaller circular piece of styrene can be seen at the top.
 
I hope I understood you correctly, is this just about cutting flat styrene parts? Take the sheet, get a mechanical pencil and ruler and draw the 5 pieces onto the sheet. Then take a somewhat older exacto or some other modelling scalpel knife, preferably with a short blade (more stable). Place the (preferably metal) ruler precisely along the drawn line and run the scalpel´s tip along the ruler, but with the cutting edge facing upwards (when you do this with the cutting edge facing down the knife is more likely to slip away from the ruler). Don´t apply too much pressure, you have to run the blade along the line many times, each time deepening the crack just a bit. It will take some time, depending on the thickness of your sheet, but it works fine for me up to 2mm thickness. Afterwards, you´ll have to sand the edges.
The more precise you are during each step (drawing, placing the ruler the same way each time, like on or behind the line, ...), the more precise and similar your parts will be.
Hope this helps.
 
Rough cut the parts with some overlap, then use a sanding block after assembly to create the final angle. Sometimes it is easier to sand things to fit than precision cutting parts... plus you can use some parts to 'cut' in the needed shape by wrapping 'em with sandpaper (such as the opening for the pipe - the pipe becomes the sanding form...)
R/ Robert
 
This thread is more than 8 years old.

Your message may be considered spam for the following reasons:

  1. This thread hasn't been active in some time. A new post in this thread might not contribute constructively to this discussion after so long.
If you wish to reply despite these issues, check the box below before replying.
Be aware that malicious compliance may result in more severe penalties.
Back
Top