Tom's Yoda Praco

thd9791

Master Member
RPF PREMIUM MEMBER
Hi everyone!

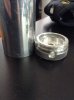
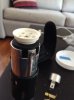
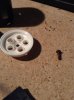
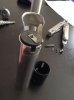
I'd like to do this right this time. I found a Praco "service" at an estate sale last week. 5 stinking bucks!!! it has the correct endcap, and ironically doesn't say Service anywhere. PRACO is etched vertically on the tube. There's another one on it's way to me, so I'll have two of these.

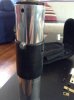
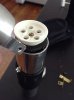
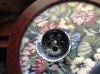
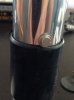
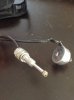
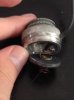
I also nabbed this Life Flasher off the bay. It has all the dimensions of a Praco without the brand name - I have a feeling it was made by the same company. The tube feels like thin steel instead of aluminum like Bolseys.

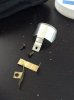
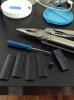
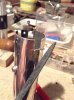
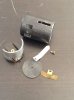
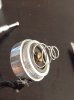
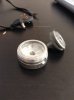
I also picked up an entire Lambo kit a few weeks ago! So I've got all the wheels, and the cast grips and oil pan from that wonderful run not too long ago. This is going to be a good build.

DSCN3240.jpgDSCN3241.jpgDSCN3245.jpgDSCN3248.jpg
 
A number of good things happened today. I took these things a part, looks like my bulb socket is higher than the rim of the tube, just like the real prop! This and the lack of holes on the black section make me think this was made by or to look like a Praco.

The black band was already loose and thankfully slides right over the tube. Since it's still the mirror image of a Praco, like a Bolsey, I'll be putting the rectangular holes on the left. They sit on the side of the real saber, and the other side of my tube has the brass button/cutout. Process of elimination here. Looks like the hole in the black part at the back of the saber is also on my midband. Yay! (I think that threaded thing really is supposed to unscrew. I unscrewed mine here, but my old Bolsey..I think I cut it in half and drilled out the rest last time I did this. ..eek) and it looks like I'll have to cut a slot for the shroud screw, it was just jammed in!

The Praco "service looking" flash's endcap screws right on, there's just this gaping hole in the side where someone tried to rig up their own electronics (On both these flashes!) Thanks previous owners, for making it look like my saber suffered a gunshot wound.

I'll have to check out my Lambo wheels, have people found long screws of the same threading to get this screwed down?

I don't have that slotted brass screw for my shroud, where are people getting those?

Also, I think Andy mentioned something about itaian jets for the part behind it but I don't know where that went.
 

Attachments

  • image.jpg
    image.jpg
    612.3 KB · Views: 85
  • image.jpg
    image.jpg
    484.8 KB · Views: 80
  • image.jpg
    image.jpg
    851.4 KB · Views: 89
  • image.jpg
    image.jpg
    667.3 KB · Views: 87
  • image.jpg
    image.jpg
    845.8 KB · Views: 100
  • image.jpg
    image.jpg
    805.9 KB · Views: 92
  • image.jpg
    image.jpg
    429.6 KB · Views: 91
  • image.jpg
    image.jpg
    744 KB · Views: 81
  • image.jpg
    image.jpg
    262.8 KB · Views: 77
  • image.jpg
    image.jpg
    112.5 KB · Views: 87
Last edited:
Tom, the Mikuni Jet will replace the screw that holds the emitter shroud to the black socket. I still need to get the circumference trimmed down on these pieces though. They are 2mm too wide overall. Great work so far, by the way.
 
Tom, the Mikuni Jet will replace the screw that holds the emitter shroud to the black socket. I still need to get the circumference trimmed down on these pieces though. They are 2mm too wide overall. Great work so far, by the way.


Ooh! Gotcha! I mixed it up with that silver do-dad. and Thank You! with a little TLC this will really shape up. I'm rather glad I don't have to stack things to get my emitter part sticking up. I think it's all about where they drilled the hole for the phillips head, mine's a bit lower than on my Bolsey/
 
Thanks Chaim! Someone get a fire extinguisher!

so here I am in my new place and all I have is a Leatherman Wave. I decided to use the wire cutters to snip a section away for the side button! (Of course I filed it down after cutting) and slid the black section in place. I snapped off one of my lambo wheels and drilled a tiny hole (basically the whole inner circle) for a longer Bolsey brass screw. It's still not long enough, so I started "counter sinking" the hole with the tip of a knife and I got like two rows of threading more. I may countersink it a bit more, we're talking 16ths of an inch to get this to stay put. I also took the files to the rim to get rid of the excess from the plastic skeleton it came in. With the Phillips head screw, the better placed holes in the midband, and the high mounted socket this feels like a good excuse for a praco :lol

speaking of the socket, I still need to cut the rectangle out for the shroud. You'll see what I mean, I added a picture of the dent in the tube.
I also scored the bottom of the post under the oil pan and used the pliers to just twist it off. I'll use a sanding drum on it when I get over to my folks place and get access to a rotary tool :)
 

Attachments

  • image.jpg
    image.jpg
    846.7 KB · Views: 78
  • image.jpg
    image.jpg
    872.8 KB · Views: 80
  • image.jpg
    image.jpg
    821.6 KB · Views: 77
  • image.jpg
    image.jpg
    828.1 KB · Views: 87
  • image.jpg
    image.jpg
    747.3 KB · Views: 72
  • image.jpg
    image.jpg
    723.1 KB · Views: 75
That is the little blue screwdriver you get wth a V8 kit! I still can't find the motor coil plate or the distributed rings in this bag of half assembled parts though.
 
The notch I did using wire cutters actually. Just snipped the sides, folded the piece down and snapped it off. Similar method to the metal tube, just with a dremel.

i finally tried countersinking the screw, a little messy but it worked! I also cut the section out behind the shroud. I used the Bolsey hole for reference, DONT DO THIS! The measurements aren't identical, I can literally see the bottom of the bulb socket and empty space inside the flash. I may throw some Apoxie on there and a strip of Mylar..

screwed down the emitter, after touching up the plate beneath it. Looks like that flat cut was done sloppily on all Bolseys and this Life flasher. Sometimes they only have one sharp corner to sit on the side of the shroud. Anyways..hit it with automotive primer and semi gloss black and it's still drying.
 

Attachments

  • image.jpg
    image.jpg
    914.9 KB · Views: 87
  • image.jpg
    image.jpg
    878 KB · Views: 93
  • image.jpg
    image.jpg
    964.3 KB · Views: 65
  • image.jpg
    image.jpg
    854.5 KB · Views: 71
  • image.jpg
    image.jpg
    871.8 KB · Views: 63
  • image.jpg
    image.jpg
    783.7 KB · Views: 72
  • image.jpg
    image.jpg
    705.5 KB · Views: 72
Got some more updates! I just found out the real prop's emitter screw wasn't an original..didn't need to cut up my emitter..oh well! I glued the oil pan on, and situated the emitter, now semi gloss black. The oil pan is a different shade of black - do you guys usually paint them all at once or is the original oil pan lighter?
 

Attachments

  • image.jpg
    image.jpg
    850.4 KB · Views: 69
  • image.jpg
    image.jpg
    807.2 KB · Views: 78
  • image.jpg
    image.jpg
    421.1 KB · Views: 104
  • image.jpg
    image.jpg
    1.1 MB · Views: 71
Last edited:
Tom, mine will all be painted the same color black: emitter, oil pan, grips. I'm not saying that is the correct thing to do, but I'm doing it that way. I'm not sure the original grips were painted or not though. I believe they were not painted but perhaps someone who knows could answer that.
 
This thread is more than 8 years old.

Your message may be considered spam for the following reasons:

  1. This thread hasn't been active in some time. A new post in this thread might not contribute constructively to this discussion after so long.
If you wish to reply despite these issues, check the box below before replying.
Be aware that malicious compliance may result in more severe penalties.
Back
Top