ALIEN Ellen Ripley Costume Tutorial (Flight Suit, Shirt & EVA Flamethrower)

Re: ALIEN Ellen Ripley Costume Tutorial (Flight Suit & Shirt)

CORD

Oops, nearly forgot to write about this part. So here's a quick post about it.

vlcsnap-2015-07-19-13h09m20s588.png

As you probably know, a key feature of this flight suit is the back detail and the lacing involved. As it was part of the suit, it is unmistakably some sort of heavy duty cord. As joberg has previously mentioned before on this thread that it is parachute cord. I looked online to see how much it was and found that the average price ranged from £10-£20. I wasn't too keen on buying this online for a few reasons: firstly, it was hard to tell what the colour truly was in person, and with my suit being rather unpredictable in terms of colour, I didn't want to risk buying something too dark/too light; secondly, I made the loops on the back and they're not necessarily uniform in size, so I was concerned that the cord might be too large for them or too small and make the lacing look a bit... empty; and thirdly, you could only buy cord in large quantities and I didn't want so much. Of course, on top of this was the price.

So my thoughts to get round this was shoelaces. I found a stray round black shoelace kicking about the house and found that it worked really nicely. I tried looking online to buy a pair but again, concern about colour, thickness and length came up. However, what if I bought my own and dyed them with the suit? That seemed to solve my concerns, and off I went to some Pound Shop in Glasgow and got this:
IMG_6169.JPG

They weren't ideal (flat, instead of round; shorter than what I wanted) but they were good enough. I cut one up and sewn them to two shoelaces to make up for the length. Afterwards, I chucked them in a dye bath left over from my first dye attempt. As it was quite a while since it was "fresh", I thought leaving them in for a few days would do the trick. Unfortunately, that was not the case. It took some colour but not very much. When I rinsed it before trying, nearly everything came out. It looked a real pale, tinted bluey-white. With the added fact that shoelaces are often composites of polyester or some sort, it makes it even harder for it to take dye; and even more so when the dye has been lying about for a while. So I waited until I did the full suit dye to try again.

When the time came to do the full dye, I duly added the shoelaces to the process. In fact, I gave them a separate bath of purely concentrated dye mix (recipe for Country Blue). Leaving that in for a day didn't help either as some of the dye still came off after a rinse, though not as bad as it initially did. So I left it in for a few more days and came back to it. This time, I wouldn't rinse but leave it to dry. But all the whilst, I wasn't too keen on it.

Until one afternoon, I went wandering in the fabric store to buy pink piping for the Nostromo shirt (which I will also detail my adventures later!) I found 100% cotton cord! If only I had seen it sooner but at least they had it in stock. They had about 6 different sizes, which allowed me to compare and buy only as much as I needed: ranging from about 20, 30, 40, 60, 80. I was stuck between 30, 40 and 60. I felt 60 was too thick and 30 possibly verging on too thin, so my gut was to go in the middle and buy the 40. I went with the measurements of that one stray shoelace that fit snugly, which was about 46" and bought a little extra. So I ended up getting 100" (50" for one when cut in half) and this only cost me £1.04 - cheap, correct size and colour could be corrected. Perfect.

IMG_6330.JPG IMG_6075.JPG

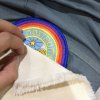
Went and chucked that in the bath with the suit. Here it is after the dye:
IMG_6132.JPG

This is noticeably bluer and lighter. Of course, this took the dye differently to the suit because keep on mind the cord was plain white to begin with whereas the suit had previously been a khaki before going grey. Not exactly matching but I felt it was good enough and went with it.

After, I cut the cord in half and sealed off the ends using cellotape and a glue gun, just to tie off the ends so it wouldn't fray. And then it went through the loops. I found that because I shoddily finished off the ends, the glue gun blobs were larger than what I would have liked and would sometimes be quite stubborn to get through the loops, so using tweezers to tug them through really helped.

IMG_6133.JPG
 
Last edited:
Re: ALIEN Ellen Ripley Costume Tutorial (Flight Suit & Shirt)

PULL TABS

Another wee thing I nearly forgot to write about!

So for this part I reused the drawstring that came with the jumpsuit, which basically involved cutting it to size and then sewing up the ends. I only managed to get about 3 tabs from this and I needed 10 more (the screen accurate version would actually have 14 in total whereas I only need 13) so I needed to use the scraps I cut from taking in the suit legs or the pockets that were unpicked. I was very wary that this had to be the same material as the original suit because when I go to dye it, it had to be the same colour.

Quite simply, you form a pull tab by sewing the ends of a folded long strip of fabric.

When it came to attaching them on the zips, I found that my zipper handle wasn't wide enough to fit the entire pull tab. Therefore, I decided to use jump rings to work round this as they are quite cheap for a large amount and do the trick. And here's how you do it, including a cheeky wee tip on how to disguise the jump ring and the handle so no one knows that it doesn't actually fit:

IMG_6128.JPG IMG_6129.JPG IMG_6130.JPG IMG_6131.JPG

Ta-da! And it's done! Now repeat 12-13 times.

Oh and another note, be careful when pulling the zips afterwards. Make sure to pull the actual zip and not the tab, as stress often causes the jump ring to open up and the tab to fall off. Either securely fix the jump ring opening (maybe hot glue gun again to seal it) or just close it a bit more. Make a couple of extra tabs in case you lose some because of this (which I have).
 
Re: ALIEN Ellen Ripley Costume Tutorial (Flight Suit & Shirt)

FINISHING OFF (12/08/2015)

Finally, the point we've all (especially me) been waiting for: sewing on the patches!

Since my patches are iron-on, I followed the instructions to iron them after working out where they should be. I was also careful to put a bit of calico (I had it lying about spare, you can use any similar material) on top of the patch so I wouldn't burn it.

IMG_6142.JPG IMG_6143.JPG IMG_6147.JPG

Having them ironed on however doesn't necessarily mean they won't lose their grip so it would be more secure to have them sewn on anyway. Make sure to use a thread similar in colour to your patch! I used a very similar dark blue on top and grey underneath just because I didn't want the blue to be blatantly obvious inside lol (and for practical reasons, I didn't have a lot of blue thread). I did a tight (stitch length at about 1-2) zig zag stitch around the patch, and made sure it was as close to the thing itself so that blue thread didn't stretch across the suit fabric.
IMG_1100.JPG IMG_1101.JPG

For the W-Y wings, I switched to white on top; however instead of using the zig zag stitch I decided to sew straight and directly on top of the patch, as the stitching would be seen due to the thin black border around the wings, plus it was white thread and you can see that from a mile away. I couldn't have used a black thread either as there wasn't enough room to avoid crossing over the white lines.
IMG_1102.JPG IMG_1103.JPG

And that's the three patches done!

I took some liberties with their placements just because of the nature of my suit, such as having the Nostromo patches overlapping onto the sleeve seam simply because it looked accurate there, rather than on the sleeve itself as it otherwise would have been far too low. Other than that, I have pretty much stuck to what is seen on film as to where they should go!

They're rather immaculate at the moment and don't look as if they've gone through any wear yet, unlike what you see here, which shows a bit of fraying round the edges:
ellen-ripley.jpg IMG_0841.JPG

So I will need to distress them with a bit of sandpaper and rough them up a little.
 

Attachments

  • IMG_6146.JPG
    IMG_6146.JPG
    1.4 MB · Views: 410
Re: ALIEN Ellen Ripley Costume Tutorial (Flight Suit & Shirt)

Wow, absolutely fantastic work, and an amazing collection of source images and information. Thank you so much for pulling all of this together! Your flight suit is looking great, you're definitely a skilled seamstress! I've been considering doing a Ripley cross-play for a while now, (Allen Ripley, I guess?) and if I decide to commission a flight suit, rather than do my own, you'll definitely be the one I contact! Can't wait to see how all of this turns out!
 
Re: ALIEN Ellen Ripley Costume Tutorial (Flight Suit & Shirt)

Re: Ripley's patches; that could be the backing material showing around the edges, meaning maybe they were not merrowed, just trimmed closely. I'm pleased that you got the accurate wings patch.


-MJ
 
Re: ALIEN Ellen Ripley Costume Tutorial (Flight Suit & Shirt)

Many thanks to all for your lovely comments and encouraging words! I seriously appreciate every single one of them as this is my first costume and it's so nice to hear that it's well received! I've actually had everything finished for a day now and I'm onto the flamethrower but just waiting to catch up with this thread. So keep your eyes peeled! :D


Wow, absolutely fantastic work, and an amazing collection of source images and information. Thank you so much for pulling all of this together! Your flight suit is looking great, you're definitely a skilled seamstress! I've been considering doing a Ripley cross-play for a while now, (Allen Ripley, I guess?) and if I decide to commission a flight suit, rather than do my own, you'll definitely be the one I contact! Can't wait to see how all of this turns out!

No problem, I just wanted it all in the one place for my sake too. Just glad it can be of use to others! I wouldn't say that I'm a skilled seamstress (yet) either, just very stubborn/determined! :) Would love to see you do an Allen Ripley; I know it's been done before for ALIENS but I'm yet to see one for the flight suit! Oh, you're too kind! I need so much more practice before I'm commissioned for anything but thank you!

Re: Ripley's patches; that could be the backing material showing around the edges, meaning maybe they were not merrowed, just trimmed closely. I'm pleased that you got the accurate wings patch.


-MJ

Yes, now that you mention it, it does look like it isn't merrowed at all. Any ideas on how I could get that look?
And I wasn't aware you could get Ripley's WY wings wrong? Have people mistaken black and white for another colour before...? P:
 
Re: ALIEN Ellen Ripley Costume Tutorial (Flight Suit & Shirt)

Well, you could get the whole patch embroidered onto an appropriately-colored carrier / backing / substrate, and just not have it merrowed at all.... If you just wanted that look, with merrowed off-the-shelf-patches, maybe you could apply a thin piece of cloth between the patch and the suit, sew all three together, then trim the phony backing away with a small pair of scissors? Sounds like a lot of trouble... Thanks for the huge pic of Ripley, BTW :)

The small wings patch has been reproduced inaccurately since at least 1980, and I don't know why. I think people have just been copying the previous one. On the bad repros, the top interior line of the 'wings' does not connect to the left and right sides, and you end up with a small 'wings' in white, with a black border and then a white 'outline' around that. The attached screencap shows a real patch on Lambert, BUT in the Alien Design Portfolio, there is a photo of a display of patches and pins, showing the incorrect small wings patch. Also they show the triangular patches as point up, when they are correctly oriented point down. BUT, here's the kicker, the Portfolio calls the small wings patch white on dark green! It's hard to tell from the film, BUT (how many buts is that so far?) a photo of a prototype Dallas jacket suggests this is possible. Additionally, the wings patch can be found with red embroidery (or a quick job with a red marker) on Dallas' green smock when he and Ash are analyzing Kane for the first time in the infirmary.

How long until your event?


-MJ
 

Attachments

  • simple wings veronica cartwright.jpg
    simple wings veronica cartwright.jpg
    64.9 KB · Views: 225
  • Red Wings 3.jpg
    Red Wings 3.jpg
    373.3 KB · Views: 265
  • Possible Green BKG on Wings Patch from Prototype Dallas Jacket Propstore.jpg
    Possible Green BKG on Wings Patch from Prototype Dallas Jacket Propstore.jpg
    37.6 KB · Views: 291
Re: ALIEN Ellen Ripley Costume Tutorial (Flight Suit & Shirt)

Well, you could get the whole patch embroidered onto an appropriately-colored carrier / backing / substrate, and just not have it merrowed at all.... If you just wanted that look, with merrowed off-the-shelf-patches, maybe you could apply a thin piece of cloth between the patch and the suit, sew all three together, then trim the phony backing away with a small pair of scissors? Sounds like a lot of trouble... Thanks for the huge pic of Ripley, BTW :)

The small wings patch has been reproduced inaccurately since at least 1980, and I don't know why. I think people have just been copying the previous one. On the bad repros, the top interior line of the 'wings' does not connect to the left and right sides, and you end up with a small 'wings' in white, with a black border and then a white 'outline' around that. The attached screencap shows a real patch on Lambert, BUT in the Alien Design Portfolio, there is a photo of a display of patches and pins, showing the incorrect small wings patch. Also they show the triangular patches as point up, when they are correctly oriented point down. BUT, here's the kicker, the Portfolio calls the small wings patch white on dark green! It's hard to tell from the film, BUT (how many buts is that so far?) a photo of a prototype Dallas jacket suggests this is possible. Additionally, the wings patch can be found with red embroidery (or a quick job with a red marker) on Dallas' green smock when he and Ash are analyzing Kane for the first time in the infirmary.

How long until your event?


-MJ

Oh, that's a nice way to do it... but yes, a bit of trouble after I've had them all sewn on... oh well, doesn't matter. I'm not that bothered anyway. I'll see what sandpaper does, if anything. But thanks for that, I'll keep that in mind for next time! :) And you're welcome, I have managed to amass a number of hi-res, large images of Ripley from my research, haha.

Oooooooh, I see, I see. Proper educational lesson there on the WY wings! I have previously read about the different colours of green and red before but didn't see where the confusion came in, so thanks for clearing that up!

The convention I'm going to is just round the corner over the next weekend of the 22nd and 23rd! It's Film and Comic Con in Glasgow and Michael Biehn and the Scottish Colonial Marines group will be there, so I'm hoping to grab a few photos! Once I do, I'll be sure to post them here. :D
 
Re: ALIEN Ellen Ripley Costume Tutorial (Flight Suit & Shirt)

HINDSIGHT IS 20/20

As I have now finished the flight suit, there are of course some things that I could have done and that I wish I did to further increase the screen accuracy of my costume and more importantly, to avoid some issues I ended up having. However, I have learned a huge amount from my mistakes and only hope that I'm not stupid enough to repeat them again in the future, and that you may be wary them and have as little problems as possible with yours! So here's a list of my regrets- or afterthoughts rather - from start to finish:

1. There were three jumpsuits in H&M, two size 10s and a size 14, all at £7. I bought the two size 10s because I wanted to turn one into the flight suit and wear the other one as it was. If only I just went ahead and bought the size 14 too, and altered it to fit me like a size 10 (with short sleeves and short bottoms or something) so then the excess fabric could have been used for the pockets and extras. This would have saved me buying extra fabric, kept material consistency throughout the suit and more importantly, avoided the major dyeing issues towards the end. (Though to be fair, the cotton twill and calico that became unused extras, I did reuse for other projects).
2. I could have bought a lighter shade and slightly greyer zips. Now that my final suit is a grey-teal, I feel that the dark grey-navy I opted for is too dark. But this was a hard one to anticipate since dyeing was so unpredictable.
3. I wish I studied the back detail more closely, so I wouldn't have had to spend an extra £8 on round white elastic I wouldn't need, and didn't waste 2 days' worth of time.
4. I could have been more accurate with my pocket measurements and been neater but I was too desperate to get it finished that I sacrificed tidiness.
5. I wish I remembered to add a bit extra on the back panels so when it folded backwards and stuck up, it was sturdier.
6. I wish I studied the legs of the suit closer and could have paid more attention to the fact that it finishes at Ripley's ankles. I therefore forgot to take the suit up more than I initially thought. Though not a major disaster as I can still fold it upwards and hide this, lol.
7. I wish I didn't take in the legs as much as I did. It's comfortable but could be a little roomier.
8. I wish I just went and did the long inner leg zip. This is my main challenge if I make another Ripley flight suit, hahahaha.
9. I wish I used Rit Dye Color Remover FIRST to strip as much off the jumpsuit as possible before dyeing. This probably would have made my life so much easier.
10. I wish I didn't use dye when sleep deprived.
11. I could have bought the size 30 100% Cotton Cord. I'm just nitpicking now.
12. I wish I realised that the patches weren't merrowed and followed Mike J's technique of how to make it look like that :p

Regardless of all this, the past month or so from start to finish has been a blast; and more significantly, one huge lesson - really just my first few steps into the world of alteration and on a much grander scale, costume/dressmaking. It's not 100% screen accurate but I'm super pleased that I've even managed to persevere with it, let alone finish.
 
Re: ALIEN Ellen Ripley Costume Tutorial (Flight Suit & Shirt)

Hey, I just made that fake un-merrowed patch thing up! :lol The only thing I've ever sewn are buttons... :p

Here's a couple of patches from the Propstore, from producer Ivor Powell. They do not appear to be merrowed.

I think Brett's hat patch is notoriously frayed, but perhaps that's intentional. I do recall reading somewhere that the costumes were deliberately aged.

This occurred to me: perhaps if you took a small pair of scissors, or a sharp X-Acto knife, and cut just a couple of threads of the merrowing very close to the uniform, you could then get them to fray up and look a little worn? Easy to do, maybe, but irreversible, no matter how it turns out :(


-MJ

- - - Updated - - -

I have learned a huge amount from my mistakes and only hope that I'm not stupid enough to repeat them again in the future...

That's all I ask for :)
 

Attachments

  • Alien_Nostromo_CrewPatches_1.jpg
    Alien_Nostromo_CrewPatches_1.jpg
    92.7 KB · Views: 801
  • Alien_Nostromo_CrewPatches_2.jpg
    Alien_Nostromo_CrewPatches_2.jpg
    96.3 KB · Views: 303
  • Alien_Nostromo_CrewPatches_4.jpg
    Alien_Nostromo_CrewPatches_4.jpg
    105.7 KB · Views: 329
Re: ALIEN Ellen Ripley Costume Tutorial (Flight Suit & Shirt)

Hey, I just made that fake un-merrowed patch thing up! :lol The only thing I've ever sewn are buttons... :p
Here's a couple of patches from the Propstore, from producer Ivor Powell. They do not appear to be merrowed.
I think Brett's hat patch is notoriously frayed, but perhaps that's intentional. I do recall reading somewhere that the costumes were deliberately aged.
This occurred to me: perhaps if you took a small pair of scissors, or a sharp X-Acto knife, and cut just a couple of threads of the merrowing very close to the uniform, you could then get them to fray up and look a little worn? Easy to do, maybe, but irreversible, no matter how it turns out :(
-MJ

Buttons are the important first steps into sewing!! :lol Regardless, it's still a good idea! The craft knife method was exactly what I had in mind before you mentioned the extra material backing as a possible solution. I was thinking about that last night but also felt that the irreversibility of the outcome a little daunting... so perhaps not now but at a later date. :) I'll try and make it worn from actually wearing it... I quite like it as everyday wear as well as a costume, hahahaha...

And wowee, thanks for the reference photos! Good to have it on here for future reference!
I'm beginning to get tempted to recreate the whole crews' uniform........
 
Re: ALIEN Ellen Ripley Costume Tutorial (Flight Suit & Shirt)

I will admit to having worn my Kane shirt when I'm running low on clean laundry :lol
 
Re: ALIEN Ellen Ripley Costume Tutorial (Flight Suit & Shirt)

I will admit to having worn my Kane shirt when I'm running low on clean laundry :lol

I don't blame you - makes a nice change from a plain white shirt!

Also, love the work on your blog! I'm hoping to make a cigarette pack and the Aspen beer can (using division6's label probably) as other props to my outfit! :)
 
Re: ALIEN Ellen Ripley Costume Tutorial (Flight Suit & Shirt)

WARRANT OFFICER PIN BADGE

(Sugar, nearly forgot about this!)
So as you know, along with the Nostormo and Weylan-Yutani wing patches, Ripley's flyer suit also features a red and gold pin badge: the Warrant Officer badge.
Here is the pin badge by destinyone on eBay.

IMG_6216.JPG IMG_6215.JPG IMG_6213.JPG
IMG_6214.JPG IMG_6212.JPG
Good size and looks about right to what is seen on film. Exactly as advertised on the eBay listing. It does the trick but it is of course, without its faults.
It has a rather rounded face, therefore not as flat or as metallic as the screen version:

women_sigourney_weaver_alien_e_2008x3010_wallpapername.com.jpg

It looks more like a metallic image printed underneath glass/plastic (if that makes sense). So it’s not strictly a metal badge as it should be, nor precisely gold in colour either.
IMG_6210.JPG IMG_6211.JPG

The biggest concern was this however:
IMG_6134.JPG IMG_6137.JPG
(my nails are not dirty, it's from the blue dye hahaha js!)


The pin pierces right through the backing as there is a hole, and the hole itself is very rough and sharp. Unfortunately, I only discovered this a few days ago when I was finishing off the flight suit, making it about two and a half weeks since I purchased it and therefore past the 14 day returns policy. I have contacted the seller and hopefully they will send me a new one, since this is after all a product fault. So please be wary when purchasing this. If worse comes to worse and I can’t get a replacement, I’m thinking of just putting a blob of glue from the glue gun at the end to soften the jagged hole and make it smoother. And maybe even a bit of fabric like batting to make it secure.

All in all, fair for £3.50. Looks the part at a distance and from face value but obviously not if you're studying it for 100% accuracy!

IMG_6134.JPG


IMG_6137.JPG


women_sigourney_weaver_alien_e_2008x3010_wallpapername.com.jpg


IMG_6213.JPG


IMG_6214.JPG


IMG_6215.JPG


IMG_6216.JPG


IMG_6210.JPG


IMG_6211.JPG


IMG_6212.JPG
 
Last edited by a moderator:
Re: ALIEN Ellen Ripley Costume Tutorial (Flight Suit & Shirt)

Thank you! I'm going to have some t-shirts of the Balaji Imperial art for sale soon :)

And I took a look at your blog as well. That yellow-and-black dress seems very 1920's-y.


-MJ
 
Re: ALIEN Ellen Ripley Costume Tutorial (Flight Suit & Shirt)

About that clutch pin back - you should be able to find another one on another pin you own? Or buy a pack of a few from the craft store...

Yeah, I ended up getting a very similar pin for my Kane costume. They both appear to be a color print onto silver material covered by domed epoxy. Not what was used on film, which was probably cloisonne or faux-cloisonne soft enamel on gold-tone metal. I think there were replicas of these made around the time of the film by the Thinking Cap Company, which seems to have had the rights and is the source of the earliest replica patches & caps.

Oddly enough, looking at a large still of Brett, you can tell his US Tricentennial patch is silkscreened and not embroidered (and on top of that it's oriented wrong!) .... Don't know why that should be, as the Nostromo patches clearly all were embroidered ... And the big wings patches ...
 
Re: ALIEN Ellen Ripley Costume Tutorial (Flight Suit & Shirt)

COMPARISON

Here it is, the final thing!

5W84sAg.jpg W5rfsCa.jpg
Photographs aren't fantastic, but the suit is certainly quite similar to what you can see in the images. I'm hoping to get a couple more in daylight. Will update this post when that happens.

As mentioned before, I didn't set out to make a 100% screen accurate costume but to try and make it as close as I could with my newbie's sewing ability and costume-making know-how. I'd say I'm about 80% there? You can judge for yourself as I point out the differences in mine with the film version.

a9ZQhAx.jpg HuJspeq.jpg CkEL8LU.jpg

1. Extra as part of the original jumpsuit.
2. The main zip doesn't reach the collar. This I couldn't do anything about since that was the original suit's structure.
3. One zipper pull instead of two on the main zip, and it doesn't reach down to the crotch as it should do. Again, original suit. Couldn't really alter this part.
4. Extra name badge bit. This was due to the removal of a mini zip that was originally there. This was as discreet as I could make it.
5. Nostromo patch overlaps the sleeve and shoulder when it should just be on the top end of the sleeve. This is because the sleeve of my suit comes quite far down. Again, not sure how to alter that so had to make do.
6. I didn't have a single long zip and didn't know how I could do the leg opening as well as the extender, so just went half and half.
7. I forgot to take it up a bit further so it's a few inches longer than it really should be.
8. Inline pockets as part of the original jumpsuit. Didn't remove as it was handy and discreet anyway.
9. Forgot to make these sturdier. Probably could have done with some stitching detail.
10. Mentioned this before but I forgot one loop so if you count them, it's 12 on the left and 11 on the right. Silly mistake.
11. Cord could have been a bit thinner and darker.
12. And the unlisted one but one we all know, two-tone pockets. This can be the fashionable version ;)

Different but not a major fail. :p
 
Re: ALIEN Ellen Ripley Costume Tutorial (Flight Suit & Shirt)

SUMMARY

Equipment:

  • Sewing Machine and standard sewing equipment: tape, pins, chalk, iron, seam ripper etc
  • Sewing/Dressmaking books
  • Kettle and Measuring Jugs and Spoons and Basin and a paint brush when it got desperate

Materials:

  • Jumpsuit (£7)100m Round White Elastic at 1.5mm (£7.68)
  • 10 6” Greyish Navy Blue nylon zips (£2.70)
  • 10 12” Greyish Navy Blue nylon zips (£3.20)
  • 100m Cotton Twill Stone (£2.95)
  • 100m Lightweight Calico (£1.99)
  • Patches (£11.99)
  • Badge (£3.50)
  • Dylon Antique Grey (£3.99)
  • Dylon Denim Blue (£3.99)
  • Rit Dye Color Remover (£3.40)
  • Rit Dye Pearl Grey x2 (3.99)
  • Rit Dye Teal (£3.99)
  • Rit Dye Royal Blue (£3.99)
  • Shoelaces (£1)
  • 100” of 100% Cotton Cord (£1.04)

Cost:
Including materials I didn't use (i.e. elastic cord, shoelaces etc): ~£70
Excluding excesses (such as failed dye used during the first dye attempt) and only what became of the final product: ~£45

Time:
~19 days worth of time, from when I started planning right to when the patches were sewn and everything was finished.
So I'm guessing somewhere around 115 hours - 130 hours? However, most of it was done over the course of a week and the rest of the time was spent correcting the colour and tweaking here and there :)
 
Last edited by a moderator:
Re: ALIEN Ellen Ripley Costume Tutorial (Flight Suit & Shirt)

The pockets look better now.

19 days? Bit of a spur of the moment thing? I've been gathering components for my Halloween costume for weeks now...


-MJ
 
This thread is more than 5 years old.

Your message may be considered spam for the following reasons:

  1. This thread hasn't been active in some time. A new post in this thread might not contribute constructively to this discussion after so long.
If you wish to reply despite these issues, check the box below before replying.
Be aware that malicious compliance may result in more severe penalties.
Back
Top