Iron Maiden

Irishpanda

New Member
So, because I am apparently a glutton for punishment, I've decided my first full suit will be this beauty:

a618969e7afded36d8d72fbff70bb1d6.jpg

I'm hoping to document my progress here, if for no other reason than to help me keep at it to the end!

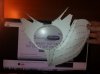
Since it's usually the most interesting part, I naturally started with the helmet:

photo 3 (1).JPG


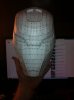
and a little further on:

photo 2.JPGphoto 1.JPG

Those vents were a pain in the ass, by the way. As were those ridges around the eyes and the groove on the helmet, but I got em in!

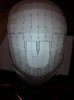
Now, when I put the faceplate on, it doesn't seem to fit quite right, but that may just be me trying to hold it on with one hand and take a picture with the other:

photo (1).JPG

The plan is to modify the suit once built. Thanks to a horrible pun between my daughter and I, I'm planning on painting the whole thing heavy metal style, with spikes and stuff, and replacing the arc reactor with a speaker (probably with a light ring around the outside). The idea being that we can play some heavy metal music through the speaker...say...Iron Maiden? :D

Obviously going the paper route, but pondering going the smooth-on route instead of standard resin/glass/bondo. Any thoughts? I have to attach the face plate for hardening, then remove it later...do I just attach with masking tape before hardening? Will the tape being there interfere with the hardening process?
 
Oh heck no, that design and model is by a guy named Bogdan Gabelko, I got the pep file from SmookCMb on this forum.

It's a gorgeous design. I hope my build does it justice. It's big drawing point for me is that it looked feminine, without resorting to armor boob cups or exposed skin. I am sticking my daughter in this, after all.
 
How cool is THAT :D I.P.
I hope your build will be a great success :thumbsup better yet: build one together with your daughter :cool:cool
 
A bit of progress:

First, a quick test fit:


photo 1 (3).JPGphoto 2 (3).JPG

All the supports go in and the back piece goes on:

photo 3 (3).JPGphoto 4 (3).JPGphoto 1 (2).JPGphoto 2 (2).JPGphoto 5 (2).JPG

Time to put it all together!

photo 3 (2).JPGphoto 4 (2).JPGphoto 4.JPG


Only problem, is I can't quite get the faceplate to line up quite right:

photo 2.JPGphoto 1.JPGphoto 3.JPG


Any ideas there? I figure I'm going to have to tape the faceplate in place, but will the tape interfere with whatever hardening I do (resin, smooth-on, etc)? Will it cause issues when I later go to cut the faceplate off?
 
Your progress is looking good! You are definitely in the right place. There are a lot of resources, and information on Iron Man armor on this forum.

I was just talking to someone about their brother's Iron man armor.
I was told he has been working on his for 2 years.
So these armors are quite a time investment.
 
After wrestling with some weak, weak masking tape in an attempt to get the faceplate to line up, I just gave up and glued the damn thing into place:

photo 1 (2).JPGphoto 2 (2).JPGphoto 3 (2).JPG

This weekend: hardening! (hopefully)
 

Attachments

  • photo 1 (2).JPG
    photo 1 (2).JPG
    33.8 KB · Views: 47
  • photo 2 (2).JPG
    photo 2 (2).JPG
    32.1 KB · Views: 53
  • photo 3 (2).JPG
    photo 3 (2).JPG
    30.4 KB · Views: 55
Last edited:
I've seen the model floating around a bit and it'll be good to see the build coming together.

Definitely an interesting variant on the typical iron man build.
Helmet is looking good already. Hope the hardening goes well.
 
Helmet is still not hardened, but hopefully will get to that tomorrow evening! Planning to go the smooth-on route. If I dont like it, or it's too costly, I will revert to a different method for the remaining pieces. Worst case, I rebuild the helmet and correct mistakes I made the first time.

Iron Boobs...er...um...the chest!

photo 1 (3).JPGphoto 2 (3).JPG


Will probably just cover up the arc reactor hole rather than assembling the pieces that go there from the file. Some of those strips are less than 1mm wide with tabs on both sides; no thanks!
 

Attachments

  • photo 2 (3).JPG
    photo 2 (3).JPG
    34.2 KB · Views: 43
Just hitting your thread right now...learning curve for sure, but looking good. I know that some folds are really, really tiny but sometime, it has to be done;) I'm eager to see the next update.
 
Will probably just cover up the arc reactor hole rather than assembling the pieces that go there from the file. Some of those strips are less than 1mm wide with tabs on both sides; no thanks!

I hate the thin strips of pep so very very much. I deleted them from my cyberman build, and ended up taking a lot of time with bondo and dremel. So i think it depends on if you're going to trade off with some other technique to fill it in, or take the time to do the 1mm strips. For me I'll stick with the bondo...

cant wait a it to see the final product. Considering a similar costume for my daughter. Yours is coming along nicely!
 
It's a bit of a catch-22...we do paper over foam for the extra detail, but that detail so often comes in the form of skinny strips of pep that feel like they will tear if you breath on them wrong. When you omit pieces like that and elect to add them later after bondo, how do you normally deal with the gap it leaves? Just slap some extra card behind it? Do you just connect the parts on either side of the narrow bit directly?
 
TIL that when Smooth-On says a pot life of 3 minutes, they are not kidding:

IMG_0559.JPGIMG_0558.JPGIMG_0560.JPG

I was part way through my first small batch when it suddenly started gumming up there on the side. You really have to work fast with this stuff! If I do this again, I may just order some of the ROTO from the net, or at least something with a slightly longer pot life. I put a coat (though probably far thicker than was needed) on the outside so that I felt comfortable removing the supports on the inside. The big pitfall here was the edge where the faceplate attaches to the helmet. The pep file was made like many other helmets like it, with the faceplate separate, and both faceplate and face opening having a flat edge. This formed a ridge inside the helmet that was a bit of a pain to work around. Eventually though, I got the inside coated too. This thing is way heavier than before, but I swear this thing is hard enough it could stop a bullet! At least now if my cats knock the thing down, I dont have to worry about it getting destroyed now.

IMG_0563.JPGIMG_0565.JPGIMG_0566.JPGIMG_0567.JPG

So what do you think? Did I overdo it? Should I just sand down what I have there, or bondo on top of it?
 
Fill in with a removable support. Card works, or if it can be shaped later just leave it open. It's what I did for parts of my helmet. Tho I still haven't gotten my vents sorted the way I want. So I need to go back and do that.
 
Well, support is no longer an issue, since I have plastic on the inside and out. Now I just need to smooth and shape. I'm assuming from here in it's just good old Bondo on top of this?
 
This thread is more than 8 years old.

Your message may be considered spam for the following reasons:

  1. This thread hasn't been active in some time. A new post in this thread might not contribute constructively to this discussion after so long.
If you wish to reply despite these issues, check the box below before replying.
Be aware that malicious compliance may result in more severe penalties.
Back
Top