Here is my latest project, a studio scale model of a Death Star Laser Tower from ANH. I have too many unfinished projects underway right now and had promised myself not to start another until one was finished but... I just got jonesing to build a SS Laser Tower and, well, I caved!
But Since I want to get this one done ASAP, I'm not going to worry too much about making and exact replica of the shooting model. I won't be chasing down all the exact correct donor kit parts, just a few. Most of the details will be based on the original, but using stuff I have on hand, scratch building and 3D printing. I figure, it's a BIG Death Star, there's bound to be some variations between the many Laser Towers.
I'm also extending my tower to make it about 3 feet tall. I have a specific display location, on top of a 6 foot cabinet next to my cubicle at work. So topping out at 9 plus feet off the ground it should be pretty imposing! And visible across the entire facility. Also being so high up in the air nobody can scrutinize if the exact right detail parts are being used. The extended base will also allow me the opportunity to add more details of my own design.
The body of the tower will be CNC milled from a special type of MDF. It's called "Super Premium" MDF from Plum Creek and has a consistent density all the way through. So the milled panels lines won't suck up paint like a sponge, as normal MDF would do. I've used this material a lot and it paints beautifully, is structurally very strong and flat, and pretty inexpensive, under $16 for a 4x8 sheet.
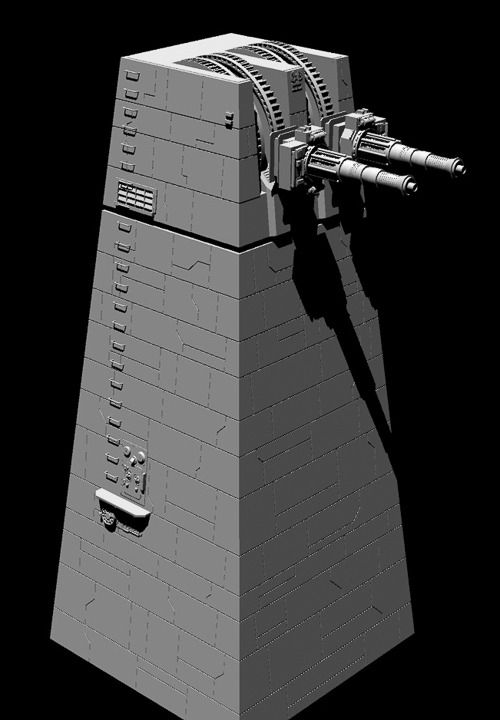
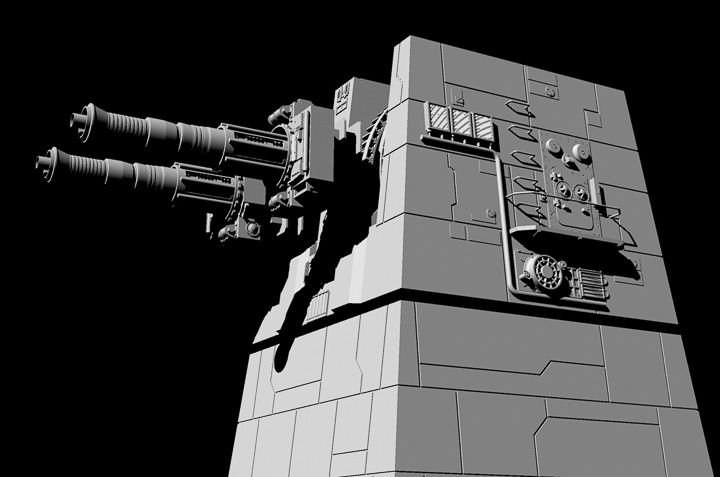
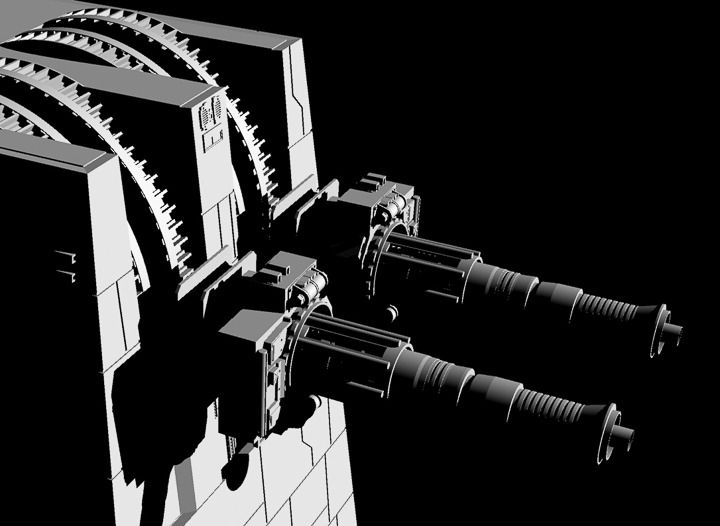
There is a lot of great reference pix of this model from the traveling Star Wars Exhibition. Using these I've started by building a 3D model of the Tower. This model can be used to create cutting files for the CNC router. laser cutting files for some of the flatter details and 3D printing files for some of the more elaborate parts. Here are some renderings from the work in progress CG model. I still have a lot of detail parts to model, but the body of the tower is complete with all the score lines so I'll be able to start with the CNC work while I continue to model the details in the computer.
But Since I want to get this one done ASAP, I'm not going to worry too much about making and exact replica of the shooting model. I won't be chasing down all the exact correct donor kit parts, just a few. Most of the details will be based on the original, but using stuff I have on hand, scratch building and 3D printing. I figure, it's a BIG Death Star, there's bound to be some variations between the many Laser Towers.
I'm also extending my tower to make it about 3 feet tall. I have a specific display location, on top of a 6 foot cabinet next to my cubicle at work. So topping out at 9 plus feet off the ground it should be pretty imposing! And visible across the entire facility. Also being so high up in the air nobody can scrutinize if the exact right detail parts are being used. The extended base will also allow me the opportunity to add more details of my own design.
The body of the tower will be CNC milled from a special type of MDF. It's called "Super Premium" MDF from Plum Creek and has a consistent density all the way through. So the milled panels lines won't suck up paint like a sponge, as normal MDF would do. I've used this material a lot and it paints beautifully, is structurally very strong and flat, and pretty inexpensive, under $16 for a 4x8 sheet.
There is a lot of great reference pix of this model from the traveling Star Wars Exhibition. Using these I've started by building a 3D model of the Tower. This model can be used to create cutting files for the CNC router. laser cutting files for some of the flatter details and 3D printing files for some of the more elaborate parts. Here are some renderings from the work in progress CG model. I still have a lot of detail parts to model, but the body of the tower is complete with all the score lines so I'll be able to start with the CNC work while I continue to model the details in the computer.


Last edited:


")


