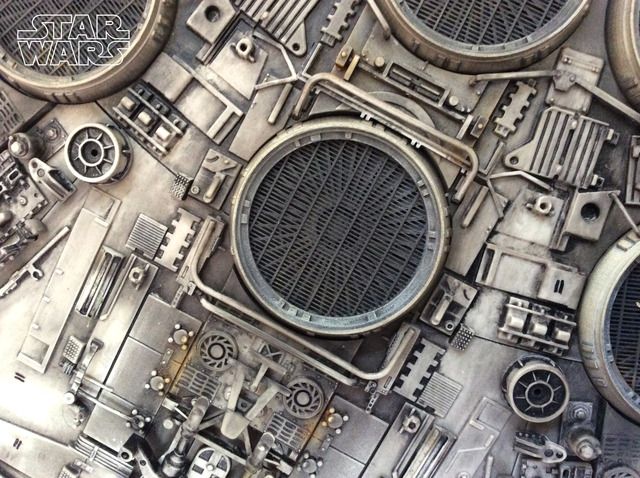
Great photos showing your work / updates mate ( as always ! ) .

So , if you're limited ( financially as I am ! ) , remember your artistic/perfectionist streak ! LOL!!! , would you just go with the supplied Deago parts ? , or 'cause some ( myself included ) are still aways off - start saving for a 3rd party replacement ? .

Cheers Ged .
 
My VERDICT is the kit ones are great with a little weathering work. The custom ones add a little extra depth that I love... seeing the vents under is great! And from angles they both look so alike...end of the day no ones gonna get studio perfection 100%.So lm happy with a study and minds eye mix of the 5ft and studio 32" never mind the on screen remembrance etc...
 
Last edited:
Really dig the new photo format with Star Wars logo Darkview.

Thanks also for the "review". I'll give these a bit of thought I think. A lot to do before I get to this point.
 
So would you consider your engine bay vents and rear section shown in these pics as complete now Darkview ?

Just looking at the photos closely, the detail is insane ! Another reason why I'm so glad I decided to get this bad boy !
 
No but near.... It's to show both options of the 6 vents. .. it's only complete when all is together then l seal it's fate ironically. ;-) l may add more in weather/or less after completion...
 
Last edited:
Hey Jordan...

Just wanted to send out a big thank you to you, man... This thread has totally taken all the "fear" out of this build for me!!
You have some truly "Jedi" skills, and I'm proud to call myself one of your now many apprentices!!

Just one question:

Got my Griffin Alkyd, and Tamiya kits, but I also got a free set of the official DeAg Tamiya acrylics (red/yellow/grey, etc.).
Once I've done your base weathering with the oil and spirit direct to the stock parts, do you see any reason not to use those acrylics for the red/grey panelling, or should I just ditch them and go with enamels instead?
I'm sticking with your freehand brush method, no airbrush, but I just don't know enough about how the different paints might react to each other, so your advice would be greatly appreciated before I make a big fat mess!!
 
Hey thanks, those acrylics should be fine. Always to the red/greys after the Newton Lamp blacks, no thinners. Do a test peice first if you have a spare or if not on the inside of a panel is best.
 
Thanks, man... I'll let you know if I have any problems... Really looking forward to seeing your finished hunk of junk!!

UPDATE 9/2 - Acrylics just don't seem to work right without a base primer... Switched to enamels... Much easier and much better result...
 
Last edited:
Well this 1 tube of Griffin Alkyd Fast Drying Oil Colour Lamp Black | Winsor & Newton has lasted me the whole build so need not
of bought a 2nd, still it comes in handy.

85325825-20bd-4c89-ae9a-aceb3372a8e9_zpsobibgui0.jpg


For those new to this thread its a month by month journal/guide on my build as it came so you know for reference my approach.
This methods not for everyone but works well for me, it helps me focus on each section and details needed.

l am do the greebies at the moment then moving on to some parts from Shapeway 3D printed parts and seeing how they go.
 
Last edited:
PIPES...

TIP: Paint the undersides of all pipework using the oil black, most l did and left in a bag for ages till needed like below,
even-out the black paint with the Tamiya Soot if you like ...

IMG_8274_zpswukls2o8.jpg


Below: Then with ultra fine sandpaper sand the top sides of the pipes, 1. it cleans off any unwanted black marks,
2. fades the underside dirt line look plus l can sand again them pipes if needed.

IMG_8275_zpsoam4h5to.jpg


Below: Here's the engine pits today with added pipes l've done like l explained above... it also adds a more three dimensional greebie feel to the build.

IMG_8273_zpskg92calr.jpg


IMG_8272_zpsohkd91dk.jpg
 
Last edited by a moderator:
Hello Darkview, I am watching your build since a while.. now i want to say: thank you!
That is incredible! You gave me a lot of Inspiration! And now, I am A big Fan of your Work ;)
I have tried to detailed Out the cockpit the Same as you, but I have failed :D
How do you paint that fine details?

Gesendet von meinem SM-G925F mit Tapatalk
 
Thanks Raziel, to your question, are you meaning the details of my cockpit? (Page2). It's pretty basic compared to others but l mainly just used enamel matts black & Silvers and good old drybrushing the console panels...the floor you can print out from my template... also check my materials used in the thread..
 
Cool, thanks for the tip. I did this on the pipes for my first underbody pit. Probably spent way too much time getting it right, but am happy with the result.

But as you say Darkview, better to take your sweet time and enjoy the build !

P.S Raziel have you considered wearable magnifying glasses ? I picked some up on Amazon cheap. best thing I ever did for those mega fine details (and a fine brush of course). Look like a dork wearing them of course, but my old eyes aren't as good as they used to be ;-)
 
Thanks for your tips. I have already "stolen" your floor ;) it's great.
Yes, I mean the console in the middle. Guess i need some smaller brushes... i tried it with the rub n buff, but it looked not "used" enough.. but I will try it with a bit drybrushing. Thank you.
 
Cool, thanks for the tip. I did this on the pipes for my first underbody pit. Probably spent way too much time getting it right, but am happy with the result.

But as you say Darkview, better to take your sweet time and enjoy the build !

P.S Raziel have you considered wearable magnifying glasses ? I picked some up on Amazon cheap. best thing I ever did for those mega fine details (and a fine brush of course). Look like a dork wearing them of course, but my old eyes aren't as good as they used to be ;-)
No, I don't have such glasses. But I will watching on these. That's really small stuff in the cockpit section. Thanks.
 
Nothing stolen about it Raziel, it's for all to use:). The rub n' buff I only used on the cargo Deago floor and halls.
Cheers Portaler, yes my daughter wants to see it all done ASAP but l tell her patience in a Jedi way ;-)...
 
I think the DeAgostini engine vents look good, Darkview. But Gus' just look amazing! I know they're not accurate for the 32" Falcon, but they seem more realistic (for lack of a better descriptor). I'm probably going to be doing my Falcon as a cross between the 32" Falcon, 5 footer, on-set/full-size Falcon, and what makes sense for a "real" Falcon, using what seems the most realistic (again) for whatever portion of the model that I'm working on (meaning I don't think I want to do a screen-accurate 32" cockpit, I'll be doing my best to recreate the on-set one). To me, these vents of Gus' seem like something that the "real" Falcon would have, so I'm seriously thinking of going that route.

Did you have to cut-out any of the actual hull to fit in the fans behind the vent screens? Or did everything fit without modification? Also, you had mentioned and shown back on your older post (page #23 I believe), that they do allow a little bit of a gap due to the curve of the hull: do all the greeblies cover that gap up, or did you have to do any modification on that?

Finally... have you decided which vents to use? The public wants to know! ;)

You've really created an awesome piece here and set the bar extremely high for the rest of us, while also sharing your techniques for how you created this stunning work. So thanks and a REALLY nice job. I look forward to seeing everything final and put together. (Geez, even your photography looks aces!)

Best,
Chris
 
Thanks Chris,
No, my initial worries about the vents were nothing, I know the fans were not like the bulk deep fans I've seen on the 5fter but loved the ones I've got. Nothing more than gluing them in was involved. Plus from angles they look like studio model... to me a happy medium. The curve turned out to be no problem due to greebie add ons etc... thanks again for your comments, just want us all to have a great hunk of junk in our living rooms;-). Definitely gone for the added vents I bought but the Deago's are sweet.


Last edited:
Hey, man...

Just a question...

Have you come up with any creative solutions to the exposed and unfinished inside edges of the engine flaps (see below)?
It doesn't seem like there are any additional parts to cover the exposed part numbers and they just look kinda lame...
I know DeAg would say the studio model was plain as the shots would have the engines burning bright, but that doesn't really help us much, as even with the LED's on, it'll still look pants... Not quite sure what to do???

Thanks in advance!!

Tristan

26.jpg
 
Well the studio 32" as most know was left clean... for effect light reasons etc. I really don't like the SHAPEWAYS stripe thing...I reckon I'll wait till the end to add anything if say maybe the studio Falcon 5fter may of had more to offer etc.
 
Last edited:

Your message may be considered spam for the following reasons:

If you wish to reply despite these issues, check the box below before replying.
Be aware that malicious compliance may result in more severe penalties.
Back
Top