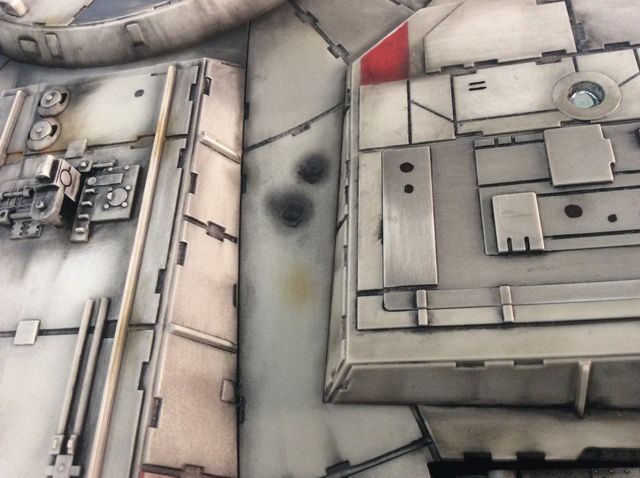
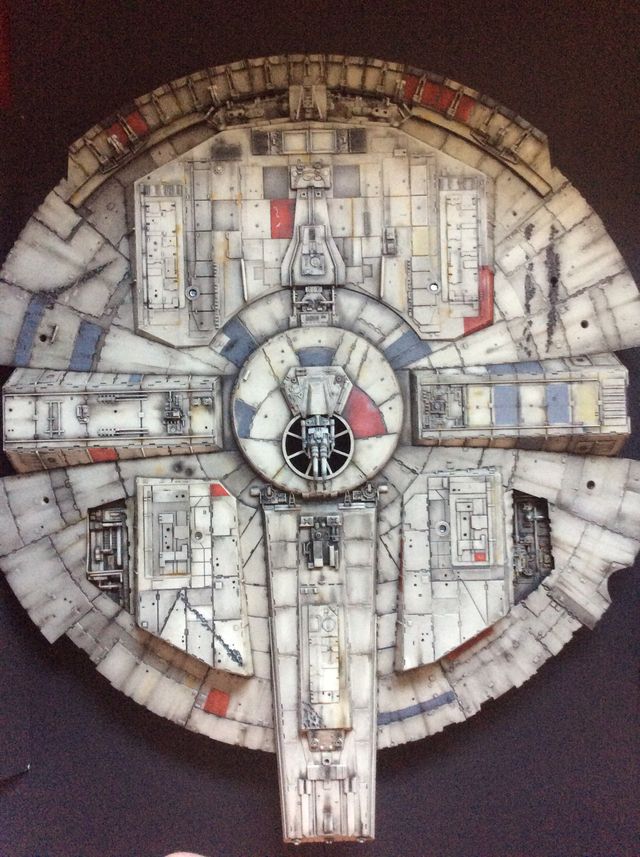
Cheers dude lm near half way with the underside.... Issue 50 has a great underside layout of the replica(page 10,11) but it can differ from the studio ESB falcon on close up inspections but it's a great ref I'm still waiting for more actual photos around the front end under to make more details/marks & blast points etc....as Mr Dymszo says there's no absolute but lm planing on as near as possible...

This may help bro... http://s898.photobucket.com/user/dtssyst/slideshow/Falcon Reference Photos 1
 
It's nowhere near the greatness of yours, DARKVIEW, but I thought I'd share my feeble attempt at this build. I used gray primer and tamiya insignia white. Then I used your trick with the lamp black oil paint. It came out a little too dark overall so I repeated it with Davy's grey oil paint. Still need to add streaks and whatnot. I thought others who are repainting with the insignia white might like to know what the base color would look like with simple weathering. I know it's not the best looking but I like the way it's turning out. And bear in mind I had no previous modeling experience before I started my subscription a year ago. It's thanks to people like you DARK that help the rest of us novices out. Again, thank you!!http://uploads.tapatalk-cdn.com/20160203/ab60f68859a3b4f38aebe263333d8681.jpg

While flat black makes the details pop, the contrast is to great and accentuates the thickness of the plates. In some cases this is desired, however the falcon had extensive paint weathering but much more subdued. This is easily recoverable by taking a bit of thinner and rubbing the recesses clear. But if you like it the way it is, that is more important than my opinion.

TazMan2000
 
That's great greedo, l like to use the given raw plastic of the falcon as a base, the quick drying oils work great then & l can rub away till I'd get the light/dark l like. So you primed a base coat!! I really like yours great effort. Looks nice n sharp.
 
Last edited:
TIP: any small pipes and parts paint with the lamp black oil (or your chosen paints) l use while on the runner. Rub with cloth/paper towel the excess.
(I usually do this the night before) then next day I rub with extra fine wire wool the side you want light.
Then cut off and sand joins then rub in the scratches that show with Tamiya soot & sponges.

If you don't have fine steel wool then a cotton bud dipped in white spirt will do... Just rub away the required light side.
 
Last edited:
Just added the 2 black blast points you can see in the middle... I used my Dremel button headed sander to give it a tad depth....l spotted these blast marks on the Studio ESB...
4e97f33c35de235986b6d8ff4eda4e87_zpsifjmmhyc.jpg


I got this Dremel years back & has been a very useful multi headed tool... I just used tamiya to fill blast holes shades..
c07b9232f8560bcabc635a63d62bb59c_zps5iunlaby.jpg
 
Last edited:
Looks great....It's all about creating our favourite hunk of junk... Thing is with Deago's base colouring it's easy for me....
 
Nice work, greedo!

Being based in Oz - I couldn't wait any longer - so I purchased Issue 1 on eBay - I can now have a practice-run on the first panel and see if my skills are adequate!

Darkview - is there a difference between the black and the white pen above?
 
Nice work, greedo!

Being based in Oz - I couldn't wait any longer - so I purchased Issue 1 on eBay - I can now have a practice-run on the first panel and see if my skills are adequate!

Darkview - is there a difference between the black and the white pen above?

No, but lm preferring the Write-for-all fine liner, they're both good & reasonably priced. (Ink flow slightly better).
 
Last edited:
You may notice that there are four holes for the roofing bolt supports for the base stand by the time you assemble all the bottom plates...issue 50 (page 12) tells you about if you want to fill them, lm keeping them because the four holes are the connectors for the final wall mount as well as the hulls support while in construction... Well thats a choice modellers can decide... I originally thought they were part of the underside lights!!! Ha, ha!!
a324675820d9075051646a55920b05fb_zpswc295lq5.jpg
 
Last edited:
This is the top turret from issue 1 & lve added the plant-ons from issue 47. I know the magazine says to wait but l know lm happy putting them all on from the spures except the gun shield as there's still a piece to get for under the shield.

TIP: if like me you hate tiny plant-on gluing use a small dressmaker pin for adding the glue...cocktail sticks are a bit big and you still can overdo the glue...lve had no problems with the pin, plus use the head side to if you want more glue to add on it... Be careful to dispose of the pin after/don't lose it!

c783901d9c1119d823a25b77efdad072_zpse5zefgm7.jpg
 
Last edited:
Outstanding work, Darkview. It's coming together wonderfully.

Just out of interest - has there been any mention in the paperwork whether the engine lights* at the rear of the Falcon will be lit?

* not sure what the technical term is!
 
Just out of interest - has there been any mention in the paperwork whether the engine lights* at the rear of the Falcon will be lit?

* not sure what the technical term is!
Yes the engine will be illuminated. You can see in this image from the latest magazine that there are lights for port and starboard engines,12615304_240432962955037_6905246199254646552_o.jpg
 
Interesting point K, & cheers for clearing that up griffog, l hope it has the grills too that you see thro the back engine light?!!
 
Just been looking through a very interesting thread on the building of the TFA Falcon kits and various infos, well worth a look in...started by Jaitea. Anyway lm hope that our ESB Falcon comes with the 6 heat fan vent details that lve viewed on TFA kit, perhaps some of you guys have info on that one!!?
http://www.therpf.com/showthread.php?t=246235
 
Last edited by a moderator:

Your message may be considered spam for the following reasons:

If you wish to reply despite these issues, check the box below before replying.
Be aware that malicious compliance may result in more severe penalties.
Back
Top