Immortan Joe costume from Mad Max, Fury Road

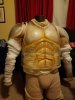
I'm picturing sort of a U shaped yolk around the neck that attaches to the back armor and just gets tied to the shoulder armor or may even just float there. We know here is a metal bracket on the back armor where something attaches In regards to the air sack.

Also those clips on e shoulder look just like a square loop and a spring clip.

- - - Updated - - -

For the clips it looks something like this http://www.strapworks.com/Swivel_Snap_p/ssss.htm
or maybe this https://www.strapworks.com/Metal_Beefy_Snaps_p/mbfs.htm

- - - Updated - - -

And the loop is just this http://www.strapworks.com/Loops_p/ssl.htm
 
I am taking Joe to DCon, with a couple other less complicated alternates. I *think* i just finished up everything I wanted to improve from last halloween.
Still haven't made the breathing apperatus, but I think i'm outta time.
IMG_1969.JPG
This was a Honda Goldwing piston 78mm iirc, my buddy split it for me. I had no way to clear the excess material from the inside to fit to boot.
So a heads up to anyone looking to get real authentic, this particular boot in size 11 would need more like 80mm plus and a style with less indention where the piston pin inserts.


IMG_1968.JPGIMG_1967.JPGIMG_1966.JPG


Last year:

IMG_1195.JPG


*sorry about the photo orientation, not sure why they rotate.
 
Last edited:
hey, do you have any tips on how you molded the the clear worbla over your roman armor? I am doing a female breast plate and its proving difficult to work with , with so many curves and humps.

- - - Updated - - -

hey, do you have any tips on how you molded the the clear worbla over your roman armor? I am doing a female breast plate and its proving difficult to work with , with so many curves and humps.
 

Everything looks good but your 929 and 240 badges are missing the black on them. Both have a black background around raised chrome numbers and edges. Just take a gloss black paint and a small brush to fix it.

Also your 500 chest badge should be gold or brass colored as the background with the 500 silver. Small things but easy to fix. Otherwise really good looking.
 
hey, do you have any tips on how you molded the the clear worbla over your roman armor? I am doing a female breast plate and its proving difficult to work with , with so many curves and humps.

- - - Updated - - -

hey, do you have any tips on how you molded the the clear worbla over your roman armor? I am doing a female breast plate and its proving difficult to work with , with so many curves and humps.

Most of us ended up using PETG and not Worbla.


Sent from my iPhone using Tapatalk
 
Right, PETG .06 in I think, Heatgun, 6 hands, and cut stress relief at arm holes and neck. See Ein's build thread pics on the process he just about has it to a science. I followed his example for the torso.
 
I used Worbla onlys for Bicep and Underarms. with the Mannequin as Help. After failing two tries with the chest armor i asked Brazen&Bold ( https://www.facebook.com/BrazenBoldProductions/?fref=ts ) who recently made an Immortan using a Vaccumformed PET - to help me out while i sold the rest of the Worbla. XD


The Chest-, Cod, and Shinbadges are all Tin-casts. So they should get the black Pattina in a year or something :D
 
So how did everyone attach the arm parts to the shoulders of the torso pieces?
I had been using super magnets on each piece but it appears the arm parts are too heavy now that I've got the spaulders the correct size.
the magnets made it where I could get in and out of the entire costume by myself by flicking my shoulders wile holding my arm out beside me one the arm parts were on.
 
i used a well proofed method i did for some other big torso armors.


Chestplate and Backplate are connected with a 40mm Leather strap on each side. On the left and right edge of the Chestplate i punched in 2x2 Eyelids to attach the leatherstrap with 2 chicagoscrews each. The backplate got 2x2 eyelids aswell but instead of chicago screws the back end of the leatherstrap got punched some holes and a simple shoelace was used to knot the frontplate to the chest.

The armplates: as visible the Gaunts are connected to the Biceptube over 2 riveted leather-straps. The Biceptube then connetcts to the Shoulderplate with an about 40mm broad Leatherstrap. As you can see on the right shoulder the big Strap is connected to the Shoulderplate with a chicagoscrew in the middle of the shoulderplate and on the top end. While the biceptube gets 2 rivets to connect.

Now here comes the part where we will never see the original because of joes waving hair and the airbubble.

The strap from the biceptube was way longer and i punched doubled holes with 2cm distance in between.

Then i used again a piece of shoelace and knoted the bicep-strap to the Strap that connects front with Chestplate - Like a T.


I could have rivited all together but it was a Commision for a customer, so i wanted to make a detachable connection to adjust on his size and experiance.
 
Hey Joe's and Joanna's!
I've finally gotten back on the gigahorse, and decided to finish this beast of a costume...

One of my biggest hurdles going forward was my body type is nowhere close to Hugh's- with properly scaled armor I looked like I was swimming in the suit.

So I've been saving up a while for a padded solution, I've seen flex design's suit first on tested. They are pricey, but the quality is top notch.

I went with the standard size, and asked them to leave off the abs. Underneath the flex design suit I attached shaped upholstery foam to make a prominent belly and love handles.

I did a little airbrushing for broken vessels and boils. I then brushed on an acrylic white and mask latex mix to look like caked on makeup. I plan to cut down some of the padding in the forearms and biceps before I add the wraps.
View attachment pixlr_20170402181440480.jpg

It looks pretty comical on its own, but the effect is very convincing under Logan's beautiful armor sculpt.
20170402_160140.jpg
 
Last edited:
So I've been saving up a while for a padded solution, I've seen flex design's first on tested. They are pricey, but the quality is top notch.

I went with the standard size, and asked them to leave off the abs. Underneath the flex design suit I attached shaped upholstery foam to make a prominent belly and love handles.

This looks fantastic! I'm not as skinny as I used to be, but I still don't have the barrel chest, muscular arms, or belly to fill out my own set of Logan's armor and have been wrestling with the idea of doing the same thing to compensate. I had seen the Tested video of Adam's muscle suit, but hadn't watched it yet. After this I may have to check out Flex Design, too!
 
I worked on Joe's codpiece tonight. Thank you Ein for the multiple castle bolt casts, you saved me a heck of a lot of time...

20170428_021135.jpg

20170428_020926.jpg

20170428_143339.jpg

I regret not taking any step to step pics. Anyway here's a brief rundown...

I really wanted the codpiece to have some dimension. I decided to start with a sports cup, this was glued and secured with thick thread to a rectangle of EVA foam. Then came the process of glueing down the nuts while checking the reference. In addition to the 3 sizes of casts I received from Ein I also include some even smaller real castle bolts I had picked up into the mix. I still need to sew everything down to be certain none come undone. Auto badges still need attached too.
 
Last edited:
Love that you went the extra mile with the padded suit underneath! Back when I was contemplating doing a full scale outfit, I was thinking something similar; cheaper and a lot more work but I thought would be really effective. I thought about doing what you essentially did with upholstery foam (but for the entire body) and two of those full-body spandex suits that you can get during Halloween: one layer to pin the foam to and then the second to form the skin. I also experimented for a short time with latex too (essentially what you did) to simulate the melted, boil-ridden skin on his back.

I never really moved forward on mine beyond the planning and some RnD but I'm really looking forward to seeing how yours turn out! Especially with all the work put into yours.
 
Thank you very much, it's been a bear of a costume to complete- however I would have probably given up on it by now if it weren't for the members here supplying references and resources. A big shout out to Logan, Ein, Ahoudini, Rawrbomb, and others. This community made a costume this complex possible.
 
@eriksmask, that is looking great. The undersuit is really selling the whole thing, and your work-in-progress cling film layout on the medals before attaching is hilarious and pretty clever. My only worry is that that undersuit will cook you to death, honestly. My Joe costume is only wearable because I've got the fans piping air into the mask - without that, I'd probably have passed out.

Immortan Joe is one of those costumes that I assumed wouldn't be all that hard at a glance, but because everything is clear plastic you have no room to hide any sins in the manufacturing. Can't wait to see once you get the arms on!
 
Thank you Ein! Yes, overheating in this thing is a major concern of mine. Your fan setup was a brilliant solution, and I was planning on doing something similar myself once I get the bellows sculpted and cast. However the foam body suit does not breath at all, so I was looking for an additional option along with the fans to keep me cooler. In my searches I came across this cooling vest... https://www.ezcooldown.com/eu/complete-performers-vest

Seems a lot of mascots and furrys use this system, there are even more advanced cooling vests that get into the $1,000's. In theory this should help, I'll probably wear some underarmor as well to help a little with collecting sweat. I'll definitely do some trial runs before hitting the con floor, the last thing a wasteland warlord wants to do is pass out.

Which can you imagine how warm poor Hugh must have been wearing all that gear in the middle of a desert.
 

Your message may be considered spam for the following reasons:

If you wish to reply despite these issues, check the box below before replying.
Be aware that malicious compliance may result in more severe penalties.
Back
Top