Payday 2 Hoxton Mask Build!

RaxManlar

New Member
Hi guys, first build! Newbie time!
Planning on cosplaying Hoxton (Old Hox) to a New Zealand con called Armageddon in October!
I really like his new mask from the Hoxton Breakout update, and decided to try teach myself resin casting to make it myself!
Here's a few reference images me and my ridiculously talented girlfriend have to work with (one without paint)

preview_5266_1420650255_2716511c33ee846a69cb5e1f22129c1b.jpg

maxresdefault.jpg

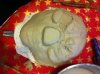
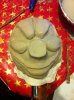
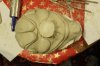
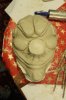
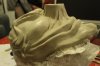
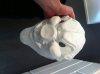
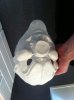
We plan on modelling the base out of clay, using 100% silicon caulk with a few drops of glycerine to make the mold, and fibreglass resin + matting to make the mother mold. The urethrane casting will be with Smooth-On 65D (which was a pain in the ass to find in this country, and cost an arm and a leg!).

Like I said, I've never ever attempted silicon molding or any resin casting of any kind, so any tips would be greatly appreciated! Will update as I work.

Cheers!
 

Attachments

  • Hoxton_Reborn.png-full.jpg
    Hoxton_Reborn.png-full.jpg
    252 KB · Views: 2,755
Forgot to add what we did today to start! We've made the clay sculpt, and that's all so far, but it's looking pretty sweet.
We began with a simple plaster life-cast of my face (which is pretty creepy looking):

attachment.php

We followed that up with layering clay on, before sculpting it into the shape of Hoxton's mask over the course of a few hours, here's the process:

IMG_0644.JPG IMG_0647.JPG IMG_0648.JPG IMG_0650.JPG

Until we got to something fairly good looking! To be honest, by the second picture I was struggling and the girlfriend took over, I think she did an amazing job.


attachment.php
attachment.php


The next step will be making the silicone mold! One the glycerine arrives, I'll get right on that.
 

Attachments

  • IMG_0641[1].JPG
    IMG_0641[1].JPG
    816.4 KB · Views: 1,085
  • IMG_0643[1].JPG
    IMG_0643[1].JPG
    1,002.4 KB · Views: 183
  • IMG_0644[1].JPG
    IMG_0644[1].JPG
    1,019.8 KB · Views: 195
  • IMG_0648[1].JPG
    IMG_0648[1].JPG
    1 MB · Views: 155
  • IMG_0650[1].JPG
    IMG_0650[1].JPG
    1,013.3 KB · Views: 162
  • IMG_0644.JPG
    IMG_0644.JPG
    2.1 MB · Views: 187
  • IMG_0647.JPG
    IMG_0647.JPG
    1.1 MB · Views: 182
  • IMG_5009.JPG
    IMG_5009.JPG
    961.2 KB · Views: 171
  • IMG_5009.JPG
    IMG_5009.JPG
    964.2 KB · Views: 930
  • IMG_5010.JPG
    IMG_5010.JPG
    1,010.6 KB · Views: 959
While you're waiting for the mold material, you could consider smoothing the sculpt. You'll get a better copy and you can finesse the design alittle if you want.
 
WELL OVERDUE PART TWO!!

After months and months of saving up, finally bought all of my materials.

I decided to make my silicone mold myself, as where I am (New Zealand) it's nearly impossible to get professional materials for this kind of thing.

My mold is made up of:

100% silicone caulk, liquid glycerin, acrylic paint and (to some extent) acetone.

So, after giving the clay sculpt a coat of PlastiKoat and vaseline, to smooth and moisten it, I began applying my mold. The first thin layer I painted into the creases and details of the sculpt. After curing, I followed this up with three thicker layers of silicone, obviously waiting for each layer to cure and dry before applying the next. I also added registration marks in order to help with the application of a fibreglass mother mold, which I plan to apply within the next few days.

IMG_0052.JPGIMG_0054.JPGIMG_0056.JPGIMG_0057.JPG
 

Attachments

  • IMG_0052.JPG
    IMG_0052.JPG
    808.7 KB · Views: 145
  • IMG_0056.JPG
    IMG_0056.JPG
    1.8 MB · Views: 162
FIbreglassing session done today!

So, once the silicone layers had all cured and dried, I attempted to use some of this...

60815.jpg
...in order to create the hard mother mold. However, the item that I bought had been expired for over two years, and was suitably buggered. So, I went back and got another pot of resin. Using this, I coated my fiberglass matting...

9f9c6154-221b-4623-b972-350892767ca8.JPG\

...and applied a layer over the top of the silicone mold, being sure to cover all gaps.

IMG_0060[1].JPG

After leaving this to set for a while, I'm hopeful that it will be releasable from the silicone, leaving me with two complete molds (a soft silicone one and a hard mother shell), which means I should be able to begin the resin curing in the next couple of days.

PRO TIP: If using fiberglassing/polyester resin USE A RESPIRATOR. NOT A SILLY LITTLE DUST MASK. WHICH I DID. BIG MISTAKE.
 
FIRST CAST PULLED!

So the fibreglass took forever to cure. I have NO idea why. And when it did cure, the damn stuff was still pliable, which made it a pretty shoddy mother mold: but it wasn't soft as heck, just kind of malleable. So, I made sure to hold the shape myself when casting (which made it a pain in the arse, but worked fine).

Anyway, once it had finally cured, I demolded the clay sculpt from the silicone, and the silicone from the fibreglass. Luckily for me, the silicone mold came out easily and didn't tear at all! The silicone managed to pick up ALL of the details of the sculpt perfectly, which I didn't expect seeing as this is the cheapo way to mold things. Here's a pic of the inside of the silicone mold:

IMG_0077[1].JPG
(creepy as hell, right?)

I immediately began casting. Which was the greatest experience of my DIY-ing life. Using Smooth-Cast 65D Resin (which is crazy expensive out here, but I'm glad I got it) I mixed the two parts together and did 4 layers of slush casting (literally just pouring in each batch of resin and slushing it around):

1st Layer: 1.5oz general coat, and then began favouring the left side of the mask
2nd Layer: 1oz general coat, and then favouring the right side
3rd Layer: 1oz general coat, favouring the centre (chin, nose, forehead)
and finally, a 4th Layer of just filling in thin spots.

This stuff is miracle resin. It is so easy to work with. You have about 3 minutes to work with each layer after it is mixed together, so work quickly before moving on. The whole thing cured entirely after leaving it for 20 minutes (Enough time for a quick episode of Rick and Morty), and the demolding process went BRILLIANTLY (DESPITE MY POOR ASS NOT USING A MOLD RELEASE!)

Here's one shot of the final cast for now, will get some more tomorrow in the daylight:

IMG_0078[1].JPG

From now, I will be sanding the living hell out of this thing for a few days. I have 10 days to sand this thing, prime it, paint it, seal it, attach a rubber outline, and build the straps to actually wear it. Phew.
 
UPDATE:

Eyes are now dremelled out, edges are dremelled down and the whole thing has been sanded, ready for priming.

9. SandedEyesCutOut.JPG10. SandedEyesCutOut2.JPG

Reckon I will be priming it tonight, and painting in in the next two days. I have zero experience in painting, but through watching Bill Doran (Punished Props) I've gathered bits and pieces of how to do it, and went out today to spend my whole paycheck on spraypaint (Primer, Matte White, Gloss Black, Gloss Pink)

IMG_0093.JPG

I don't know why these bloody pictures are side-on all the time. My phone, I guess.

ONWARDS!
 

Attachments

  • 9. SandedEyesCutOut.JPG
    9. SandedEyesCutOut.JPG
    847.7 KB · Views: 124
  • 9. SandedEyesCutOut.JPG
    9. SandedEyesCutOut.JPG
    843.9 KB · Views: 217
  • IMG_0094[1].JPG
    IMG_0094[1].JPG
    724 KB · Views: 136
FINISHED!

The past couple of days have been mental.
I've sanded it all the way down again, primed it, painted it, created the rubber outline and the straps.

In terms of priming and painting, I started with a few coats of grey primer:

IMG_0100[1].JPG
Lovely.

Next, I put down a few base coats of matte white, masked the white areas off and applied gloss pink on the forehead and nose. This came out badly, because the tape put alot of chips and gaps in the white paint. I ended up going over the white again with a paintbrush, and fixing up the borders of the pink, ending up with this:

IMG_0103[1].JPG
IT'S TAKING SHAPE!

Next, I decided to abandon the tape entirely, and just use a paintbrush to apply the gloss black on the nose and eyes. After leaving this to dry, I hit the whole thing with a few coats of ClearCoat, to seal in the paint and add a lovely gloss finish.

IMG_0114[1].JPG IMG_0107[1].JPG

I like how this turned out; but for my next mask I'll definitely be investing in an airbrush. Will make the whole thing look a hundred times better.
 
Next, I needed to figure out how to make the rubber outline on the mask, and the straps.

When looking for bits and bobs at The Warehouse, I found this little gem for $6: a bicycle inner tube.

IMG_0079[1].JPG

After cutting the thing in half and trimming it down, I used some crazy strong epoxy superglue to slowly attach it to the edges of the mask, all around. Came out looking pretty top, and didn't have to break the bank.

IMG_0125[1].JPG IMG_0124[1].JPG IMG_0119[1].JPG IMG_0122[1].JPG

Next, I needed to strap the thing to my head. Looking over ingame models + official PAYDAY merch, I could see they use a backplate method: One solid plate at the back, with five elastic straps connected to it:

Payday2-Chains-Resin-Mask-The-theme-of-the-film-characters-Mask-Resin-hand-made-High-Quality.jpg

For this, I got a bunch of thick, strong elastic from a dollar store, and some plastic fasteners (the kind you see on backpack straps etc) to make them size-adjustable.

IMG_0127[1].JPG

Taking some good ol'd fashion EVA foam, I crafted a piece based on the back of my skull. Cutting 5 slits in it, I passed the five elastic pieces (with fasteners attached) through the EVA, and glued them in place inside the mask. It turned out brilliantly: comfy, and not too bad looking in my opinion!

IMG_0130[1].JPG IMG_0131[1].JPG

SO SHE IS DONE! I will be doing some test shots in the full get-up in the next few days. The rest of the cosplay consists of a nice grey suit, an EVA + Cloth formed bulletproof vest, some blue gloves, a duffel bag, a bunch of fake cash and cocaine, and a trusty selection of airsoft guns (AK-47, Revolver, Glock 17), and I can't wait.

Hope I've given people tips/inspiration. If this is my first build, you lot can surely do alot better. :D Go forth and craft, you magnificent bastards.

IMG_0132[1].JPG IMG_0133[1].JPG
 
This thread is more than 8 years old.

Your message may be considered spam for the following reasons:

  1. This thread hasn't been active in some time. A new post in this thread might not contribute constructively to this discussion after so long.
If you wish to reply despite these issues, check the box below before replying.
Be aware that malicious compliance may result in more severe penalties.
Back
Top