Zypher
Active Member
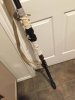
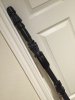
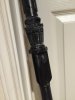
Wood grain is screen accurate.
Oh, really? I can't see it at all in the reference photos I'm using
 Good to know! I thought people were assuming the base of her staff on screen is metal.
Wood grain is screen accurate.
Good to know! I thought people were assuming the base of her staff on screen is metal.
 I also purchased the work gloves Division6 suggested and stained them darker. I couldn't swing the cost of the Pozu boots, but found a suitable substitute of roxy boots on ebay. I ran out of time to construct the leather bracer, as well as the belt (mine is just two regular belts). Despite all this I am proud of my accomplishment in completing my first true cosplay (i've disneybounded before) and have you all to thank for my inspiration and direction. You guys are the best!
link to that please? I have been waiting to remake the belt until more info surfaced about the buckle area.I also saw on the RL forum that the belt "buckle" they were discussing is much different...no idea. I just briefly went through their thread. :wacko
link to that please? I have been waiting to remake the belt until more info surfaced about the buckle area.
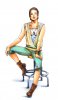
(If you click on the picture when it goes to a separate page, beware it blows up HUGE! Though you can see detail the smaller version leaves out...) Here's to hoping I can get crack-a-lackin' on this costume soon. I'm just getting really hung up on the right fabrics. (mainly the wrap dress and pants.) I bought all my materials first, and then just multi-tasked as much as possible. I agree on the staff! JJ's kit is amazing. So the shirt is just a base, missing all her details, and the viscose really needs to be dyed, and the arm wraps need adjusting and dyeing. But this is how it turned out! I didn't see a single other Rey last night (and I went to two showings at two different theater locations!). Several people wanted pictures and said they loved it. I'm also a perfectionist so it was hard to me to have it not be 100% perfect!


What's the spoiler policy in this thread?
Because I NEED the wool vest from the end. SO NEED. IT'S SO CUTE. Who has photos?!!!