This is not really a build thread, just a thread so that I can show my work and get some critical feedback. All comments are welcome. I didn't start taking photos from the get go but you can see what I've done:
Basic plumbing pipe support for the main assembly. Lots of gaps soon to be filled with putty and greeblies. Hundreds of 0.75mm holes drilled and filled with fiber optics.


Shapeways bridge drilled for 0.5mm FO:


Engines with grill from honeycombgrids.com:


extras:


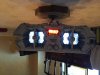
Battlestar guts:


Basic plumbing pipe support for the main assembly. Lots of gaps soon to be filled with putty and greeblies. Hundreds of 0.75mm holes drilled and filled with fiber optics.
Shapeways bridge drilled for 0.5mm FO:
Engines with grill from honeycombgrids.com:
extras:
Battlestar guts:


")


