Han Solo in Carbonite: A novice build

QCWolf

Sr Member
RPF PREMIUM MEMBER
How do you eat an elephant?

One bite at a time.

After spending the better part of a year gathering parts and materials, I finally began building my Holy Grail of props.
Here are the resources that I have used:

Body Kit: King Jawa
Box Kit: Zenix
Greeblie kit: Zenix
Hero Panel Light Kit: Modeljag
Panel #2 Light Kit: Warpcell
Volvo panels and end pockets: Moncal

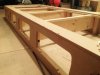
I began with the body kit from King Jawa. I found it to be a great kit that is easy to work with and has really good detail. I liked the amount of flashing around the sides because it allowed me to glue and screw it to the board easily.

IMG_1543_zps177b1a96.jpg
 
I had delusions that I would make my own box from MDF but arrived at the harsh reality that my woodworking skills are still stuck in my 1987 wood shop class. Therefore, I decided to get the box kit from Zenix. It arrived quickly and was a breeze to assemble.
Photo Feb 07, 4 23 19 PM.jpg

Photo Feb 07, 4 25 02 PM.jpg

Once I got the frame together, I added some more cross supports to prevent bowing and I added an interior lip with the thought that I would cut a panel board to fit the space precisely and rest on the lip. I did this to make the depth of my glue pour only a quarter inch instead of the half inch of MDF thickness. I wanted the texture of the Carbonite to be flush with the edge. I also used a router and a rabbeting bit to make space for the Moncal end pockets to be counter sunk.
 

Attachments

  • Photo Feb 09, 11 27 36 PM.jpg
    Photo Feb 09, 11 27 36 PM.jpg
    210.8 KB · Views: 466
  • Photo Feb 09, 11 27 11 PM.jpg
    Photo Feb 09, 11 27 11 PM.jpg
    1.6 MB · Views: 489
Last edited:
This was my first time using Bondo so I didn't know what to expect. I knew I had to work fast before it hardened, but I didn't know how fast. I was also unprepared for the amount of sanding needed to achieve decent results. Also, I went a little crazy with the screws. I used way too many and ended up removing some so I could use a round over bit for the edges. However, anything worth doing is worth overdoing so all the extra support and screws I added has made my block extremely sturdy. Heavy, but sturdy.

Photo Feb 09, 11 27 11 PM.jpgPhoto Feb 09, 11 27 36 PM.jpgPhoto Feb 14, 3 32 59 PM.jpgPhoto Feb 14, 5 40 14 PM.jpgPhoto Feb 15, 7 58 38 PM.jpg
 
Last edited:
This is looking great!
I also have never used Bondo before, so any extra tips for the green would be great.
 
This will be interesting... I've got all the same HIC parts in my cart.

Though haven't seen the Moncal end bits... is that a junkyard thing?
 
Looking great! The best thing about the HIC is that the frame is suppose to be a little wonky, so it doesn't have to be extremely smooth. I got mine really smooth and I wish I had made it dented and scraped up. I might do that some other time.
 
I got the gallon can at Home Depot. I wasn't sure how much I'd need so I went big. Wear a mask of some kind for sure when sanding. I was amazed at the amount of dust that was produced. It got everywhere. I would HIGHLY recommend a power sander of some kind. My arm would have fallen off if I did it all manually.

- - - Updated - - -

I got the Moncal parts by contacting him directly. They are super busy with other projects and it took a really long time to fill my order (nearly 10 months) but they are really nice.
 
This is looking great!
I also have never used Bondo before, so any extra tips for the green would be great.

Bondo is super easy to work with. It is a trial and error type of product. The more hardener you mix in, the quicker it sets. If you want a longer work time, just put a small amount of hardener in. Also, I was turned on to a better product called Evercoat. It's a superior type of product than bondo.
 
I contacted him directly. It took nearly 10 months to fill my order but they were great to work with and had great communication throughout the process.

- - - Updated - - -

Looking great! The best thing about the HIC is that the frame is suppose to be a little wonky, so it doesn't have to be extremely smooth. I got mine really smooth and I wish I had made it dented and scraped up. I might do that some other time.

If it's supposed to be wonky, then mine is a success. Ha!
 
I was turned on to a better product called Evercoat. It's a superior type of product than bondo.

Jedifyfe, thank you. In what way is Evercote better? Like easier to sand or easier to apply, or does the end texture look better. I know your carbonite flow area texture ended up looking outstanding from all the HIC's I've seen. Was that Evercote?
 
I used some expanding foam to support the end pockets from the inside and added some 1/4 in plywood to the control panel holes. I elected not to add the angled element to the side panels. For my skill level, it seemed like a lot of effort for little payoff.
Photo Feb 14, 4 24 20 PM.jpgPhoto Feb 18, 3 30 09 PM.jpgPhoto Feb 18, 3 30 25 PM.jpgPhoto Feb 18, 3 30 45 PM.jpg
 
Last edited:
Jedifyfe, thank you. In what way is Evercote better? Like easier to sand or easier to apply, or does the end texture look better. I know your carbonite flow area texture ended up looking outstanding from all the HIC's I've seen. Was that Evercote?

Thank you! Matt Munson told me about Evercoat. It bonds better and sands really well. I believe that it is what most pro prop makers use now a day. It's a bit more expensive and slightly harder to find (bought mine off amazon). It's more durable to scuffs and chipping. Bondo is fairly weak and can be dented easily. Bondo is much easier to find, cheap and great for the first timer. I will still use bondo on various projects but Evercoat is for the bigger projects.

- - - Updated - - -

This is like Christmas. I love when people have tons of progress shots all at once!!!
 
Using my sophisticated support system, I moved the block outside to prime it.
Photo Feb 18, 4 27 32 PM.jpgPhoto Feb 18, 4 49 54 PM.jpg

I started to get excited seeing the block all one color. I could begin to imagine what it was going to look like.
 
Last edited:
Once the priming was done, I dragged the block back inside and screwed the body to the board. I used CA glue to bond the pieces together and filled the seams with Bondo. I also found it extremely helpful to use a heat gun to soften the edges of the cast so I could screw it and glue it with relative ease.
Photo Feb 28, 6 23 34 PM.jpg
I read in one post that a good way to seal the edges was to use silicone caulk. So, I did that and it worked pretty well. The only thing I didn't like was that after it dried, it was very flexible. This turned out not to be an issue because I covered it all up with glue.
Photo Mar 01, 2 33 48 PM.jpgPhoto Mar 01, 2 33 57 PM.jpgPhoto Mar 01, 2 34 08 PM.jpgPhoto Mar 01, 2 34 19 PM.jpg
 
Last edited:
I decided to go the wood glue route and got a gallon from Home Depot. I knew that multiple thin coats was a smarter way to apply the glue, but living in the Phoenix area, I thought the warm, dry climate would help dry things out faster. The day before I poured the glue, the temp was in the upper 80s with very low humidity. The day I made the pour, it began to rain and dropped into the 40s. Dang! The following picture is the entire gallon of wood glue poured onto the block. It took a full two weeks to cure.

Photo Mar 02, 6 08 06 PM.jpgPhoto Mar 02, 6 08 57 PM.jpg
 
Last edited:

Your message may be considered spam for the following reasons:

If you wish to reply despite these issues, check the box below before replying.
Be aware that malicious compliance may result in more severe penalties.
Back
Top