Mass Effect 2/3 Blood Dragon Armor - Pepakura/Foam

WarDarkFox

Active Member
This year I'm going to take on building the Blood Dragon Armor from Mass effect. This is the first full armor build I have done so we will see how crazy this can get. I started the build back in October and have been working on it off and on since then getting the parts constructed and then waiting for the weather to be nice to work out in the garage(must clean space first). Something new that I'm using this time around from when i built my Proton pack and Cyclops visor is a Silhouette Cameo for cutting all my parts out instead of by hand, which will save me a tremendous amount of time and I can concentrate on just building. Also No edge Id's, line colors to indicate valley/folds, and working solely from the model. Thank you Darhood for the pep files and Zero-Sama for the unfolding, however for my build purposes I am redoing all the unfolding specifically for better part layout as well as to work with the cameo. I am also reworking the shin piece because......it just doesn't look right to me with that large gap between the knee and shoe(picture for reference)

FullSuitScreenCap.png

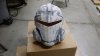
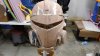
So far I have completed the helmet which was started before I bought the cameo so it has edge id's and the chest armor(minus attaching the neck part and gluing the circle on the back down). I did have to start the chest over again due to sizing issues, thought I had done it correctly but was off by about 2 inches. There will still need to be some tweaking so it first comfortably but that it is close enough i can move forward. I did use some aluminum duct tape to re-enforce areas that i felt needed some extra attention so to not warp or tear while building.

I believe I will start reconfiguring the shoulder or bracer file next.

Helmet and Chest Build Pictures
20141107_145215.jpg20141117_141435.jpg20141117_141421.jpg20141120_150541.jpg20141125_145737.jpg20141203_142239.jpg20141203_142254.jpg20150121_234959.jpg20150125_012422.jpg20150209_011331.jpg20150209_011402.jpg20141203_145311a.jpg2015-02-12 03.46.00.jpg2015-02-12 03.47.27.jpg2015-02-12 03.48.04.jpg
 
Last edited:
Re: Mass Effect 2/3 Blood Dragon Armor - Pepakura

Looking nice! Yeah, the shins are the piece of this armor I really dislike, because of that stupid gap.
I LOVE the helmet though, and the rerebraces and shoulders are cool too.

Your construction is looking great so far!
 
Re: Mass Effect 2/3 Blood Dragon Armor - Pepakura

Working little by little on the armor. My one major issue is that none of the files I have, have a set scale so there is a lot of time dedicated to rescaling and testing before starting on the actual piece. There is also a lot done with reworking how pieces connect or are laid out on the paper to avoid waste. Thankfully the cameo helps cut down on time.

I have completed both shoulder/bicep pieces and the left forearm
20150318_012755.jpg20150317_014918.jpg20150317_014932.jpg

Next up is the right forearm. Working my way down the armor with the boots last. I would like to have all the pieces done before I start resin but these very nice days we've been having make it hard to wait.
 
Re: Mass Effect 2/3 Blood Dragon Armor - Pepakura

it's looking good! who's unfolds did you use for the forearms?
 
Re: Mass Effect 2/3 Blood Dragon Armor - Pepakura

it's looking good! who's unfolds did you use for the forearms?

The files I have are from Darhood and were originally unfolded by either zero-sama or eidylon found in the Mass effect library in the forum. However I decided to unfold them and redo them myself to make them easier and require less parts to put together. There were a few parts i neglected to use since they would later be cut out and instead used a scrap piece of card as a temporary placement.

I'm also unfolding them for foam since I have run into many a issue with part that don't scale well to a normal body. The thigh piece is the first part to get foamed in a way it will look close to the game version but allow me to sit or bend. If i did it in pep I would have to stand the entire time while wearing it
 
Re: Mass Effect 2/3 Blood Dragon Armor - Pepakura

It's been a while since I updated my build, had a lot of things going on all at once but still plugging away at the armor. I've had to switch tactics a bit, making the thigh and cod pieces out of foam and free handing the hand plates to make them work better due to the scale issues cause by this being a video game pep file.

2015-05-08 23.08.01.jpg20150520_233109.jpg20150528_015642.jpg20150528_015649.jpg

I have only a few more pieces to make before all are ready for the next step, deciding if I want to begin the resin stage for my pep pieces while I finish the others. I have the knee/shin guards, boots, and shoulder pieces left to do and deciding if I want to replace the bicep guards with a foam version instead of pep. In any case the next part to tackle are the knee/shin guards which I already have decided to free hand instead of using pep, because of scaling and other quarks. They will be different than the video game due to wanting the whole part of the shin covered instead of the weird top half.
 
Last edited:
Re: Mass Effect 2/3 Blood Dragon Armor - Pepakura

I decided to make a crude resin/drying/painting station for my armor. The pieces are not set other than the base, so I can piece or pull areas out that I do not need at the moment. Will help with dying of the pep parts so they do not warp and can work on the whole area instead of picking and choosing what to resin while the other sits. Pretty soon once I get the final pieces ready i can resin. I have shin guards and the shoulder parts to do. For the shoes I think once again I am going to go a simpler route and get some cheap comfortable shoes and glue the armor directly on instead of peping or foaming the entire shoe

attachment.php
 
With the help of my wonderful wife (amid the odd look upon request to wrap my leg in plastic wrap and duct tape), I was able to make some rough templates for the shin area starting with my left leg. I made sure to give extra length on each side once traced in foam to correct for the depth of foam being used. It is a great start and next step will have to think about how to do the knee section as well as cut out for the ankle area. It will remain 1 piece till after hardening in which i will cut down the back and glue a strip of velco in order to have a nice semi tight sealed armor piece

attachment.php
attachment.php
 
Wednesday I began the resin/fiberglass stage for my armor. I still have the right shin guard, pauldron overs, and finally the boots to complete but wanted to get things rolling with the pepakura parts since I am still on the fence if I want to try adding filler to my epoxy resin as an alternative to bondo or use bondo again(sandtastic). The boots I'm thinking of getting a pair of dress shoes and adding foam pieces to look like the blood dragon boots, mostly for comfort but also for a faster build
.20150618_213322.jpg20150618_213331.jpg20150619_013709.jpg
 
Last edited:
Odd seems like some picture were removed from past posts. Oh well, i included all that i have done so far. I rebuild the biceps out of foam instead of the pep versions and they fit much better and are less awkward. Both shin sections are done. Next step is to harden the inside of the helmet and work on doing the same for the forearms. The chest has been cut in half and unfortunately discovered that sections of fiberglass cured above the part. so going to have to rip out those areas and reapply.
20150610_171042.jpg20150610_171053.jpg20150702_020033.jpg20150702_020111.jpg
 
Sorry to hear about the difficulties. The foam process looks great though. I always liked the look of this armour.

Thanks Clothar, yes this build has been very interesting and frustrating but it has made me think of different ways to complete it. I've never built armor before or used foam so everything is new. I did run into another issue last night with the chest armor.........it was too small. After cutting it in half to test wear it did not fit and I couldn't breather, no amount of sanding or cutting was going to get it close enough to wear so I have to scrap it and start over again. This time (for the sake of time) I converted the file to foam and going to build it that way instead. I just have to wait on the materials to get here bu I think in the end the only part of the armor that is going to be pep related is the helmet. Speaking of I worked a lot on it last night and applied a round of Rondo to the outside. I chose rondo because of the self leveling and the ease at which I could brush it on before things started to solidify
 

Attachments

  • 20150709_231319.jpg
    20150709_231319.jpg
    1.2 MB · Views: 264
  • 20150714_030044.jpg
    20150714_030044.jpg
    2.6 MB · Views: 265
Last night I worked on the helmet some more( god the sanding is reduculase) and decided hey why don't i start prepping my foam armor for paint....coated all in plastidip(some parts had been sealed with glue and others weren't. I will propably need a few coats before i can put primer on it and figure out what to do about a few of the gaps and seems. I think i saw someone talk about latex caulk. I also recieved my foam roll in the mail and now can begin working on the chest armor and gauntlets. I hope I am doing the whole plastidip process correct though

11752516_703161662669_1936549042990542162_n.jpg11742835_703161647699_7139156792619657963_n.jpg
 
This is amazingly neat work, I'm definitely impressed dude :D

Thank you Cafe!!!


I have the chest all laid out now and just need to cut it out, then for the exposed pieces sand those dang "metal designs" off of the foam so it is smooth.20150720_225303.jpg

Also testing out the metallic spray(can't remember if flat or glossy).....not sure if I want to move to chrome or not. Would it make it "pop" more as far as being shiny if i went chrome or stick to metallic and figure out the fkat/glossy issue? Thinking of doing the whole thing metal although the game version has the majority black with a metal face.....decisions
20150720_232854.jpg
 
Decided to go with the game look and painted the whole helmet in a gloss black, then lightly spritzed metallic paint around the faceplate to allow some the black to show through. I'll have to tape off the face area and reapply paint to the rest and then seal it all in a glossy clear spray. The visor is next on the list for the helmet, followed by any padding and led lights that I can put inside.
20150728_004411.jpg

Foam working the chest is going along slowly and I still have the gauntlets to redo in foam as well. the other parts are going through a series of sealing and primer, before gloss black in applied and then the final metallic coating. Pretty soon i will need to look into the under suit and boots to go with it
 
Update time, finally figured out the paint scheme for the entire armor. Need to add that to the helmet before i cut the visor out. I unfortunately had to redo the entire chest over again due to parts/size issues on top of building it in two sections that will later connect as one. I've had to do several redos of parts and have a bit of gaps to seal but it is coming along. Once it is finished I can start on the front part of the chest and finish with the gauntlets....hopefully

20150805_000206[1].jpg
 
Welp foam version of the chest armor wasn't working out too well. I got so far with the back and then things just started to not align correctly. So had to scrap it and now onto v3 in card stock since I have decided I will finish this build correctly instead of rushing to get it done by Sept 19th. Now with all the time to finish it I decided to go back and rebuild in card but this time do it a bit differently. I did the back section and will build upon it working towards the front. If my plan works out I will harden the outside, rondo(1-2 layers), resin/fiberglass mix, and then another rondo. At that point I will pull apart the outside card and hopefully be left with a kind of molded piece that will not require a lot of sanding.

20150818_021920.jpg20150818_021905.jpg

If you can or can't see it, the tabs are all on the outside this time, which actually made it easier to piece together
 
Update Time!!!!

It's been a whole since my last post, been struggling with the chest piece. The problem is that the files are all game rips so they are not meant for building and slipping on. It is going to take a bit of modification in order to wear on top of getting in and out of it. So once again I'm going to try it in foam but take it slow. The first time I was rushing to get it done by a specific date and mistakes were made. So It will probably be a while before i update with the progress. I'm going to finish this out and not give up, re-watch some tutorials, get better at my foam cutting/gluing, and make this armor build awesome.
 
Slowly working on the chest, it is a bit difficult as there are many pieces I have to make by hand in order to make it fit correctly. I know it is not going to be as accurate as the armor in the pep file or in the game but again if i did that I would not be able to move or look around as the past versions of it have felt when I test wore them. Only down side now is the weather is getting colder and my workspace is in the garage....contact cement is getting thicker and it is getting harder to get out there to work so I do what I can each night or this week try to recover from a cold that is going through the family.

20151027_233237.jpg20151107_235931.jpg20151027_233228.jpg
 

Your message may be considered spam for the following reasons:

If you wish to reply despite these issues, check the box below before replying.
Be aware that malicious compliance may result in more severe penalties.
Back
Top