You are using an out of date browser. It may not display this or other websites correctly.
You should upgrade or use an alternative browser.
You should upgrade or use an alternative browser.
Hasbro Millennium Falcon : Weathering , filters and pastels
- Thread starter Vacformedhero
- Start date
Vacformedhero
Sr Member
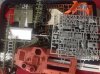
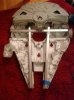
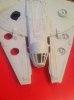
Cut out the recessed areas last night and attempted to remove items that should be pipe , I am still undecided about replacing actuators with brass tubing ,
areas are not as clean as some others posted here, I would say for anyone starting this alteration now chisels and scalpel are cleaner to pare the items down , I still haven't found a dremel tool that is clean with this material. And would appreciate any tips for sanding if anyone has had success .
now the fun part replacing the details , the ultimate jigsaw , the more time I invest the more I am considering buying more kits for key details
Attachments

Vacformedhero
Sr Member
Vacformedhero
Sr Member
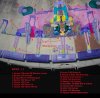
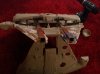
No 5 in the map picture , been staring at the sprues for some time unable to identify the 8 rad pieces surrounding the verticals , is it only the surround that is 8 rad component or is it also the pipe work/ landing gear items surrounding it ?Sorry if this is covered somewhere but I am confused. The kit map calls out the piece as 8 rad , I have this kit but cannot identify which pieces they are , has anyone an idea ?
I have decided that I will try and detail mine (first one anyway) as the larger falcon for the moment as it cuts down on scratch building some hull details and I prefer the docking ring details of the larger ship. Also I cannot access the smaller kit map images at the moment. Hoping to have some more done by the weekend worth posting
Attachments
Vacformedhero
Sr Member
http://vimeo.com/51995786
this is stunning master class , adding to my thread as reference , motivation and awe ...my other want ship")
this is stunning master class , adding to my thread as reference , motivation and awe ...my other want ship
Vacformedhero
Sr Member
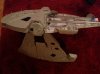
Aluminium skeleton nearing completion , this will aid structural rigidity , the ship should flex less, this will give the falcon 5 mounting points , I could do 6 but it will depend on how it goes over the next few weeks. I will fit docking rings , lower canon and mandible fronts to these docking points when not in use. Now I have something to attach my engine lighting kit assembly to
Attachments
judgedredd
Sr Member
wow that video is inspiring!
Vacformedhero
Sr Member
i didn't realise that, yes so far that video has been a very good tuition in weathering, I am not quite ready to go yet, still modifying but watching as many of these to give me inspirationLove the transfos so far. (thanks for the video showing Lasse and his model...one of our member here). Eager to see the next update
I know unreal talentwow that video is inspiring!
Vacformedhero
Sr Member
gyoung2993
Sr Member
Will be watching your build with great interests !!!....Maybe I can learn something new...great ideas you have sir !!!
Vacformedhero
Sr Member
Thanks gyoung, this forum is great, an i have picked up many tips from other builds too, hopefully I can deliver, but I am enjoying the journey.Will be watching your build with great interests !!!....Maybe I can learn something new...great ideas you have sir !!!
Vacformedhero
Sr Member
Additional information from other treads
https://www.youtube.com/watch?v=rCDNItpZwt8
https://www.youtube.com/watch?v=rCDNItpZwt8
https://www.youtube.com/watch?v=rCDNItpZwt8
HTH
cheers
Thanks The primer coat is Krylon Fusion Satin White # 2420, then preshading the panel lines in Tamiya XF-1 Flat Black. The final shade is a loose copy of Lear60man's mix. I used three 10ml bottles of Tamiya XF-2 Flat White, added two drops of XF-1 Flat Black, then about 6 or 7 drops of Tamiya XF-55 Deck Tan. Where Lear60man started in the center of each panel and worked his way out to the panel lines, I just misted over the entire model until the lines gradually faded to where you see it now. Either way works fine Like I said, there's still a ton of weathering left...all the little splatters and streaks and so on. For the streaks , I intend to use pastel chalks ground to a powder on a piece of sandpaper and applied with a fine pointed brush. NOT looking forward to that
Robert
As I live in the UK the only access I have to Floquil "Grime" is a sample I made on holiday a few years ago (they don't like you taking paints on planes!). I've been playing around trying to find a mix with Tamiya flat acrylics. The raw plastic of the Deagostini parts seem to be a fair match for Grime.
My closest bet in Tamiya, considering you need to add extra white as the falcon was supposedly a white/grime mix, is:
25% FX-14 JA Grey (gives it the green hue that Grime seems to have)
25% FX-57 Buff
50% FX-2 White
In the photo you'll see several swatches painted on the hull part, they are in order:
1. JA Grey + white and JA Grey undiluted
2. Buff
3. Buff + white
4. My mix of JA Grey, Buff and white.
{\rtf1\ansi\ansicpg1252
{\fonttbl}
{\colortbl;\red255\green255\blue255;}
}
I wish there was a simpler answer Vacformedhero!!!!!
Vacformedhero
Sr Member
Last night I sat down and wrote down a snag list of items that needed doing to move on my hasbro.
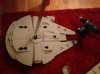
key before anything is sorting out the skeleton and bonding it to the bottom half of the falcon.
When I reviewed my current frame I realised that because the material is so soft (especially with some of the rigidity removed by me) that some of the key reference points were moving about and the horizontal box section was too short by a few mm. Nothing for it than to rebuild it, while I was at it I changed the front box section to match the others at 20mm X 20mm so all mounting points matched, I made this change after realising that it would fit, and as I am bonding the lower half to it I could remove more stiffening structures to fit this box section in.
i have revisited the cockpit as well and decided not to cut down the deasostini as I am building the 5 foot model so I will add a ring behind the hasbro window and this will allow the full length of the deagostini in.
next I want to discuss lighting.
for me I want to display this puppy and want it to be very crisp looking.
i had some rules for myself.
-it had to be an off the shelf product , this would mean I can order spares and repair it easily.
-I want the cockpit to fully lit as near as I can to the full set cockpit
-as I have multiple mounting points it needs to be low enough voltage for small plugs at each mount.
-lighting had to have low temperature
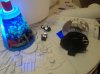
With this in mind I found a mass produced controllable led system that was flexible enough to suit my needs
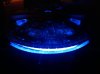
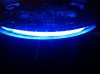
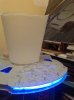
the engine diffuser is as per a previous posters method of a waste paper bin cut to size.
please see my test shots and see what you think, I am very pleased especially with the lights off, but also that with ambient lights on it's still strong.
key before anything is sorting out the skeleton and bonding it to the bottom half of the falcon.
When I reviewed my current frame I realised that because the material is so soft (especially with some of the rigidity removed by me) that some of the key reference points were moving about and the horizontal box section was too short by a few mm. Nothing for it than to rebuild it, while I was at it I changed the front box section to match the others at 20mm X 20mm so all mounting points matched, I made this change after realising that it would fit, and as I am bonding the lower half to it I could remove more stiffening structures to fit this box section in.
i have revisited the cockpit as well and decided not to cut down the deasostini as I am building the 5 foot model so I will add a ring behind the hasbro window and this will allow the full length of the deagostini in.
next I want to discuss lighting.
for me I want to display this puppy and want it to be very crisp looking.
i had some rules for myself.
-it had to be an off the shelf product , this would mean I can order spares and repair it easily.
-I want the cockpit to fully lit as near as I can to the full set cockpit
-as I have multiple mounting points it needs to be low enough voltage for small plugs at each mount.
-lighting had to have low temperature
With this in mind I found a mass produced controllable led system that was flexible enough to suit my needs
the engine diffuser is as per a previous posters method of a waste paper bin cut to size.
please see my test shots and see what you think, I am very pleased especially with the lights off, but also that with ambient lights on it's still strong.
Attachments
Last edited:
Vacformedhero
Sr Member
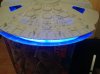
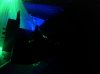
Another set of lighting tests I did today was for the cockpit. Over christmas my children received fibre optic night lights, the minion one is rubbish but the turtles is excellent. I hunted down one on sale.
the test shows the cockpit front panel threaded with 3 fibre strands being fed from the engine light, the remainder will be fed by the night light, when they are distributed around the cabin it should look bright and busy.
the third colour will be white fed from a dedicated white led or something else I am testing by hot wiring the engine lighting circuit ( more to follow)
In the test shots in the right you will see the blue feed of three strands from the engine while the changing ones are on the left. Not too shabby in full light either but being in the cockpit they should be in shadow the whole time .
Attachments


Amish Trooper
Sr Member
Hey Vac is the Sylvania Osram set up?
Vacformedhero
Sr Member
Hey Vac is the Sylvania Osram set up?
Vac, love the engine lights, any hints where to get the LED system? Would be well happy if I could have an engine lit like this.
D
Hi it's IKEA Dioder system , multicolour straight led , very very bright 12v that you cannot look at directly in any colour
http://www.ikea.com/us/en/catalog/products/50192365/
i am planning to combine them with other LEDs for the cockpit , I am playing with some white from Ikea , they have another system with round lights that could be great for the large x wing or blockade runner , althought the cost would be prohibative for 11 engines , but could be done.
Once Iam ready to mount in final config I'll post
As an aside the bin was also IKEA very cheap
Last edited:
Similar threads
- Replies
- 41
- Views
- 3,587
- Replies
- 24
- Views
- 1,155
- Replies
- 5
- Views
- 1,449