Building a Shizuma Drive

Valor

Sr Member
RPF PREMIUM MEMBER
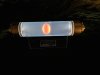
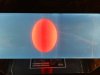
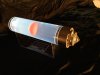
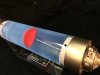
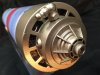
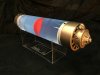
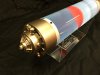
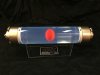
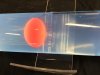
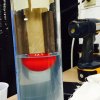
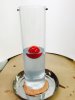
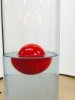
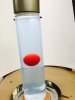
I've been commissioned to build a replica of a Shizuma Drive from the manga series Giant Robo. In the film it is a powerful energy source. The piece is pretty straightforward. A small red orb suspended in a clear tube of clear/blue bubbly liquid.

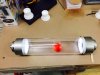
My initial thoughts are to use a 3" acrylic tube. Fill it with blue-tinted resin.

My concerns with this are:
• Can I get the bubbles I want throughout the resin? How do I keep them from floating to the top as it cures?
• How do I get a red orb to sit perfectly in the middle? Some initial thoughts – Suspend it on fishing line.

Man, I'd love some advice.

Valor
 

Attachments

  • img_show-1.aspx.jpeg
    img_show-1.aspx.jpeg
    67.3 KB · Views: 96
  • Unknown-1.jpeg
    Unknown-1.jpeg
    4 KB · Views: 84
  • Unknown.jpeg
    Unknown.jpeg
    5.8 KB · Views: 95
Last edited:
Re: Help with a Shizuma Drive

You could pour in the green resin almost to the middle, then after it have cured, you place the red orb and fill up a little bit more so that it sits in the middle, then after that has hardened you pour the rest.
 
Shizuma Drive

Thanks, that's a great idea. It eliminates needing to suspend the probe with a string. Do you suspect I'll see the two dividing lines between the pours when everything is set?
 
Last edited:
Re: Help with a Shizuma Drive

Update, So I'm almost done with this build. Here's some details.

Tube: I used a 3" extruded acrylic clear tube.

Endcaps: These were build from various PVC plumbing pieces and a couple bits from my shop. For the lighting I stripped out the insides of two LED tap lights. I had to unsolder the LEDs and add longer ones. I also created a pushbutton for the switch on the inside. From the outside it looks like a hex bolt. These slip-fit to the end of the tube and secure with a tiny hex screw.

The ball: I ended up using a pingpong ball. Painted it red.

The liquid: After researching several clear resin, I stumbled upon a product from Smooth-on called Encapso K. It is a water-clear liquid that hardens into a rubber. It is usually used to create fake water in vases with fake flowers. It is perfect for my Shizuma drive because as is hardens there's no heat to expand or crack the tube. Smooth-on also sells tints for this material so I added a tiny bit of blue.

As suggested by a member here, I did the liquid in three different pours to capture the red ball. One almost halfway up the tube. Placed the ball and poured a tiny bit more to lock it in place. Then one more pour to fill the tube. A funny thing I hadn't anticipated was how much the gell would magnify the ball on the inside. It looks ready to burst!

I'll post some fully assembled and lit photos this weekend after everything sets.
 

Attachments

  • image5.JPG
    image5.JPG
    102.8 KB · Views: 61
  • image4.JPG
    image4.JPG
    111.2 KB · Views: 52
  • image3.JPG
    image3.JPG
    109.9 KB · Views: 45
  • image3-1.JPG
    image3-1.JPG
    84.6 KB · Views: 69
  • image2.JPG
    image2.JPG
    66.7 KB · Views: 51
  • image2-1.JPG
    image2-1.JPG
    76.3 KB · Views: 58
  • image1.JPG
    image1.JPG
    49.8 KB · Views: 56
  • image1-1.JPG
    image1-1.JPG
    69.5 KB · Views: 54
  • FullSizeRender.jpg
    FullSizeRender.jpg
    62.3 KB · Views: 58
  • FullSizeRender-1.jpg
    FullSizeRender-1.jpg
    86 KB · Views: 53
  • Trial_Size.jpg
    Trial_Size.jpg
    344.6 KB · Views: 46
Re: Help with a Shizuma Drive

this is a really neat build :D , and a very good informational thread :darnkids . I have 1 question, did you leave out the little cone shaped things on the ends out deliberately :confused .

I'll be :popcorn your progress .
 
Re: Help with a Shizuma Drive

Thanks ... and Yeah. I left out the metal cone pieces. I actually have them, but I didn't want to risk tearing the somewhat fragile rubber. A small concession :)
 
Re: Help with a Shizuma Drive

a suggestion on making air bubbles... how about injecting the bubbles where you want them with a syringe ,,, maybe like a bit before it totally gets hardened (like when its jelled ) so you make the bubble or maybe even colored water and it will fill the hole from the needle as you pull it out... just an idea .
 
The Encapso K has set enough for me to do final assemble and a quick photo shoot. Man, this thing is cool when it's lit. The way the clear gel distorts the orb is a total happy surprise. I was worried the lighting in the ends would not evenly light the length of the tube. But the final effect is really even and beautiful! It's kind of creepy looking :) She's heavy (and round), so I build a simple stand (with collector plate).
 

Attachments

  • IMG_3157.jpg
    IMG_3157.jpg
    346.8 KB · Views: 58
  • IMG_3155.jpg
    IMG_3155.jpg
    527.4 KB · Views: 67
  • IMG_3154.jpg
    IMG_3154.jpg
    501.3 KB · Views: 63
  • IMG_3153.jpg
    IMG_3153.jpg
    463.6 KB · Views: 69
  • IMG_3151.JPG
    IMG_3151.JPG
    653.9 KB · Views: 60
  • IMG_3149.JPG
    IMG_3149.JPG
    461.5 KB · Views: 63
  • IMG_3147.JPG
    IMG_3147.JPG
    612.5 KB · Views: 61
  • IMG_3145.JPG
    IMG_3145.JPG
    494.7 KB · Views: 66
  • IMG_3144.JPG
    IMG_3144.JPG
    317.5 KB · Views: 58
  • IMG_3174.jpg
    IMG_3174.jpg
    496.7 KB · Views: 59
that's very cool! could you please show how you made that "collector plate"?? it doesn't have to be this particular one, it looks very professional and awesome!! please!! :love
 
This thread is more than 9 years old.

Your message may be considered spam for the following reasons:

  1. This thread hasn't been active in some time. A new post in this thread might not contribute constructively to this discussion after so long.
If you wish to reply despite these issues, check the box below before replying.
Be aware that malicious compliance may result in more severe penalties.
Back
Top