The Hobbit- Dwarven stone carving build

Antmanx68

New Member
Going to start work on a replica of the carving above the hidden door in Erebor seen in the 2nd Hobbit film. It will be 2 feet x 4 feet made of hard coated polystyrene.

Screen grabs from the movie.

cap1.jpg


capp2.jpg


Enlarged, lightened version with rulers for template:

ref.jpg
 
Update

Based on the screen captures, I drew a template in Photoshop to help me map out my runes and the light-burst cut outs.

small raast.jpg

I used Rasterbator to get the template to the right size and then taped it to my foam.

IMG_2113.JPG


Using the template, I dremeled out the runes.
IMG_2116.JPG

Next up will be cutting out the negative space and gluing it down onto a second layer of foam.
 
Update. I've finished cutting out the light bursts and the throne / arkenstone which is the central image of the figure. After gluing the throne in place, I did a very light coat of watery HWFF foam coat to get into the runes. Then the next morning we applied a thick, gritty coat of HWFF foam coat. We used 3 parts foam coat, .5 part water, .5 part boost to at strength and .5 part black latex paint to tint it and give us more working time. We also added some of the medium grit to help with the rocky texture.

IMG_2121.JPGIMG_2122.JPGIMG_2124.JPGIMG_2125.JPGIMG_2126.JPGct.jpg

With a little bit of heat gunning to prep it, the HWFF foam coat reaally achieved the stone texture I was looking for. I didn't carve in any cracks or fine details because the mixture was thick and would have just covered them up. Since the coat is basically cement, there should be some fine cracks that occur on their own that would look neat.

Next update will be the final paint and clear coat.
 

Attachments

  • IMG_2128.JPG
    IMG_2128.JPG
    66.4 KB · Views: 844
  • at.jpg
    at.jpg
    112.9 KB · Views: 237
Last edited:
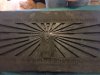
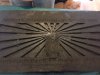
OK, This project is pretty much done. The paint was done last night and there were pretty much 3 steps to the process.

First I mixed up some green, tan, black, white acrylic paints with a lot of water to be kind of a dirty gray wash and liberally applied it on the matte black foam coat. While it was still wet I made a similar mixture but with a heavier green hue and gobbed that on top to let little puddles form and have the two colors mingle to form an organic, marble-esque effect.

When that started to dry I padded it with a rag and then started dry brushed on a thicker gray paint on the high points, being careful not to make it look tpo uniform or cover up too much of the colors from step 1.

Step 3 was to add some "veins" of white and brown color. For the brown I dry brushed on some Tan colored Tandy leather gel stain and then wiped it off with a rag. To get the speckled white effect I poured on some crushed red pepper and then lightly dusted the surface with some white spray paint. I immediately removed the pepper flakes and it left me with the desired specks.

My final step was going to be to do a coat of glossy clear coat followed by a coat of flat clear coat to give it a kind of shimmery, cave-stone effect BUT I overestimated how much the thick foam coat actually sealed the foam. As soon as I sprayed the first bit of clear coat the foam started melting in parts (DAMMIT!). After patching up the fried parts, it still looks decent, I lost a little bit of the subtlety I had before but It doesn't look too bad. It was a good exercise in foam cutting and it was my first time using foam coat as opposed to just latex paint. Thanks for reading!


attachment.php


finished.jpg
 
that is so awsome! never even thought about making that, what a good idea! you've got the texture and colour pretty spot on
 
This thread is more than 9 years old.

Your message may be considered spam for the following reasons:

  1. This thread hasn't been active in some time. A new post in this thread might not contribute constructively to this discussion after so long.
If you wish to reply despite these issues, check the box below before replying.
Be aware that malicious compliance may result in more severe penalties.
Back
Top