How far will you go to please your GF?
One of my best friends has a Halloween party every year with a costume contest. My GF said we needed to do Stargate: she would be Captain Carter (already had most of her costume, with tweaks suggested by Stitch) and I could be a Jaffa warrior.
I get to wear armor? Oh, Hell YEAH!
And thus began this ongoing journey. The party is Nov. 1st. Since I began, my friend's wife found another costume contest the week before, so with a week shaved off my build time, I'm a little rushed. Foam seemed the way to go, and I felt confident after reading enough threads and watching Evil Ted's vids on Youtube.
This is the goal with the skullcap instead of the big helmet.


I started with the belt buckle. One of the simplest pieces, and I learned a bit better how to work with foam.


The collar. This took a while to get the pattern where I felt comfortable with it. After a lot of research, I got the line pattern cut in with Dremel and soldering iron. Then I coated it with black plastidip, and drybrushed with gunmetal and silver. Gold and silver accents added with a small brush.


Chest and back plates are the same, so pattern, glue, and paint.


Picked up some used combat boots and drybrushed them with gunmetal and silver.


Gauntlets. The hardest part was figuring out the line patterns from screen caps and auction pics.


Shin / boot uppers. Had to do a little high-heat shaping for the bottom part.


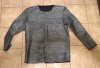
The chainmail suit was supposed to be easy. After far too many problems trying to work with one of the fabric printing companies, I wound up doing it by hand. Still working on it, too.

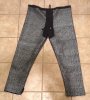
Skirt, vest, and skullcap. I can do real chainmail too, I just wanted something closer to what was onscreen, without having to wear knitted wool. Yeah, I'll look more like Master Bra'tac than Teal'c.


Made a few of these from fabric paint to glue to my forehead with spirit gum. I'll test one this weekend.

And that's my progress so far. I'll update as often as I can, but being pressed for time ...
One of my best friends has a Halloween party every year with a costume contest. My GF said we needed to do Stargate: she would be Captain Carter (already had most of her costume, with tweaks suggested by Stitch) and I could be a Jaffa warrior.
I get to wear armor? Oh, Hell YEAH!
And thus began this ongoing journey. The party is Nov. 1st. Since I began, my friend's wife found another costume contest the week before, so with a week shaved off my build time, I'm a little rushed. Foam seemed the way to go, and I felt confident after reading enough threads and watching Evil Ted's vids on Youtube.
This is the goal with the skullcap instead of the big helmet.
I started with the belt buckle. One of the simplest pieces, and I learned a bit better how to work with foam.
The collar. This took a while to get the pattern where I felt comfortable with it. After a lot of research, I got the line pattern cut in with Dremel and soldering iron. Then I coated it with black plastidip, and drybrushed with gunmetal and silver. Gold and silver accents added with a small brush.
Chest and back plates are the same, so pattern, glue, and paint.
Picked up some used combat boots and drybrushed them with gunmetal and silver.
Gauntlets. The hardest part was figuring out the line patterns from screen caps and auction pics.
Shin / boot uppers. Had to do a little high-heat shaping for the bottom part.
The chainmail suit was supposed to be easy. After far too many problems trying to work with one of the fabric printing companies, I wound up doing it by hand. Still working on it, too.
Skirt, vest, and skullcap. I can do real chainmail too, I just wanted something closer to what was onscreen, without having to wear knitted wool. Yeah, I'll look more like Master Bra'tac than Teal'c.
Made a few of these from fabric paint to glue to my forehead with spirit gum. I'll test one this weekend.
And that's my progress so far. I'll update as often as I can, but being pressed for time ...


")