Phaser 1 Kit Buildup plus MM P2 Restoration

Re: John Long Phaser 1 Kit Buildup plus MM P2 Restoration

HA!

Yeah, and boy, does my back hurt!

Sorry about the protracted absence guys, I have more than one project going on plus a web site, and I just haven't had a minute to spare. I AM going in tomorrow, Wednesday, Oct. 22, 2014, for another session, and I think I'll be remaking the brass part of the handle from start to finish. Partly because I think I can do it better this time (I'm not happy with my soldering), and partly to generate some more video for you guys. Meanwhile, here's a blast from the past: my buddy John with GJ's phaser. It was this examination that ultimately led to the P1 hero kit. :)

MVC-003F.JPGMVC-006F.JPGArticle P1.JPG
 
Re: John Long Phaser 1 Kit Buildup plus MM P2 Restoration

Kudos to John Long (and Greg Jein for extensive cooperation) in bringing to light the many features of the TOS Phaser. John's P1 kit does honor to the legacy of the original P1, using the same materials. If I had one wish, it would be that John Long would do something like a Kickstarter to get a full on "hero" phaser (P1/P2) built up to sell for those of us that want a spot on studio replica like the ones used in the original series without the need to build it ourselves. I know John's Kickstarter would be successful. Please John, if your reading this, grant us that final wish.
 
Last edited:
Re: John Long Phaser 1 Kit Buildup plus MM P2 Restoration

Great idea, Tom! :)

Preparing my post on last night's glorious waste of sheet brass right now... :)
 
Re: John Long Phaser 1 Kit Buildup plus MM P2 Restoration

And here we go!

Last night was Dickensian. Totally the best of times and the worst of times. I felt like I was in A Star Trek Carol, with the Ghosts of Phasers Past, Present, and Future laughing their butts off at me. Revealing, though! I learned I have an amazing talent I bet no one else has. I can waste good brass like a mother***er! :p

Seriously though, in the end I had a very good procedure for cutting the brass to exactly the right size, annealing it, bending it, and soldering it. So, if you want to make an omelette, you gotta break a few hundred square inches of brass. Or something. Crap. I'm hungry now.

I started with one last trip to the laser cutter (well, last for the time being). I've always wanted a bag full of popsicle sticks, my birthday's coming up, and I was gonna get one. Cutting to the chase:

IMG_2869.jpgIMG_2870.JPGIMG_2911.jpg

I'M RICH, MA!!!!

That's 60 sticks, theoretically enough for 15 handles. But if the way I went through brass last night is any clue, I'll be lucky to get three. :p

And I've got the artwork nearly perfect, though the cutouts need a little nudging here and there, and at least there wasn't any wasted wood. So when I run low on sticks one far-off day (or this Saturday), I can just pop out 60 more. Long time and lots of work to get here, but from now on at least making the wood parts of the handle will be very simple, quick, and rare. One step closer to a house full of phasers!

IMG_2868.jpg

I shot quite a bit of video last night of the process, and while I was going along I got the idea to make a short video just on making the handle, from start to finish. Since I enjoy making films as much as making TOS props, this is just going to add to the fun. I'll have it posted in the next couple of weeks (first I have to finish the handle, then I have to edit the video, and that may take a while). Of course I'll post the link to it in this thread.

For the record, after much trial and error and much scrapping of brass, the size I came up with is 3 5/16" H X 3 3/8" W. The longer side is the one that wraps around. This got me perfectly butting edges on my form, and a handle that matches the MM one as perfectly as I care to get. Of course, these are ad-hoc numbers and not from measurements of the original. You've seen the process, so I needn't tell you that YMMV. ;)

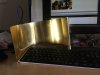
Most of the waste I generated was from getting the width of the brass sheets exactly right, so they'd butt up perfectly together instead of overlapping, like this:

IMG_2892.jpgIMG_2893.jpg

The brass relaxed a bit in the second photo by a trivial amount because I wasn't holding it closed, but this one was actually perfectly cut. These, on the other hand, were wrong:

IMG_2891.JPG

So were these:

IMG_2908.jpg

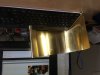
In fact, I started the evening with a roll of brass 6" X 100"...

IMG_2871.jpgIMG_2843.jpgIMG_2872.jpg

And now I'm down to this:

IMG_2912.jpg

I decided to solder it differently from before, since I wound up with pretty crappy results (those will be in the video, unless I threw them out in frustration). I got the handle edges together by bending them slightly out of shape and putting it in the bench vise and GENTLY squeezing it till the edges butted up correctly. It hardly takes any pressure at all to hold the shape in place in the vise, and just a teeny bit more to keep the edges butted together.

IMG_2899.jpg

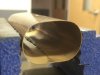
But when I soldered it, I got this crap:

IMG_2902.jpg

This is what you get when you completely space out on cleaning your soldering surfaces and using flux. Yeah. It was that kinda night.

So I cleaned the surfaces on both sides with a coarse sanding sponge and some Scotch-Brite.

IMG_2903.JPG

You can use a wire brush, but I hate those. Also a wire brush bit on a Dremel will work (I have several), but I didn't feel like breaking it out and changing collets and bits, even though it would've gone quicker with the Dremel. Yeah, it was definitely that kinda night. Then I fluxed the crap out of it and soldered.

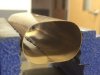
This time, I got much better results:

IMG_2906.jpg

Eventually I'll get it nailed down to where I can get a perfect solder along the entire length of the joint, but structurally this will do just fine. The third one came out fine as well:

IMG_2907.jpg

It would have come out better, but I thought I'd get clever and solder it on the outside instead of the inside, and that just gave me a clumpy mess, which I had to re-do. As you'll see in the video, the easiest way I've found is to lay the solder along the joint on the inside of the handle, and bring the torch in underneath from the outside. This pulls the solder downward into the joint very evenly because there's room to work your flame around freely. If you're trying to put the solder on the outside, your flame has to be inside the tube, and that restricts your movement, causes your heat to be uneven, and leads to the crapulent result you see above. The video will show this clearly. Plus it's incredibly cool - I had the shot focused closely on the inside of the tube and you can really see what's happening.

So that's all I got done. It ain't much, but it was 8 hours of work to get there. Now that the huge brass roll has served its purpose, I'm going back to hobby sheet. It's more expensive to purchase, but it's a LOT easier to cut to size in the sheet metal shear when you're not fighting the curl you get when drawing from a roll. I wasted a lot of brass because the curl threw off my measurements.

So that's it for last night's work, except for the video (did I mention there will be a video?). Next session, I FINALLY will assemble the first handle, including the Hubbel plug, and get it puttied up and possibly even primed. I have my tang nut, but it's the wrong size, so I'm ordering a new one today plus the matching threaded rod. Fortunately, those two parts are cheap! I like cheap. :)
 

Attachments

  • 2014-10-23 13.05.14.jpg
    2014-10-23 13.05.14.jpg
    661.3 KB · Views: 105
  • 2014-10-23 13.05.14.jpg
    2014-10-23 13.05.14.jpg
    1.3 MB · Views: 107
  • IMG_2898.jpg
    IMG_2898.jpg
    1.2 MB · Views: 90
  • IMG_2897.jpg
    IMG_2897.jpg
    1.2 MB · Views: 94
Last edited:
Re: John Long Phaser 1 Kit Buildup plus MM P2 Restoration

By the way, guys, I've completely forgotten something insanely useful!

You don't have to do this soldering thing if you find it daunting (even though I swear it's really easy and incredibly fun), and you certainly don't have to squeeze a brass tube. In order to make an accurate handle that way, you'd have to bore out the tube's interior walls on a lathe before you squeezed it to get it down to the proper thickness, and now of course you're getting into true pain-in-the-ass territory.

Ever heard of Shapeways? You can 3D-print a perfect brass handle with or without the sticks on it, 3D print the wood parts in plastic, 3D print the perfect tang nut in brass, even the parts to the Hubbel plugs. You don't even have to know how to use CAD, any 3D modeling program that exports an .stl file can work. Brass printing is more expensive than steel, but the handle walls are SO thin, and Shapeways' minimum wall thickness is a mere 0.8mm, so the total amount of brass you'd use would be quite small. I bet you could print a perfect brass handle tube for less than $40, including their $10.00 handling fee. You'd have to use the "raw" finish, which is the cheapest, so you'd have to sand the outside, but that's a lot easier for most people than the alternatives. Or you could splurge and get the polished finish.

In fact, I'll tell ya what. I've already done the measurement work and made the cross-section in Illustrator for my laser cutting stuff. I'll extrude it into a handle in 3D and post the .stl file on Thingiverse, so anyone can just download it, send it to Shapeways, and print themselves a perfect brass handle tube. It's no work at all to extrude an Illustrator shape, so I'll get it done as soon as I can crowbar it into my schedule.

Honestly, I am so sick of seeing fans getting jacked for $200 for handles that aren't right anyway, and I'm kicking myself for not thinking of this sooner. I never considered printing my own handles because I actually want to do it the way I'm doing it (does anyone here doubt how much fun I'm having?), but I'm surprised this hadn't occurred to me before. And I wouldn't mind helping fans keep more of their money. I wouldn't mind that at all.

Hmm... maybe eventually a separate mini-thread on creating a totally perfect handle using printed parts and a few cheapie items from Michael's and Home Depot... the wheels are turning... :devil

OKAY, FINE, STOP WHINING, I'LL DO IT!! Geez, I was only thinking out loud, why do have to wheedle an old fart like that? :p
 
Last edited by a moderator:
Re: John Long Phaser 1 Kit Buildup plus MM P2 Restoration

Nice! Right idea, but those are for sale (though I've never seen such an affordable handle), and if you did it in brass, it wouldn't be right - the sticks are built-in. The rest of it looks awesome, though! Sure beats some of the prices I've seen elsewhere, and you can't say enough about that.

But unless someone else has already done an accurate, free handle model made for printing in brass, I'm still going to put one up on Thingiverse. It costs me nothing, and I'm sure it'll help somebody somewhere. :)
 
Re: John Long Phaser 1 Kit Buildup plus MM P2 Restoration

The upside if having the sticks built in is that I was able to precisely copy the shape and positioning of the Jein grip. On that phaser the sticks aren't evenly positioned and I have copied that idiosyncrasy in my model. The price is a reflection of the fact that I made the sidewall as thin as possible and also that I didn't put any markup on it

AHAAAA!!!! Hadn't thought of that. Excellent! Officer thinking, Lieutenant!
:)

Usually you don't think of using CNC-type tools to replicate imperfections, very clever!!
 
Re: John Long Phaser 1 Kit Buildup plus MM P2 Restoration


The 3D printed metal parts typically have only 80% metal and 20% plastic or binder material depending on the process, which would make this weaker than an actual metal part by quite a bit. Actually it's made of metal bits embedded in plastic and then they polish it. I wish 3D printing would give exact results to metal, but while the 3D printed metal look is the same the tensile strength is not even close to real metal. With the thin walled Jein handle for the TOS Phaser I think sticking with the original brass metal tube process and parts yields far better results.

As for smaller parts like the brass nut, the 3D printers, even at Shapeways, can not match the clean and even surfaces that you get by CNC milling a part. The 3D printers are just not spitting out parts that clean…yet.

The rest of the Jein that's fiberglass would be perfect for 3D printing though.

Handcrafted work offered here can be expensive, but in many cases it can be worth it. I know people complained about John Longs kits being too expensive, but he had invested in parts and labor even before he sold them. His TOS P1 kit and Communicator kit were both worth far more than he sold them for. That said, 3D printed parts will start to replace a lot of handmade parts and the prices asked for things will come down.

BTW, beautiful progress.
 
Last edited:
Re: John Long Phaser 1 Kit Buildup plus MM P2 Restoration

I did some checking on that. Shapeways uses different processes depending on the metal. With brass, they actually high-rez print the model in wax, then do a casting in plaster using the lost wax method. So what you get is 100% brass.

I agree that making it the way the originals were done is better for any number of reasons, and in my case I have to add that my #1 requirement in a prop is that I made it myself.

I'm just saying that lots of people find this kind of work a bit out of reach, but that shouldn't lock them out of having a great prop. I think Starkiller's handle is fantastic, and by adding no markup, he's being very generous. We need more of that in the hobby, and I'd like to see more open-sourcing as well. I'm willing to contribute to that effort because I think it's important.
 
Re: John Long Phaser 1 Kit Buildup plus MM P2 Restoration

I never understood the complaints about John's kits. The same people making those complaints think nothing of shelling out thousands for a buildup, and John made it much more affordable to own a 100% period-accurrate p1. Then again, no good deed goes unpunished, I guess. :)
 
Re: John Long Phaser 1 Kit Buildup plus MM P2 Restoration

So brass parts are actually cast brass. I wonder how they would compare to parts that are cut or milled, would they be softer or weaker?
 
Re: John Long Phaser 1 Kit Buildup plus MM P2 Restoration

Speaking as a professional amateur metallurgist cuz I watch How It's Made and welding movies like Flashdance, I'd say the cast brass will be stronger just by wall thickness. The 0.010" cartridge brass I'm using comes to 0.254mm, but Shapeways' minimum wall for brass is 0.8mm. So it's almost half a millimeter thicker.

But I'm guessing strength wasn't the main factor in the old guys' choosing sheet. I think they wanted plenty of room for the batteries and threaded rod. The top insert with the male plug does add some structure, and with the end cap in, plus the cylindrical shape, it's probably got good compression strength. The sticks add some rigidity.

But shear strength, probably not so much. My handles are already dented just from being made, and I'm sure they'd crush easily. I'm fair certain the cast ones would stand up pretty well.

Having said all that, my wife just this second reminded me that her BFF has a master's in metallurgy, so I'm gonna ginny me up an email with the metal specs and just ask her. :)

- - - Updated - - -

I'll ask her about cutting or milling too.

EDIT --

As of now, July 27, 2015, my wife's friend hasn't gotten back to me....
 
Last edited:
Re: John Long Phaser 1 Kit Buildup plus MM P2 Restoration

I did some checking on that. Shapeways uses different processes depending on the metal. With brass, they actually high-rez print the model in wax, then do a casting in plaster using the lost wax method. So what you get is 100% brass.

Thanks for the correction. Which selection is that for the Shapeways Jein Handle that uses the casting process to get a solid metal part?

http://www.shapeways.com/model/1598432/gein-just-grip-curve.html?materialId=6
 
Last edited:
Re: John Long Phaser 1 Kit Buildup plus MM P2 Restoration

Thanks for the correction. Which selection is that for the Shapeways Jein Handle that uses the casting process to get a solid metal part?

http://www.shapeways.com/model/1598432/gein-just-grip-curve.html?materialId=6

He doesn't have brass as an option there, just various steel finishes. The brass-finish steel could work, but they do steel a totally different way. It's printed out to a pretty fragile consistency, then it's infused with bronze. The finished piece is perfectly strong, it's just not lost wax casting. I'm sure it's worth asking Starkiller to add the brass option to his page.

HEY, STARKILLER, HOW 'BOUT THE BRASS?

See? :p

I think I smell a 3D-printed handle thread coming in the future... :) I can't do it any time soon, But it would be great to see someone go through the various online and open-source resources and come up with all the parts for a really great brass handle that anyone could put together really cheaply. :)

Now if only there were a cheap way to print aluminum...
 
Re: John Long Phaser 1 Kit Buildup plus MM P2 Restoration

Awesome day today. Got in at 9:30 this morning and worked till the shop closed at midnight -- 14 1/2 hours, mofos!!! I'm tickled pink with how the handle's coming along! Lots to post tomorrow after a lengthy coma. Then I'll be down for at least a week, but the computer work will continue. LLAP, dudes! :)
 
Re: John Long Phaser 1 Kit Buildup plus MM P2 Restoration

And here we go!

2014-10-26 10.35.39.jpg2014-10-26 10.27.37.jpg2014-10-26 10.34.38.jpg2014-10-26 10.56.02.jpg

This is a vintage Hubbell Bakelite midget plug, which is what was used on the original handle. I've had this for many years under obligation of secrecy, but now that the cat's out of the bag after a post on another board, I can finally talk about it.

I don't know what model this particular item is, but the modern-day Hubbell equivalent is this one, model HBL7465V, and Sci-Fi Props does seem to have the best price for it, $10 plus $3.95 shipping. They're widely available, you just have to shop around. The vintage Bakelite ones, however, are harder to find, but they do crop up on eBay. What you want to look for when you get your male plug, whatever kind it is, is that both posts are brass. Many have one post in brass and the other in what looks like nickel-plated steel, and that's not what the plug on the original phaser looks like.

The last photo shows the weird texture of Bakelite after sanding, like some kind of brittle resin.

Prepping the plug for the handle is very simple. Sand it down on a sanding wheel, with a Dremel sanding drum, or even a cutoff wheel if you're skilled with it -- you want to avoid biting into the metal prongs. Then, just hook up your wire...

2014-10-26 10.35.39.jpg


2014-10-26 10.56.02.jpg


2014-10-26 10.27.37.jpg


2014-10-26 10.34.38.jpg


2014-10-26 12.50.15.jpg


2014-10-26 10.56.02.jpg
 
Last edited by a moderator:
Re: John Long Phaser 1 Kit Buildup plus MM P2 Restoration

A word about wire. Get yourself one of these ratcheting wire strippers (also called "automatic wire strippers"). They will change your life.

2014-10-26 12.50.15.jpg


It grabs the wire firmly, then strips it perfectly when you squeeze the handle. It's magic.

Update!!
Here's my YouTube video on this highly complex tool!


As for length, once again I resorted to my :ninjasuper-secret-decoder-ring-prop-voodoo-ninja:ninja skills:

2014-10-26 12.44.49-1.jpg

2014-10-26 12.50.15.jpg


2014-10-26 12.44.49-1.jpg


IMG_2933.jpg


2014-10-26 12.44.49-1.jpg


2014-10-26 12.50.15.jpg
 
Last edited by a moderator:
Re: John Long Phaser 1 Kit Buildup plus MM P2 Restoration

The upside down pics are opening fine if I open in a new tab.
 
This thread is more than 5 years old.

Your message may be considered spam for the following reasons:

  1. This thread hasn't been active in some time. A new post in this thread might not contribute constructively to this discussion after so long.
If you wish to reply despite these issues, check the box below before replying.
Be aware that malicious compliance may result in more severe penalties.
Back
Top