2015 Wonderfest - sneak peek at 16yr old's start for next year

I have a machinist scriber he can use..but its a bit small for marking the vertical and horizontal patterns on the compound curves of the hull. The patterns will be used to cut plastic sheeting to fit.

So here's a go at a homemade version...still have to figure out how to attach the mechanical pencil and lock it into place...it will have to be able to travel inwards quite a ways...have some ideas...will see if I can get it put together for him this weekend.


DSC_0681.JPG
DSC_0685.JPG

Hmm.. maybe one of these days I'll figure out how to get portrait mode photos to display correctly here..
 
Last edited:
Rotor head and blades ...rotor parts to be cast...

Blade still needs a fill-in piece between the green blade and the rotor head to account for the resizing that took place

DSC_0686.JPG
DSC_0688.JPG
DSC_0689.JPG
DSC_0690.JPG
DSC_0691.JPG
DSC_0693.JPG
DSC_0695.JPG

Fritz is laying down watching clouds in the sky...typical Fritz!
DSC_0698.JPG
DSC_0697.JPG
 

Attachments

  • DSC_0687.JPG
    DSC_0687.JPG
    6.2 MB · Views: 68
Rear hull...time for mounting blocks.

We got to talking about the weight of the resin fins on the back...so having learned from his previous models...planned compartments to add weights. The rear supports for the hull will be almost at center of gravity (fore/aft)?? We guestimated that the fins will be about 10 pounds in resin. Last year on the Stormwalker he had to add about 16oz of weights in the rear rectangular leg compartments to help even out the walker...so here he's cut out sections of the hull blocks to allow insertion of of dumbell weights...yep...should be able to get upto 16 pounds of weights.

Why 16 pounds? Well talking with Wonderfest content coordinator (fantastic fella by the way!) Jon-Luc is going to be limited in how he will be able to display the model and still enter it in the contest...due to entry size limitations. SO....rather than displaying it in its full almost 6-7' length (straight) as originally planned...and luckily given that its an articulated flying craft...its going to have to be displayed in a 'U' shape configuration...luckily IPMS and Eagle Quest don't have the same size limitation issue...so...it'll be displayed straight in those contests....now back to the U shape and weights...to get things to fit (eg the 3 hull sections)...the ship will almost have to double back on itself..as such...the rear section is going to be displayed angled 'up'...so we're thinking he's going to need more weights to help offset that angle...maybe not...but better to have the space built in and not need it!

Anyways...here's a look-see...and notice the forest of clamps!! Got these at Sears...they're great! Irwin makes some small ones, but about half of them don't work after a week or so of use...

This first photo of the rear section shows marksalot on the ribs where the chamfering will go...due to the compound hull shapes at the rear-underneath...the chamfers sometimes change sides/directions!

DSC_0701.JPG

DSC_0702.JPG

Pizza and models...what's better than that!?

DSC_0706.JPG

Ribs getting permanently glued on...
DSC_0707.JPG
DSC_0710.JPG

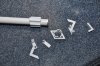
Mounting blocks...they came in at three pounds after being hollowed out for the weights
DSC_0713.JPG

Here's a shot of the weights (hull is upside down)
DSC_0712.JPG
 
The more I look at this design, the more I think it would be a PERFEKT fit into the BIOSHOCK universe. it´s got identical design elements...

GREAT WORK!!!

Markus
 
The more I look at this design, the more I think it would be a PERFEKT fit into the BIOSHOCK universe. it´s got identical design elements...

GREAT WORK!!!

Markus


Hi Markus,

Thanks for the note!

I'm not familiar with Bioshock myself, I think I've seen a few drawings on Deviantart or other places? I'll Jon-Luc if he knows about it when he wakes up.

Might be a good inspirational universe for his future creations!

Jesse (aka Jon-Luc's dad)
 
Way behind on uploading pics...have a few minutes so here a few updates:

Some deck planking work on the front lower engine deck:

DSC_0738.JPG
DSC_0742.JPG
DSC_0743.JPG
DSC_0745.JPG
 
Here's he's started work on the forward hull's gun decks where machine guns will be mounted.

The shape and placement of these gun decks are what give the Szitakötő its name (e.g. "Dragonfly"):


DSC_0740.JPG

Ah rivets...rivets everywhere...
DSC_0746.JPG

Frtiz is laying down again...where Heinrich?

The filler pieces (scrollsawed MDF) is what the splinter shields will be glued to.

DSC_0749.JPG

More on this later

DSC_0740.JPG


DSC_0746.JPG


DSC_0749.JPG
 
Last edited by a moderator:
Now for some prop work. The prop blade master is one of the first things he made. When he resized the ship a bit, that blade become a little on the small side relative to the rest of the ship...so what do you do...make a new master? NO!!! he enhanced the blade design...he added a filler piece in at the base of the blade to connect with the prop rotor head. Heres the start of it, I think I have more photos later ....

The MDF gets turned into what we call "Poor Folk's Ren-Shape"..eg. the MDF gets covered with Tamiya white and sand like crazy. As some of you who know us are aware...it was a small piece of Ren-Shape (less than a cubic inch) that started his whole modeling experience...it was given to him at the Friday modeling University that they used to hold at Wonderfest...and it was off and running after that...never looked back! Funny thing is I bought a $300 piece of Ren-Shape and neither of us have had the heart (guts) to cut into it yet!!

DSC_0750.JPG

After shaping with a Foredom powercarver:
DSC_0752.JPG

Test fit of the main prop, the filler piece and the prop rotor head...getting there:
DSC_0754.JPG
DSC_0760.JPG
DSC_0757.JPG
DSC_0762.JPG

This might give a better idea of the prop shape and undulations/waves in its shape:

DSC_0764.JPG
 
Remember all those little pieces of wood being cut a while back...well More deck planking...front hull - upper deck, looks like the splinter wall work was underway too:
DSC_0768.JPG
DSC_0770.JPG
DSC_0771.JPG

Upper and lower decks in place after planking along with some progress on the splinter shields.. ..
DSC_0772.JPG
DSC_0775.JPG

A shot with some of the deck structures (still under construction) in place:
DSC_0778.JPG
DSC_0781.JPG
DSC_0785.JPG
DSC_0786.JPG
 
Deck planking work station...
DSC_0791.JPG

Prop rotor head design with balde extension sketches...that brass...there's a story behind those brass rods that are heavily aged...because they are quite old!
DSC_0792.JPG

So of all the rod in the shop for him to pick to reinforce the prop blades (eg prevent resin droop) he found a short piece of 5/32" rod....the only piece that was in the shop...he's got 8 blades to make and it needs to be long enough to extend for the blade extension as well...so off to my hobby-shop shopping haunts...alas...not one single piece of 5/32 brass rod..and ordering it? everyone says they're having trouble getting brass...yeah, could mail order but delivery time...so what to do? put it off until we can figure something out for him...as luck would have it I was poking around out in the wood shop (aka garage) and found a box with some old brass, basswood and balsa pieces...and there were some 5/32" brass rods in there...whew...just enough to do 9 props...

Those brass rods are over 30 years old...they're from the last models I built. Back while in university I built architectural models to help get through school. The very last two models I ever built were engineering studies of microwave radio towers for what was then MCI. The towers were two different designs and in 1/48th scale they stood over 48" tall. These rods were leftovers from what were the tower legs. Dup..actually that wasn't my last model building..rather it was a model of the Lutzow in 1/144..scratch built...balsa hull...RC control, freon powered BB guns and penny pumps to prevent sinking...was a member of Hullbusters...wonder if anyone is still doing that nutty thing of putting a grand or so into a boat and then go out and sink each other!??? ahh...those were the days...and that was my last model...sigh.

anyways back to the present and his project :)

DSC_0797.JPG
 
Middle hull deck planking...yeah there's gonna be a lot of pics of deck planking..think it took about week for to all get done for all three hulls (5 decks):DSC_0798.JPG
DSC_0800.JPG
DSC_0801.JPG
DSC_0805.JPG
DSC_0808.JPG
 
Here's some shots of all three hulls end-to end...but note that the front hull is not at the correct height to match up with the back two...they were mounted high to enable getting underneath they're wider bellies easier...

DSC_0810.JPG
DSC_0811.JPG
DSC_0813.JPG
 
now for some mold box construction and mold making...the blade mold didn't work...didn't get crisp edges with this new mold material..there'll be photos of the new suspended mold approach later...

connection was dropping last night and some of the attachments didn't work...hopefully this fixes them...would be nice if this "feature" of the site got fixed :)


DSC_0816.JPG
DSC_0828.JPG
DSC_0829.JPG
DSC_0855.JPG
DSC_0857.JPG
 
Last edited:
OK...more planking pics..

connection was dropping last night and some of the attachments didn't work...hopefully this fixes them...would be nice if this "feature" of the site got fixed :)

DSC_0830.JPG
DSC_0834.JPG
DSC_0836.JPG
DSC_0839.JPG
 
Last edited:
A twist on all the decking...notice all those little ugly holes??? well lookey here..they're getting filled with "bolt heads"

connection was dropping last night and some of the attachments didn't work...hopefully this fixes them...would be nice if this "feature" of the site got fixed :)


DSC_0823.JPG
DSC_0825.JPG
DSC_0840.JPG
DSC_0841.JPG
- - - Updated - - -

Working on piping to go under the various consoles
DSC_0819.JPG
 
Last edited:
Some color and weathering studies on hull plating.

The colors were inspired by a WW I Zepplin.

DSC_0842.JPG
DSC_0846.JPG
DSC_0846.JPG
DSC_0853.JPG

Arggg...connection was dropping last night and some of the attachements didn't work...hopefully this fixes them...
- - - Updated - - -
 
Last edited:
This thread is more than 6 years old.

Your message may be considered spam for the following reasons:

  1. This thread hasn't been active in some time. A new post in this thread might not contribute constructively to this discussion after so long.
If you wish to reply despite these issues, check the box below before replying.
Be aware that malicious compliance may result in more severe penalties.
Back
Top