BobbyFromBUF

Well-Known Member
I would like to start off by saying that the Replica Prop Forum is amazing! How cool is it to have a forum like this one? Filled with new innovative ideas, great advice, and tremendous resources! Not to mention great people!

I would like to immediately follow up that statement by apologizing for creating ANOTHER Groot thread. I realize that there are quite a few out there already. I just really need a central place where I can share some photos, plans, and questions.

The plan is to finish before Halloween - which will be a challenge.

I am planning to copy some of the methods I see here on the RPF, and work with foam mats, plumbing pipe insulation, and other cheap or found materials. I would ideally like to spend less than $40 altogether.
 
I started off my build by working on some homemade stilts. I wanted to make sure that this costume would make me at least 7 feet tall. I feel like it should be "go big, or go home"... So, big it is. From the floor to the top of my mask I am around 7'4".

I purchased (4) 8 foot long 2"x3" boards from Home Depot for $2.15 per board.

DSC_0166 by bobby_whalen, on Flickr

I also bought a box of screws for about $8.

DSC_0167 by bobby_whalen, on Flickr

I did some measuring and guessing, and settled on 16" as the height from the floor for the platforms. This was arrived at based on the fact that I am 5'8".

DSC_0168 by bobby_whalen, on Flickr

DSC_0169 by bobby_whalen, on Flickr

I predrilled all the holes to ensure that the wood did not split while assembling.

I used some really old, beat up boots as the way to make these wearable.

DSC_0170 by bobby_whalen, on Flickr

I wanted to be able to lace the laces through the tongue to ensure the tongue did not slide down while I was slipping the boots on. So, I marked some spots where I wanted the holes in the tongue to be.

DSC_0170 by bobby_whalen, on Flickr

Next I heated up my soldering iron, and used the hot iron to pierce a hole through the leather. I learned this technique on whitearmor.net while working on my TK.

DSC_0172 by bobby_whalen, on Flickr

Now you can see that the laces go through the leather at the top to ensure no slippage.

DSC_0173 by bobby_whalen, on Flickr

Next, I traced the souls of the boots onto a scrap piece of wood.

DSC_0174 by bobby_whalen, on Flickr

Again, I predrilled pilot holes to ensure that the scrap wood did not split while I was assembling the pieces.

DSC_0175 by bobby_whalen, on Flickr

DSC_0176 by bobby_whalen, on Flickr

After assembling the wood and doing some testing I decided I would need quite a bit of support if I wanted to do any walking on these stilts. Also, just as an aside, I plan on wearing this costume to a party of two knowing full well that I will need to find a spot in the corner and mostly just stand still.

I used some 1" nylon webbing to add support to the final stilt. The webbing costs $.88 per yard at Walmart. After cutting each piece of nylon webbing I burn the ends with a lighter to prevent fraying.

DSC_0177 by bobby_whalen, on Flickr

Again, I used the heated up soldering iron to burn holes through the webbing (where the screws will go).

DSC_0179 by bobby_whalen, on Flickr

DSC_0180 by bobby_whalen, on Flickr

Finally, a bit of test run in my basement.

DSC_0182 by bobby_whalen, on Flickr

DSC_0183 by bobby_whalen,

DSC_0184 by bobby_whalen, on Flickr
 
Last edited:
I just doubled checked the weight, and each stilt weighs in at 10.2lbs. Making the pair a total of 20.4lbs. Again, I must stress that I plan on wearing this costume to couple of parties where I can hang out in the corner, and get people to bring me drinks, etc... ;-)
 
Next, I started on the costume itself with a freehand drawing. Not too bad...

The total height of the mask is 20"

15313140371_68d76af8ee_b.jpg
DSC_0185 by bobby_whalen, on Flickr

The total with of the face of the mask is 12"

15316301745_7c8053b3e0_b.jpg
DSC_0186 by bobby_whalen, on Flickr

As you can see, the outside edge of the eyes ended up being about 6" apart.

15129758587_73f76c22f3_b.jpg
DSC_0187 by bobby_whalen, on Flickr

In this photo you can see that the mouth started out being about 5.5" from the center of the eyes. After some test fitting I figured out that this is too high. I think I finally settled on the mouth being about 4" below the centerpoint of the eyes.

15129758137_c99c9c182e_b.jpg
DSC_0188 by bobby_whalen, on Flickr

I traced the general shape onto foam, and then cut it out. After it was cut out I did a little bit of reshaping of the foam with a heat gun.

15315960812_db34a9606c_b.jpg
DSC_0189 by bobby_whalen, on Flickr

Then I cut out a piece of foam to work as the back of the mask.

15313137911_1188f75d7c_b.jpg
DSC_0190 by bobby_whalen, on Flickr

More drawing with a marker to figure out proportions.

15315959962_42d32fcf48_b.jpg
DSC_0191 by bobby_whalen, on Flickr

Then I used a dremel tool to start adding some details.

15315959392_7ecdf36bc1_b.jpg
DSC_0192 by bobby_whalen, on Flickr

15129755537_92d9e7bf3f_b.jpg
DSC_0193 by bobby_whalen, on Flickr

15313135711_38d506e599_b.jpg
DSC_0194 by bobby_whalen, on Flickr
 
From what I can tell from screen captures online, and what I remember from seeing GOTG in theatres, Groot has sort of brown to yellowish eyes. With that said, I settled on using some $1 sunglasses from Dollar Tree for the lenses.

DSC_0274 by bobby_whalen, on Flickr

I used some craft foam (about $.90 per sheet at Hobby Lobby) to create some new frames for the lenses.

DSC_0274 by bobby_whalen, on Flickr

DSC_0275 by bobby_whalen, on Flickr

DSC_0276 by bobby_whalen, on Flickr

DSC_0277 by bobby_whalen, on Flickr

DSC_0278 by bobby_whalen, on Flickr

DSC_0279 by bobby_whalen, on Flickr

DSC_0280 by bobby_whalen, on Flickr

With the lenses installed I realize that I must address the issue of fogging. I have not resolved this issue yet, but time is of the essence so I must make progress on other things for now.
 
If I do decide to take this mask off at the party I'm sure people will want to look at it/hold it. Therefore, I am adding some detail to the top. Since this will only be seen if I allow it (the top of the mask will be over 7' in the air while the mask is on my head). I have chosen not to spend too much time or effort on the top of the mask. I used some scrap pieces if foam to add some lumps and bumps for now. Maybe later I'll add some more details.

15129586690_b20c4d9f69_b.jpg
DSC_0281 by bobby_whalen, on Flickr

15313129671_2248881d51_b.jpg
DSC_0282 by bobby_whalen, on Flickr
 
So, as I mentioned above, I really liked the idea of having some solid foam arm parts with openings for my hands. This way I will still have some use of my hands. I have a half finished Stormtrooper that I am still working on - so I used this same concept for the Groot forearms.

15142297200_0272e4b698_b.jpg
DSC_0294 by bobby_whalen, on Flickr

The foam piece I started with was about 14" x 23".

15305969146_dc023bf822_b.jpg
DSC_0295 by bobby_whalen, on Flickr

15328703522_d4012b22f9_b.jpg
DSC_0297 by bobby_whalen, on Flickr

I plan on wearing some gloves on my hands underneath this forearm part. I used a technique I learned from youtube. https://www.youtube.com/watch?v=p6Qr2UF6zm8 You cover a cotton gardening glove with silicone caulk, and then use a comb to create a pattern in the silicone. You then wait for the silicone to dry, and bam - easy wood texture.

15142255799_9528ed4ac2_b.jpg
DSC_0298 by bobby_whalen, on Flickr

15142255349_bb36ea11ec_b.jpg
DSC_0299 by bobby_whalen, on Flickr

15142294470_a75ffc821f_b.jpg
DSC_0302 by bobby_whalen, on Flickr

Next I started hot glueing the foam to create the forearm shape. This was tricky as the foam was not very cooperative. I ended up using some tape to hold the shape while the glue was drying.

15142471717_f0b5b7fcca_b.jpg
DSC_0303 by bobby_whalen, on Flickr

15328700612_b00d353d66_b.jpg
DSC_0304 by bobby_whalen, on Flickr

15305965546_6f56043b5e_b.jpg
DSC_0305 by bobby_whalen, on Flickr

Then I used a sharpie to start freehand drawing the shape of the fingers. It took a couple of tries to get it right.

15142252709_5399237e2d_b.jpg
DSC_0306 by bobby_whalen, on Flickr

15142252259_b2b8100ba2_b.jpg
DSC_0307 by bobby_whalen, on Flickr

Now, to start adding the pipe insulation. I have never done this before, so it took me a little while to get the hang of it. With the EVA foam pieces the hot glue generally forms enough of a cure in about 45 seconds. At that point you can stop holding the two pieces together. I found that with the pipe insulation it takes closer to 65 seconds. I'm not sure why, but found this to be the case pretty consistently.

15329004465_bbd1f06858_b.jpg
DSC_0311 by bobby_whalen, on Flickr

A technique I learned from my Iron Man Mark VI build was that sometimes when you cut foam, the pieces will fit together better if you cut them with scissors on an angle. This will give you a flat edge to glue to another flat edge. It takes some practice, but eventually you will get the idea, and figure out which direction the cuts should be.

15142290560_d453030707_b.jpg
DSC_0312 by bobby_whalen, on Flickr

15142467177_62342c5c17_b.jpg
DSC_0315 by bobby_whalen, on Flickr

At this point I just kept adding pipe insulation pieces until it started to look right. Here are a bunch of pics.

15142248869_49389c7ff9_b.jpg
DSC_0316 by bobby_whalen, on Flickr

15325842521_ff09094dca_b.jpg
DSC_0317 by bobby_whalen, on Flickr

15325842051_7645ba1d09_b.jpg
DSC_0318 by bobby_whalen, on Flickr

15142465167_87e43d1dcd_b.jpg
DSC_0320 by bobby_whalen, on Flickr

15305958896_1f8fb76cf0_b.jpg
DSC_0321 by bobby_whalen, on Flickr

15142246379_5c18ffa316_b.jpg
DSC_0322 by bobby_whalen, on Flickr

15142463877_9c27fa491c_b.jpg
DSC_0323 by bobby_whalen, on Flickr

I quickly figured out that overlapping and angles are the keys to the right look. I have one perfectly straight piece, and it is definitely the worst looking of all the pipe insulation pieces.

15142416488_2719d46978_b.jpg
DSC_0324 by bobby_whalen, on Flickr

15142245229_4761e4e5db_b.jpg
DSC_0325 by bobby_whalen, on Flickr

15142244959_990626e45e_b.jpg
DSC_0326 by bobby_whalen, on Flickr

15142415558_89494cb1bb_b.jpg
DSC_0327 by bobby_whalen, on Flickr

To stay organized I would cut the insulation, trace it on the foam, then make the appropriate cuts to the insulation, and then glue.

15305956376_7e270fb2f2_b.jpg
DSC_0328 by bobby_whalen, on Flickr

15142461757_c2fe1a0984_b.jpg
DSC_0329 by bobby_whalen, on Flickr

15142243369_f3175df2d5_b.jpg
DSC_0330 by bobby_whalen, on Flickr

15142242669_7f992efb64_b.jpg
DSC_0332 by bobby_whalen, on Flickr

15305954486_d8704bb95a_b.jpg
DSC_0333 by bobby_whalen, on Flickr

15142459517_9587131a1b_b.jpg
DSC_0335 by bobby_whalen, on Flickr

15142412438_1ec31657d7_b.jpg
DSC_0336 by bobby_whalen, on Flickr

15142281160_eda77894b6_b.jpg
DSC_0337 by bobby_whalen, on Flickr

On the parts where it was possible I started using clamps so I could keep moving forward while the glue was drying. I know it's only 65 seconds, but those start to add up.

15142411578_01f223c05a_b.jpg
DSC_0338 by bobby_whalen, on Flickr

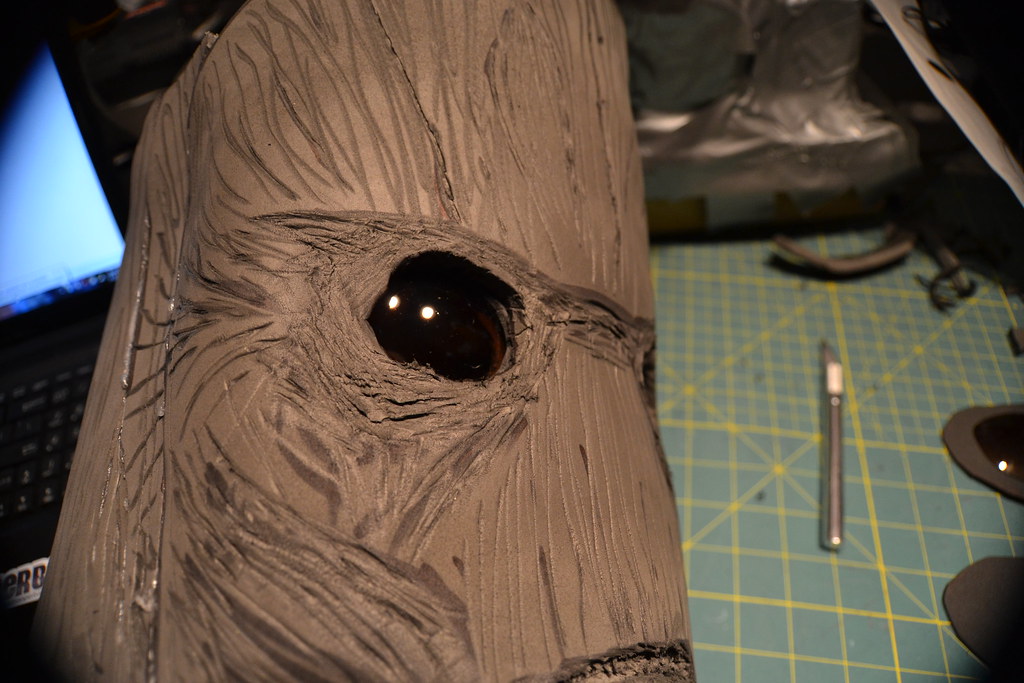
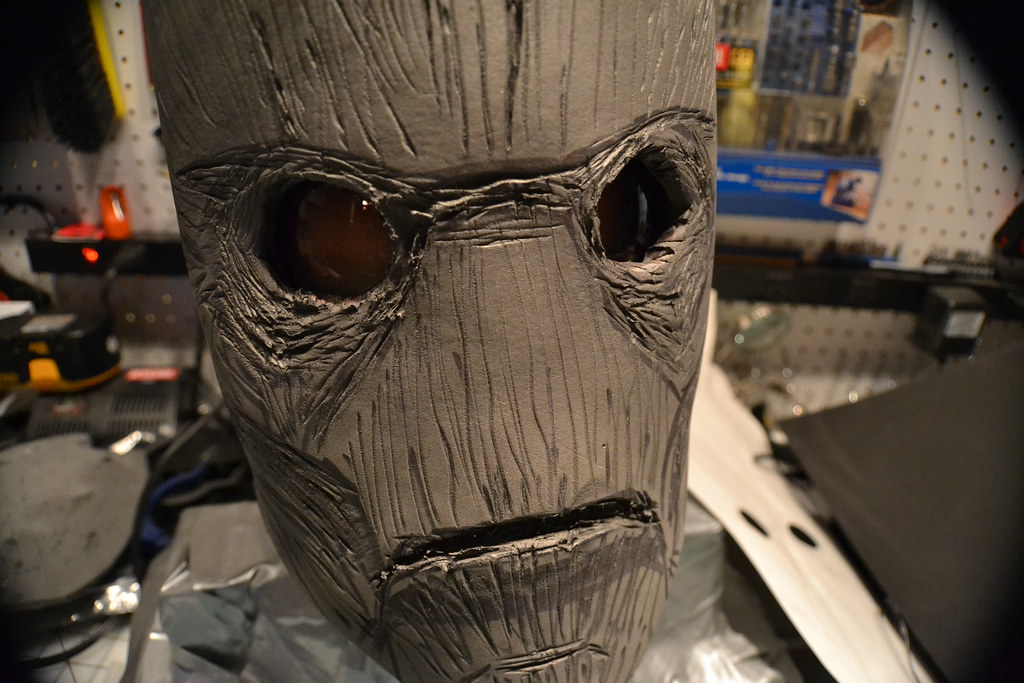
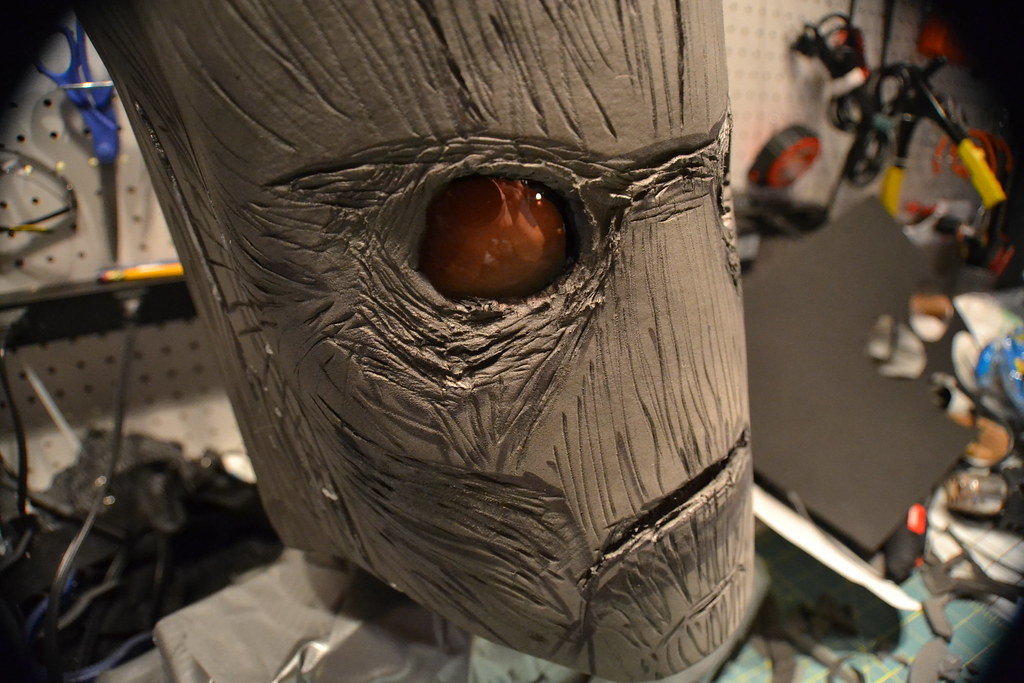
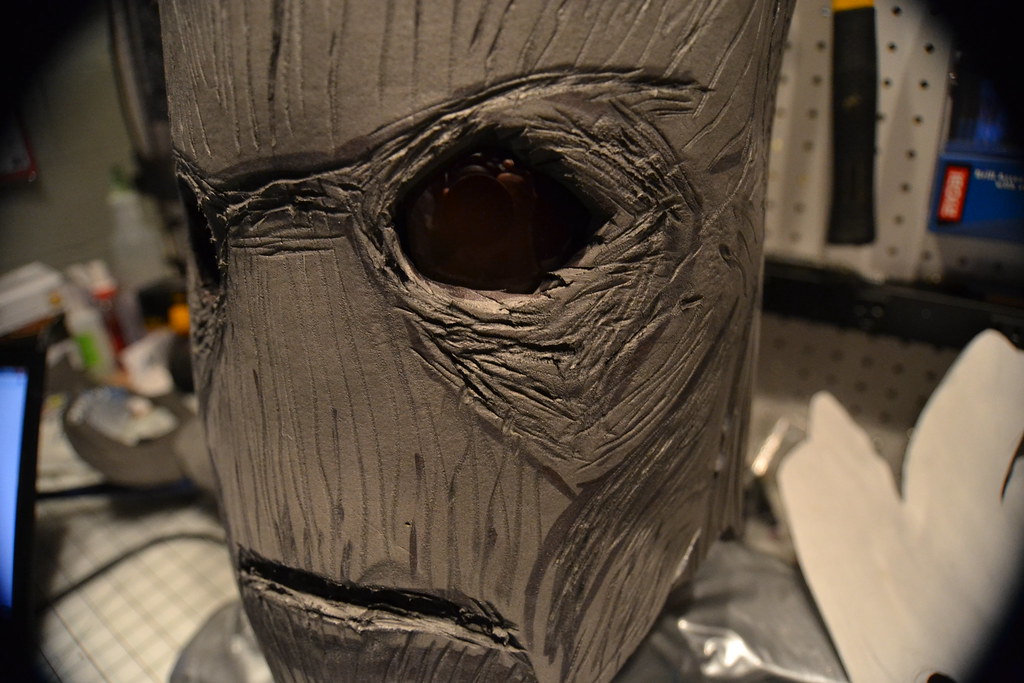
Finally, I added some bark details with the dremel.

15328993375_87e8a253d7_b.jpg
DSC_0339 by bobby_whalen, on Flickr

15305950136_e11bd1a5e1_b.jpg
DSC_0342 by bobby_whalen, on Flickr

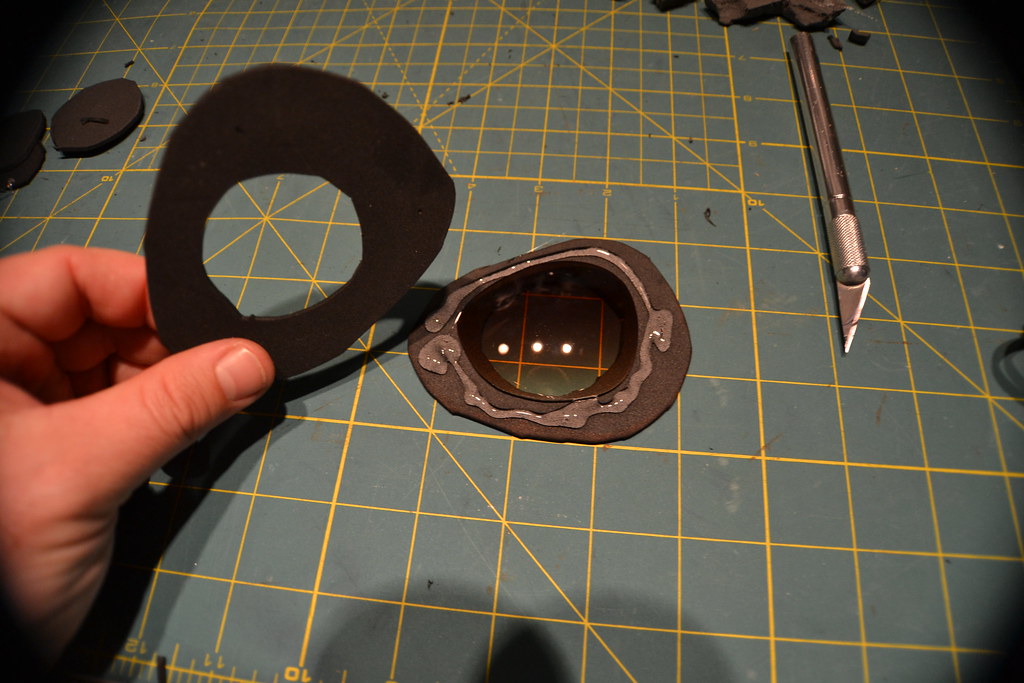
I didn't like that I could see the diamond plate pattern on the inside of the foam, so I added a layer of craft foam to cover that.

15328991625_d2823ab388_b.jpg
DSC_0343 by bobby_whalen, on Flickr

15305949346_c005d07237_b.jpg
DSC_0344 by bobby_whalen, on Flickr

15142237029_e0f2603c32_b.jpg
DSC_0345 by bobby_whalen, on Flickr

15142277090_5e76be6117_b.jpg
DSC_0346 by bobby_whalen, on Flickr

15142276690_60ab6b24be_b.jpg
DSC_0347 by bobby_whalen, on Flickr

Alright, now off to bed. Zzzzzzzz
 
Wow, that's coming along really well! There are some great ideas here.

One suggestion - can you put air vents in the top of the head somehow? You're probably going to be very warm, and having some ways for air to circulate would be a good idea.
 
Wow, that's coming along really well! There are some great ideas here.

One suggestion - can you put air vents in the top of the head somehow? You're probably going to be very warm, and having some ways for air to circulate would be a good idea.

Thanks for the kind words! I agree. I think that I could even use the little bumps and lumps on the top of the mask to disguise some vents. I'm gonna go for it!

- - - Updated - - -

Awesome Tutorial!

Thanks! I saw some other Groot build threads that were like:

Post #1 - I'm gonna build a Groot.
Post #2 - I built a Groot.
Post #3 - Pic of me in my Groot.

Haha! Don't get me wrong, I can only hope my build turns out half as good as some of those threads, but I just wanted to dive a little deeper into my process.
 
I think that your face on this looks great. You might be able to achieve more depth by adding another layer of foam around the face or just in the eyes and by adding a dremeled thicker upper and lower mouth. This is a great build!!
 
Wow. I'm extremely impressed on the build so far. Especially seeing that you found cheaper ways to approach it. Keep up the great work. I'm excited about the progress shots and can't wait for the final project.
 
This thread is more than 3 years old.

Your message may be considered spam for the following reasons:

  1. This thread hasn't been active in some time. A new post in this thread might not contribute constructively to this discussion after so long.
If you wish to reply despite these issues, check the box below before replying.
Be aware that malicious compliance may result in more severe penalties.
Back
Top