panicindetroit
New Member
Hello RPF,
I have been tweaking this old pep file of the Rocketeer’s rocketpack in Sketchup for some time now (I believe the original creator was a someone named Torsoboy, circa 2008 or 9). The proportions are now generally to scale, give or take several centimeters/maybe an inch or two in some areas; places that can be fixed later on. Either way it’s close. Opposed to the original, it’s a little smoother and now separated into individual components. All in all it isn’t perfect, but I’m hoping it will serve as a great foundation for the build I have planned!


The Plan:
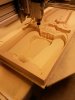
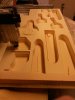
- CNC mill the model in 4 slices (red shapes in the image) along its length using 3” urethane foam sheet.
- Glue shapes with 4 slices back together with temporary adhesive
- use plaster/bondo/magic sculp to make all necessary proportion changes and additions, then smooth the model planes down. The rocket at this stage will just be the nacelles and a suggestion of the central section, as illustrated in red in the attached image. I will not include surface details or vents/radiator/flaps/rivets /interior engines at this stage as those will be built separately and added later.
- vacuum form (probably a large blister form) the main body in two separate halves, lengthwise. In other words the front and back of the rocket will be pulled separately. I am hoping to use 3/16” or ¼” plastic. One side may have an undercut lip that will help key it in place with the other half.
- vacuum form the central section separately with the intention that it will be removable later on. (thanks Valor for the idea!)
- all other surface details and components will be fabricated from styrene, sheet plastic, clay sculpted/molded/resin cast, and miscellaneous hardware
Questions for you guys!
1.) Would you recommend ABS or Styrene or Pet-G (Vivak) to vacuum form this? I am mostly familiar with Pet-G, as I work in the prosthetics industry and we use it frequently for sockets. Pet-G is cheap, sandable, paintable, drillable, and will accept glues and epoxies given the appropriate surface abrasion. I’m open to suggestions regarding the benefits of ABS for a pull this large and curvaceous.
2.) Anyone have any ideas or recommendations for other build methods I could take to vacuum form this? I’m not really sold on the two halves method because that’s quite a LARGE seamline, and I’m not quite sure how to join the two halves, outside of bondo or epoxy and days of sanding.
I truly appreciate any feedback, and I’m really looking forward to sharing this build with you folks!
I have been tweaking this old pep file of the Rocketeer’s rocketpack in Sketchup for some time now (I believe the original creator was a someone named Torsoboy, circa 2008 or 9). The proportions are now generally to scale, give or take several centimeters/maybe an inch or two in some areas; places that can be fixed later on. Either way it’s close. Opposed to the original, it’s a little smoother and now separated into individual components. All in all it isn’t perfect, but I’m hoping it will serve as a great foundation for the build I have planned!
The Plan:
- CNC mill the model in 4 slices (red shapes in the image) along its length using 3” urethane foam sheet.
- Glue shapes with 4 slices back together with temporary adhesive
- use plaster/bondo/magic sculp to make all necessary proportion changes and additions, then smooth the model planes down. The rocket at this stage will just be the nacelles and a suggestion of the central section, as illustrated in red in the attached image. I will not include surface details or vents/radiator/flaps/rivets /interior engines at this stage as those will be built separately and added later.
- vacuum form (probably a large blister form) the main body in two separate halves, lengthwise. In other words the front and back of the rocket will be pulled separately. I am hoping to use 3/16” or ¼” plastic. One side may have an undercut lip that will help key it in place with the other half.
- vacuum form the central section separately with the intention that it will be removable later on. (thanks Valor for the idea!)
- all other surface details and components will be fabricated from styrene, sheet plastic, clay sculpted/molded/resin cast, and miscellaneous hardware
Questions for you guys!
1.) Would you recommend ABS or Styrene or Pet-G (Vivak) to vacuum form this? I am mostly familiar with Pet-G, as I work in the prosthetics industry and we use it frequently for sockets. Pet-G is cheap, sandable, paintable, drillable, and will accept glues and epoxies given the appropriate surface abrasion. I’m open to suggestions regarding the benefits of ABS for a pull this large and curvaceous.
2.) Anyone have any ideas or recommendations for other build methods I could take to vacuum form this? I’m not really sold on the two halves method because that’s quite a LARGE seamline, and I’m not quite sure how to join the two halves, outside of bondo or epoxy and days of sanding.
I truly appreciate any feedback, and I’m really looking forward to sharing this build with you folks!