You are using an out of date browser. It may not display this or other websites correctly.
You should upgrade or use an alternative browser.
You should upgrade or use an alternative browser.
1/24th Scale Y-Wing Fighter, a Red Jammer Custom
- Thread starter Avanaut
- Start date
Avanaut
Well-Known Member
As it happens, the landing gear part that makes one of the three missing pieces on the sides of the Y-wing does not appear on the Red Jammer after all. Well, it does, but it's the wrong half of the two piece part (with my luck I'll find the right one right after I post this). I need to get this build forward so I scratched the missing part.
The proportions are a bit off here and there, still needs some gentle touches of a file, but the overall appearance is close enough.
Moving on to tackle the next challenge.
The proportions are a bit off here and there, still needs some gentle touches of a file, but the overall appearance is close enough.

Moving on to tackle the next challenge.
MonsieurTox
Master Member
You're right this is the opposite part used on Red Jammer (I flipped the pic of my Y to show you the part), however I remember this part is used on at least one other place (maybe 2, cant recall and I sont have time to check my ref pics) on Red Jammer, they're trimmed though.
Avanaut
Well-Known Member
I found two trimmed parts on the Red, thank you again! I couldn't use either one for making a copy, though, this will do fine. I need to find the #3 and the side pontoons are done.You're right this is the opposite part used on Red Jammer (I flipped the pic of my Y to show you the part), however I remember this part is used on at least one other place (maybe 2, cant recall and I sont have time to check my ref pics) on Red Jammer, they're trimmed though.
Avanaut
Well-Known Member
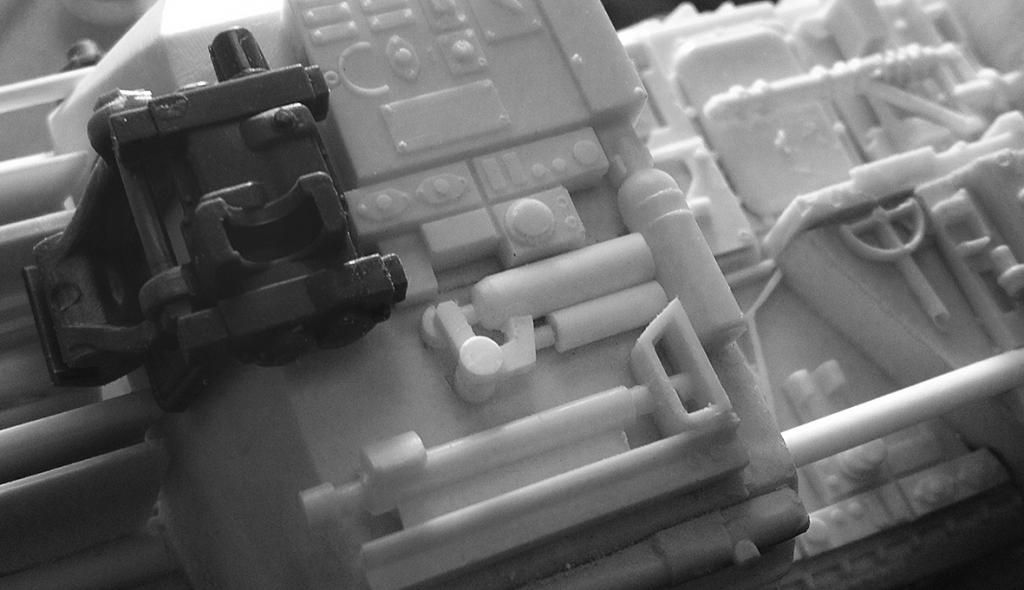
A few days of frantic building behind me, the body of the Y-wing is all but done. Sans piping, of course. The last mystery pieces were found and I must say identifying the part #5 in the photo (with a lot of sanding dust) was a great moment. I cut it from the Centurion part (resin copy) and tried it on to see how it fits... I didn't have to trim it at all, it fit like a glove! I have done something right along this build.
I gotta change that big Cent panel part, the casting is not good, I've since learned to make them without those tiny bubbles that ruin bolt heads.
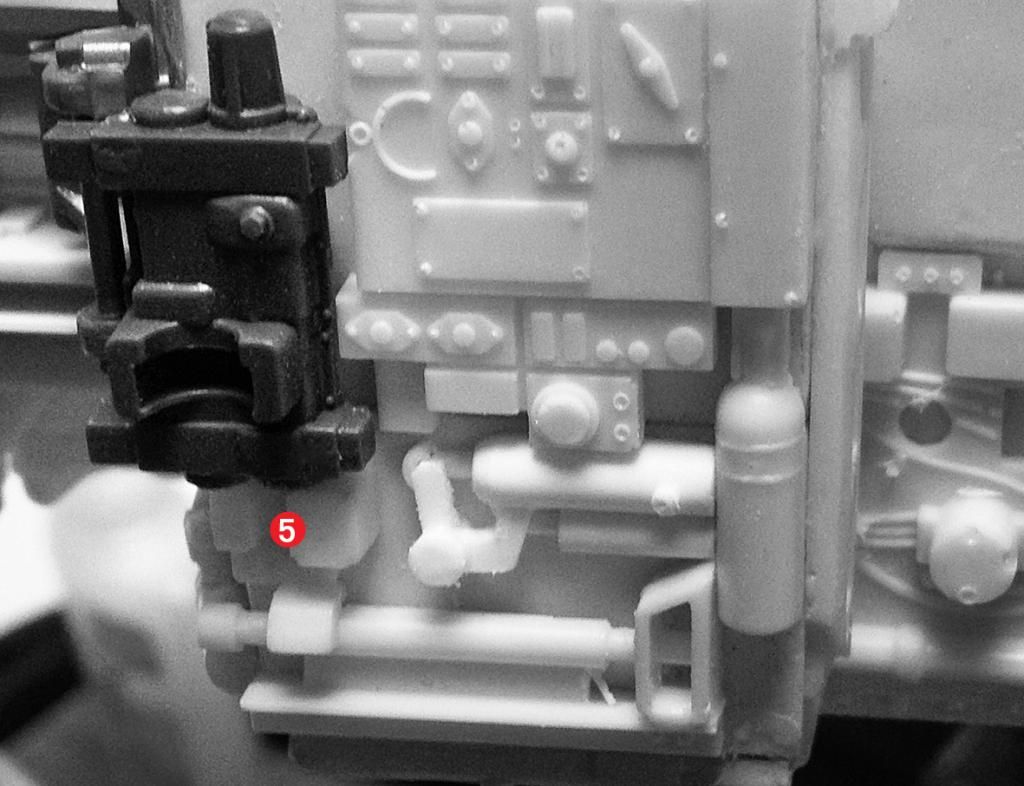
Next: the engines, which require very little work, should be a breeze. It's the cockpit and the head that I'm worried about at the moment.
I gotta change that big Cent panel part, the casting is not good, I've since learned to make them without those tiny bubbles that ruin bolt heads.

Next: the engines, which require very little work, should be a breeze. It's the cockpit and the head that I'm worried about at the moment.
Avanaut since you in no doubt have done quite a bit of research for the Tie-killer Y, I was wondering if you could chime in on droid colors for this ship. I know in the movie it was droidless, but I'v seen photos of it with a light grey droid and a black one. Is this correct and what you have seen also?I wanted to have a droid on the Y-wing. I do not know the donor kits of the little greeblies on the plate around the droid socket, so I did what Lee (ralphee) did in his build – I copied them from the original Lancaster turret part that came with the kit. I have only once before made silicone molds and this was my first time using this kind of resin. Like I said earlier, there is a steep learning curve. While I was at it, I made a resin copy of the droid also (sitting too tall at the moment), you never know if a spare droid is needed, right? In the photo there are also some additional parts from the 8Rad, not glued on yet.
Avanaut
Well-Known Member
My build is a general Y-wing, a blend of Gold Leader, Tiger Sprocket and the MOM (as they are often called here), so the need to determine the right astromech for the build is really not very important. Anything that looks good will suffice.Avanaut since you in no doubt have done quite a bit of research for the Tie-killer Y, I was wondering if you could chime in on droid colors for this ship. I know in the movie it was droidless, but I'v seen photos of it with a light grey droid and a black one. Is this correct and what you have seen also?
I have seen Gold Leader images with the grey/silver and the black droid, but since there were none aboard in the movie, I am thinking it doesn't really matter that much. See, the droids weren't specific to any individual fighter. In ANH they offered changing R2-D2 for another astromech on Luke Skywalker's X-wing before flying to the Death Star, just like that. Luke declined the offer, as we know. So, I think pretty much any astromech will do, but if I did the Gold Leader myself I'd probably go for the black. It looks great and it actually has been on the Goldie.
Hey Avanaut, This thread has been quite for a long time. Wondering how your progress is going? I've been looking through some kit scans and comparing to your parts map (which is very helpful BTW) and you have the part circled in red below as an 1/35 8Rad. I can't seem to find that part in this kit. Maybe I'm not matching the part I'm looking for with your map correctly, but it appears to be the right one. I read on a thread that it may belong to a howitzer. Do you know anymore on this?

Avanaut
Well-Known Member
I put this build on hold because I realized I need to learn a thing or two before I'm comfortable to proceed. I built a Salzo V4 for practice and there's a couple of more things on the list before I return to this super rare beauty.
The markings on my map aren't about that long piece circled in red (I'm sure I know what it's from but I can't recall it now, it wasn't important to know because it's on the Neisen cast already). The two red dots on my map refer to the Tamiya 8Rad part #17, which can be found in duplicate on top of the part circled in red.
Does this help you out?
Hey Avanaut, This thread has been quite for a long time. Wondering how your progress is going? I've been looking through some kit scans and comparing to your parts map (which is very helpful BTW) and you have the part circled in red below as an 1/35 8Rad. I can't seem to find that part in this kit. Maybe I'm not matching the part I'm looking for with your map correctly, but it appears to be the right one. I read on a thread that it may belong to a howitzer. Do you know anymore on this?
View attachment 617625
Avanaut
Well-Known Member
Yeah, these birds were quite elusive when it came to good reference. It's one of the reasons I decided to put the build on hold. I was hoping for more info even though I was almost where I needed to be. So, thank the maker for the Stephen Lane Propstore images, they are a treasure.
Thanks for your quick reply. It was just a matter of me getting wrong which pieces you were identifying in your parts map. You know how bad the resolution is in some of those old ILM photos. Thanks
Big Dog
Active Member
While on the topic of clarification over your parts map image, would you mind providing the part # of the Hanomag piece you point toward directly behind the R2 unit on the Gold Leader. I've been trying to build up some parts maps of my own and couldn't determine which piece in the Hanomag set you believed it to be. Thanks.
Avanaut
Well-Known Member
Sure, I believe that's part #13 hiding back there. You can see it's placement better in this Gold Leader photograph:

While on the topic of clarification over your parts map image, would you mind providing the part # of the Hanomag piece you point toward directly behind the R2 unit on the Gold Leader. I've been trying to build up some parts maps of my own and couldn't determine which piece in the Hanomag set you believed it to be. Thanks.
I know this post is 2 years old but part #1 is also from the Centurion. It's from a larger piece that has been trimmed. I came across it last night.I did some castings of the Tamiya Centurion during the weekend and got a little work done on the Y-wing. Going throught the details using the reference I have. I found questions along with some answers.
http://i1166.photobucket.com/albums...ng/GoldLeaderFlankComparisonx_zps0ba7c63a.jpg
First the Gold Leader starboard side flank. Yup, I should've guessed it. First, it's different than the one on the MOM Tour Y-wing, and secondly there's a part (1), or parts, I had not really noticed before. As I can't find any better photoreference of that area, I will have to pass on this arrangement.
http://i1166.photobucket.com/albums...-Wing/MOMPortFlankComparisonx_zps1bef1f19.jpg
Ont the MOM Tour T-wing the starboard Centurion and 8Rad parts are arranged differently, the unknown parts on the bottom are missing but, alas, there's another new part (2) I can't identify. I will look for something close to it from the kits I have. It is time for some compromises.
http://i1166.photobucket.com/albums/q614/Avanaut/Project Y-Wing/MOMFlankComparisonx_zps3cb5bdf0.jpg
The port side on the MOM has the best reference available, yet there was another surprise. I had overlooked the part below the 8Rad (3), I have to try to find something similar. The part in the middle, in the place of the cut centurion part (4), wasn't a surprise but it is unknown to me. It's back to kit scans.
As you can see from these photos, the flank protrusions are all I am going to go for, the recessed areas behind them and areas under the wings are too difficut for me, they will remain in the Red Jammer configuration.
Avanaut
Well-Known Member
I know this post is 2 years old but part #1 is also from the Centurion. It's from a larger piece that has been trimmed. I came across it last night.
Thank you Kokkari! I have this still on hold, buried under other builds, but with the recent activity around it (It has been wonderful to watch this bird finally come out of the dark) I am eager to proceed the first chance I get. I practically have all I need by now, all I need is to slap the last few items on and prime the model.
