Denix Mauser / Blaster Assembly Info

Sure! I get mine at Home Depot or walmart down here, maybe your equivelant hardware or superstore may have it? You should be able to get a pack of 12 or so rolled up pads for like 3-4 bucks. And each one of those pads can be unfolded(kinda) and torn or cut to the size pad you want/need.

http://m.homedepot.com/p/Homax-4-0-12-Pad-Steel-Wool-Super-Fine-Grade-10120000/100212006

That's what a lot of us use. It's grade 0000, so super fine.

You may be able to get some shipped from amazon for cheap too, but I'm sure a big hardware store would carry it.

Sometimes if you want to use some ISO alch to just barely dribble on some it makes a great wet sand if you just want to be super fine. But I'd recommend a mask and gloves to handle it. It breaks into hundreds of little fibers and bits of the stuff and gets a little messy. Glasses to be safe. And the gloves just make your hands not get so scratched up. Hope I answered any questions, if not, you can on me if you need to!
 
I only use steel wool for weathering if I want to weather a lot of paint/aluminum black fast or if I think the layers are too thick.

i often usually wet sand using a high grit automotive sand paper. I can use it all over to get a nice smooth look on the base paint and using it in particular areas, I can expose whatever metal I want in a very specific area.

However on this project, I took Scottjua's advice an used WD40. He used a fine steel wool but I used a paper towel and was able to do a great weathering job. Although if you over do it, you can easily remove too much paint.
 
Yeah i was looking at the 0000 because it was reccomended to take some scratches out of a chromed piece I had, but since it was going to be good to buff out a scratch, I thought it might be too fine to take off paint. I guess I missed the WD40 part. I'll try that... paint goes on tomorrow.

And I had found those large bags at Canadian Tire... Good to know on the 0000 because I have no idea what I would do with more than one of those bags. In my condo, every free drawer, stool, cabinet with storage is crammed full of my wifes knitting stuff. Yarn everywhere. Not sure what where I would put all those pads.

BTW... If it hasn't been said enough, this is a great project.:D When you have as limited living/working space as I do, smaller work like this blaster are ideal.
 
Who made the scope you're using? I originally thought the scope was a M19 tank scope, but yours looks different. I am just learning all this stuff.


Take a look at the FIRST post of this thread ;)
"...This thread only applies to the kits I recently offered but could be helpful to anyone building a DL-44 Blaster..."

All parts were offered by David aka BobaDebt as part of a run

Markus
 
Last edited by a moderator:
ROTJ blaster - 1 (01726200xA1AA6).jpg
So this is version one of my blaster. I plan on painting it, but I want to show it off around the neighborhood on Halloween and Todd's holster is pretty snug and I don't want to scrape a bunch of paint off and have to re-do it. So I finished up the milled details with Birchwood Casey aluminum black and put a little gun oil on those areas the next day. I painted the grips with a light coat of Rustoleum satin black spray enamel. I used a Q-tip and painted the rivets on the scope and pistons with the satin black. I AL blacked up the flash hider then used fine 0000 steel wool to remove most of the black leaving some here and there and in the crevices. Assembled the kit and it is one heck of a blaster! Stand is by TCSloan, plaque is by feezlenuts and plaque stand by Portumac Studios.

Thanks David for such a great project and I am looking forward to the next one!

Mike
 
View attachment 393430
So this is version one of my blaster. I plan on painting it, but I want to show it off around the neighborhood on Halloween and Todd's holster is pretty snug and I don't want to scrape a bunch of paint off and have to re-do it. So I finished up the milled details with Birchwood Casey aluminum black and put a little gun oil on those areas the next day. I painted the grips with a light coat of Rustoleum satin black spray enamel. I used a Q-tip and painted the rivets on the scope and pistons with the satin black. I AL blacked up the flash hider then used fine 0000 steel wool to remove most of the black leaving some here and there and in the crevices. Assembled the kit and it is one heck of a blaster! Stand is by TCSloan, plaque is by feezlenuts and plaque stand by Portumac Studios.

Thanks David for such a great project and I am looking forward to the next one!

Mike

I didn't bother gun oiling mine, mostly because I don't have any, and not sure how paint would take to it... but I'm curious. Is gun oil in spray form? How long does it take to "set"?

I ask about the spray, because I went on a hunt and only found it in one place in a spray can. We don't have any gun shops around where I live... it's kind of hard to find stuff.
I have only used liquid gun oil that comes in small plastic bottles. Hoppe's is a common brand I have used for a long time. Right now I am using the oil that came with my Beretta shotgun, which is also in a small bottle. I only used a small amount then wiped it done pretty well with a soft cloth. I should be able to get the rest of it when I degrease before painting it.
 
Thanks Curmudgeon. Like MJF said pretty much instantaneous on the milled parts of the mauser, maybe a little longer on the slick part of the flash hider.

When parts have been machined, they usually are polished to a certain degree to get the scratches out. The polished type surface creates a resistance surface that makes it difficult for the AB to penetrate and tends to roll off. I usually use steel wool or a high grit automotive wet sandpaper. You do not want to rub too hard or you will make deep scratches. For the muzzle, I recommend rubbing around rather than up and down the length. This will probably cause the item to go black as soon as the AB hits the surface. Try to resist putting on a lot of AB and the urge to get coverage on one shot. Once you have applied it to your satisfaction, you basically use steel wool and or wet sandpaper to remove the AB till you get the proper look. My The Empire Strikes Back blaster has more scoring than my Return of the Jedi blaster to match to on screen look appropriate to the different blasters.
 
Last edited:
When parts have been machined, they usually are polished to a certain degree to get the scratches out. The polished type surface creates a resistance surface that makes it difficult for the AB to penetrate and tends to roll off. I usually use steel wool or a high grit automotive wet sandpaper. You do not want to rub too hard or you will make deep scratches. For the muzzle, I recommend rubbing around rather than up and down the length. This will probably cause the item to go black as soon as the AB hits the surface. Try to resist putting on a lot of AB and the urge to get coverage on one shot. Once you have applied it to your satisfaction, you basically use steel wool and or wet sandpaper to remove the AB till you get the proper look. My The Empire Strikes Back blaster has more scoring than my Return of the Jedi blaster to match to on screen look appropriate to the different blasters.
Yeah, I did not think to rough it up before applying the AL black. When I first tried it I stood the flash hider on its end vertically. When I applied it to the highly polished surfaces it mostly rolled off. So I turned on its side horizontally and applied it in stages, rotating it after each part dried. I went over a lot of the areas twice to get it pretty blacked up. MJF's method sounds a lot easier.

Mike
 
One problem I had in the past with AB is that I got the item to blacken but it did not grab hold of the surface. As a result the AB was a layer that chipped away like a cheap paint job. Not sure if it was due to a improper surface prep or trying to blacken the item quickly with a lot of AB because it was a long time ago. Just know it can happen and that it is not the proper result.
 
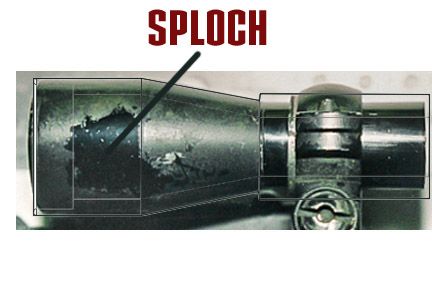
I’m trying to re-create a template for the ‘sploch” on the back of the scope

Does anyone have any ideas on a way to print this on adhesive material that is already cut

If we can figure this out I can print a bunch and send them out to be used as paint masks

 
yes, that would be both easy and peasy.

could be done as either a positive or negative mask depending on which finish you wanted to put down first
 
So what do you need to get this started?

In that picture the splotch was created when they removed the paint and exposed the anodized surface.

We can do that exact same thing by creating a mask that could be stuck to the scope and painted over, then you could remove the mask and expose the anodized surface of the scope.

A light sanding and other techniques could blend it together.
 
yes exactly

I would only need that shape (preferably in a vector format, but I can trace a bitmap if that is all you have)
with a scale block next to it (a 1 inch square) so that I know that the shape I cut in vinyl is the correct size.

from there I can reproduce as many exact copies as you need.
 
This thread is more than 3 years old.

Your message may be considered spam for the following reasons:

  1. This thread hasn't been active in some time. A new post in this thread might not contribute constructively to this discussion after so long.
If you wish to reply despite these issues, check the box below before replying.
Be aware that malicious compliance may result in more severe penalties.
Back
Top