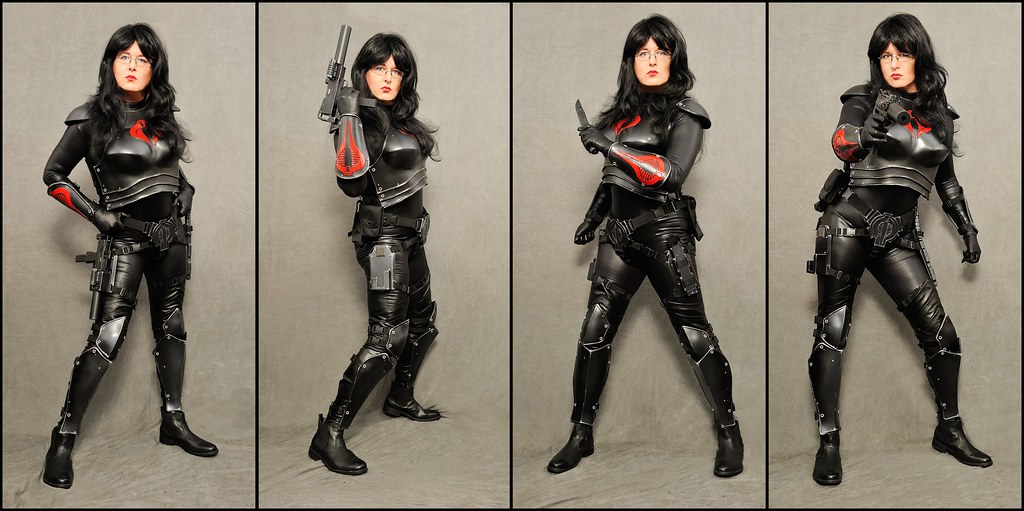
Been doing mostly simple costumes recently (not worth a thread on here), mostly superheros in spandex (Black widow, Black Canary, Ms Marvel, Power Girl) where I would buy most of it, but make a few items such as the belt, bracelets or the shoulder pad etc but felt like doing something that was a bit more complex, but not impossible for my level of abilities, created a short list and had a think and decided to do the Baroness from G.I Joe cartons/comics/actions figures etc. But not because I was a huge fan, sorry (GI Joe actually was never very big in the UK any way), but simply because liked the look of the outfit, it looked practical and comfortable enough for con wear and felt I could actually build it. Also chose it because she wears glasses, like me, result, so don’t have to keep taking them off for photo’s etc (I don’t get along with contacts) and some versions of the costume have a sort of military utility belt thingy I can use to put my phone/money/keys/Oyster card in when I’m at a con and don’t have to carry around a handbag (another limitation of most superhero costumes). Plus I get to be a bad ass villain, wear black, carry guns and scowl a lot ")

Since the costume varies a lot I’m mostly basing my costume on a 1/6 action figure by Sideshow Collectable
http://www.sideshowtoy.com/collectibles/g-i-joe-baroness-sideshow-collectibles-1000041/
(Its seems fitting to do a GI Joe costume based of an action figure)
The costume actually looks reasonable practical, I figured I could use a black catsuit and wig I already have as the base, make the armour sections my self, make up all the straps and belt etc from webbing fastened with push buckles (easily and cheaply available on ebay), sew some boot covers for the thigh boots (the action figure uses boot covers as well) and get some toy guns to accessorise with.
So far I’ve been building the armour, I built a former to shape the breastplate around by covering my torso in cling film, then applying masking tape to get the basic shape. Cut that off me and filled the out with expanding foam, but the foam distorted the shape a bit (or I’m lopsided....), so I pulled off the tape and reshaped with the a breadknife (cuts expanding foam perfectly).
Then I applied another layer of masking tape, the a thin layer of newspaper wallpaper paste papier mache and then a lot of poly filler. Then, after a lot of sanding I had a breastplate shape, ish, it was not quite as smooth as I would of liked and wasn't 100% symmetrical
Original plan was to heat form a double layer of worlba ( dam the stuff is expensive and I needed a big sheet) and mould it over the form I made . But it was my first go with it and well I guess there is a learning curve, as it seemed the temperature it would start to form over complex curves was only 2 degrees from melting down after making a lot of mess I gave up with it and went back to EVA foam which I have more experience with.
I used my favourite 6mm high density foam erm gym matt http://www.sportsdirect.com/lonsdale-fitness-mat-761108?colcode=76110803 .Had to make the base chestplate in 5 pieces because I never could get the required curves from one, with darts in the breast cups to get the shape I wanted, which where glued with contact adhesive (similar to this guys technique https://www.youtube.com/watch?v=ho5BIBxwiPA) and reinforced with hot glue, the shapes is OK if a bit pointy (bit of a 50’s bra look going on), but the joins aren't as neat as I want, tried to tidy them up with a dremel but went a bit to far so I had a lot of filling to do. Back plate was 3 pieces and the arm and shoulder guards single ones, they where warmed with a heat gun and bent around my body to get the shape. The trim (dremeled to make it rounder) and the Cobra logos where done with thin craft foam, circular details are screw cup washers glues on.
EVA foam has to be sealed before painting (this is a topic that comes up a lot in these forums) I’ve used PVA before, but I’ve found something else :- I bought some wood sealer recently, because I had to seal some balsa I used on my Sailor Pluto time key staff,
I originally intended to get cellulose dope, but found this in my local model shop instead
 http://www.deluxematerials.co.uk/pages/building.htm
It did what it said on the label and sealed the wood nicely and was easily sandable , didn’t smell bad, make me feel ill or destroy my brushes (if I washed them out with water when they where still wet, let them dry and they go solid), so I thought, does it work on foam? Turns out it does, 2 coats (dries quite quick to) and it renders the foam sealed for painting, is waterproof and lightly sandable, result Smile but I currently don’t know about the long term reliability of it, have no idea what its actually made of and it does make the foam a little stiffer, lets just say its an experiment.
Have started the long process of sanding (dislike), priming, filling etc, stared using a filler primer for plastics I got from Halfords, It seemed to work fine, initially, but on a week old test piece I think its gone quite hard and it cracks very easily, so I’ve sanded most of it off and am using regular primer instead. Plan to paint the pieces a very dark metallic grey (I want to contrast with the under suit a little and straight black wouldn’t do that) with the cobra logo’s in gloss red, so far I’ve put the last coat of primer on chest, back and arm pieces, they are not perfect, but I got bored sanding and decided to write of any more flaws as battle damage

Have just done the shoulder guards this morning, am waiting for the first coat of sealer to dry.
Todo, knee and shin guards, belt buckle, boot covers, belt and strapping
Since the costume varies a lot I’m mostly basing my costume on a 1/6 action figure by Sideshow Collectable
http://www.sideshowtoy.com/collectibles/g-i-joe-baroness-sideshow-collectibles-1000041/
(Its seems fitting to do a GI Joe costume based of an action figure)
The costume actually looks reasonable practical, I figured I could use a black catsuit and wig I already have as the base, make the armour sections my self, make up all the straps and belt etc from webbing fastened with push buckles (easily and cheaply available on ebay), sew some boot covers for the thigh boots (the action figure uses boot covers as well) and get some toy guns to accessorise with.
So far I’ve been building the armour, I built a former to shape the breastplate around by covering my torso in cling film, then applying masking tape to get the basic shape. Cut that off me and filled the out with expanding foam, but the foam distorted the shape a bit (or I’m lopsided....), so I pulled off the tape and reshaped with the a breadknife (cuts expanding foam perfectly).
Then I applied another layer of masking tape, the a thin layer of newspaper wallpaper paste papier mache and then a lot of poly filler. Then, after a lot of sanding I had a breastplate shape, ish, it was not quite as smooth as I would of liked and wasn't 100% symmetrical
Original plan was to heat form a double layer of worlba ( dam the stuff is expensive and I needed a big sheet) and mould it over the form I made . But it was my first go with it and well I guess there is a learning curve, as it seemed the temperature it would start to form over complex curves was only 2 degrees from melting down
after making a lot of mess I gave up with it and went back to EVA foam which I have more experience with.I used my favourite 6mm high density foam erm gym matt http://www.sportsdirect.com/lonsdale-fitness-mat-761108?colcode=76110803 .Had to make the base chestplate in 5 pieces because I never could get the required curves from one, with darts in the breast cups to get the shape I wanted, which where glued with contact adhesive (similar to this guys technique https://www.youtube.com/watch?v=ho5BIBxwiPA) and reinforced with hot glue, the shapes is OK if a bit pointy (bit of a 50’s bra look going on), but the joins aren't as neat as I want, tried to tidy them up with a dremel but went a bit to far so I had a lot of filling to do. Back plate was 3 pieces and the arm and shoulder guards single ones, they where warmed with a heat gun and bent around my body to get the shape. The trim (dremeled to make it rounder) and the Cobra logos where done with thin craft foam, circular details are screw cup washers glues on.
EVA foam has to be sealed before painting (this is a topic that comes up a lot in these forums) I’ve used PVA before, but I’ve found something else :- I bought some wood sealer recently, because I had to seal some balsa I used on my Sailor Pluto time key staff,
I originally intended to get cellulose dope, but found this in my local model shop instead
It did what it said on the label and sealed the wood nicely and was easily sandable , didn’t smell bad, make me feel ill or destroy my brushes (if I washed them out with water when they where still wet, let them dry and they go solid), so I thought, does it work on foam? Turns out it does, 2 coats (dries quite quick to) and it renders the foam sealed for painting, is waterproof and lightly sandable, result Smile but I currently don’t know about the long term reliability of it, have no idea what its actually made of and it does make the foam a little stiffer, lets just say its an experiment.
Have started the long process of sanding (dislike), priming, filling etc, stared using a filler primer for plastics I got from Halfords, It seemed to work fine, initially, but on a week old test piece I think its gone quite hard and it cracks very easily, so I’ve sanded most of it off and am using regular primer instead. Plan to paint the pieces a very dark metallic grey (I want to contrast with the under suit a little and straight black wouldn’t do that) with the cobra logo’s in gloss red, so far I’ve put the last coat of primer on chest, back and arm pieces, they are not perfect, but I got bored sanding and decided to write of any more flaws as battle damage
Have just done the shoulder guards this morning, am waiting for the first coat of sealer to dry.
Todo, knee and shin guards, belt buckle, boot covers, belt and strapping